# USER PROFILES
This section will demonstrate how different modules in the MSS portal work. Note that the portal will configure different dashboards based on the type of user logged in. This document aims to demonstrate how each of the different profiles looks and function. After successful login, a user is allowed access to a corresponding profile. The portal generates profiles based on the type of user logged in. The following profiles are accessible:
i. Member profile
ii. Admin profile
iii. Sponsor profile
iv. Pensioner profile
v. Client Relationship Manager (CRM) profile
vi. Client Relationship Executive (CRE) profile
vii. Admin and Principal Officer (PO) profile
# Member Profile
This profile serves as an interface between the FundMaster and members of various scheme that are administered using the system. These users can carry out several activities as will be discussed in this section. When a user login using a member's account, he/she will be launched into the member's profile dashboard as shown in the illustration below. Note the pop-up window that serves to remind of a member's pending tasks such as uploading missing documents, adding beneficiaries, etc.
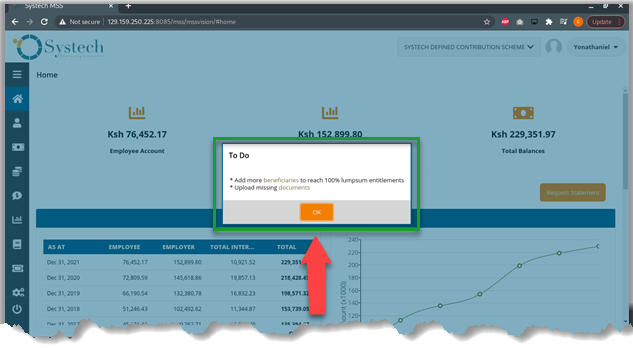
Action: Clicking the OK button to close the pop-up window.
# Dashboard Components
The following illustration shows the member dashboard that consists of a menu bar on the left side and a summary of the key information:
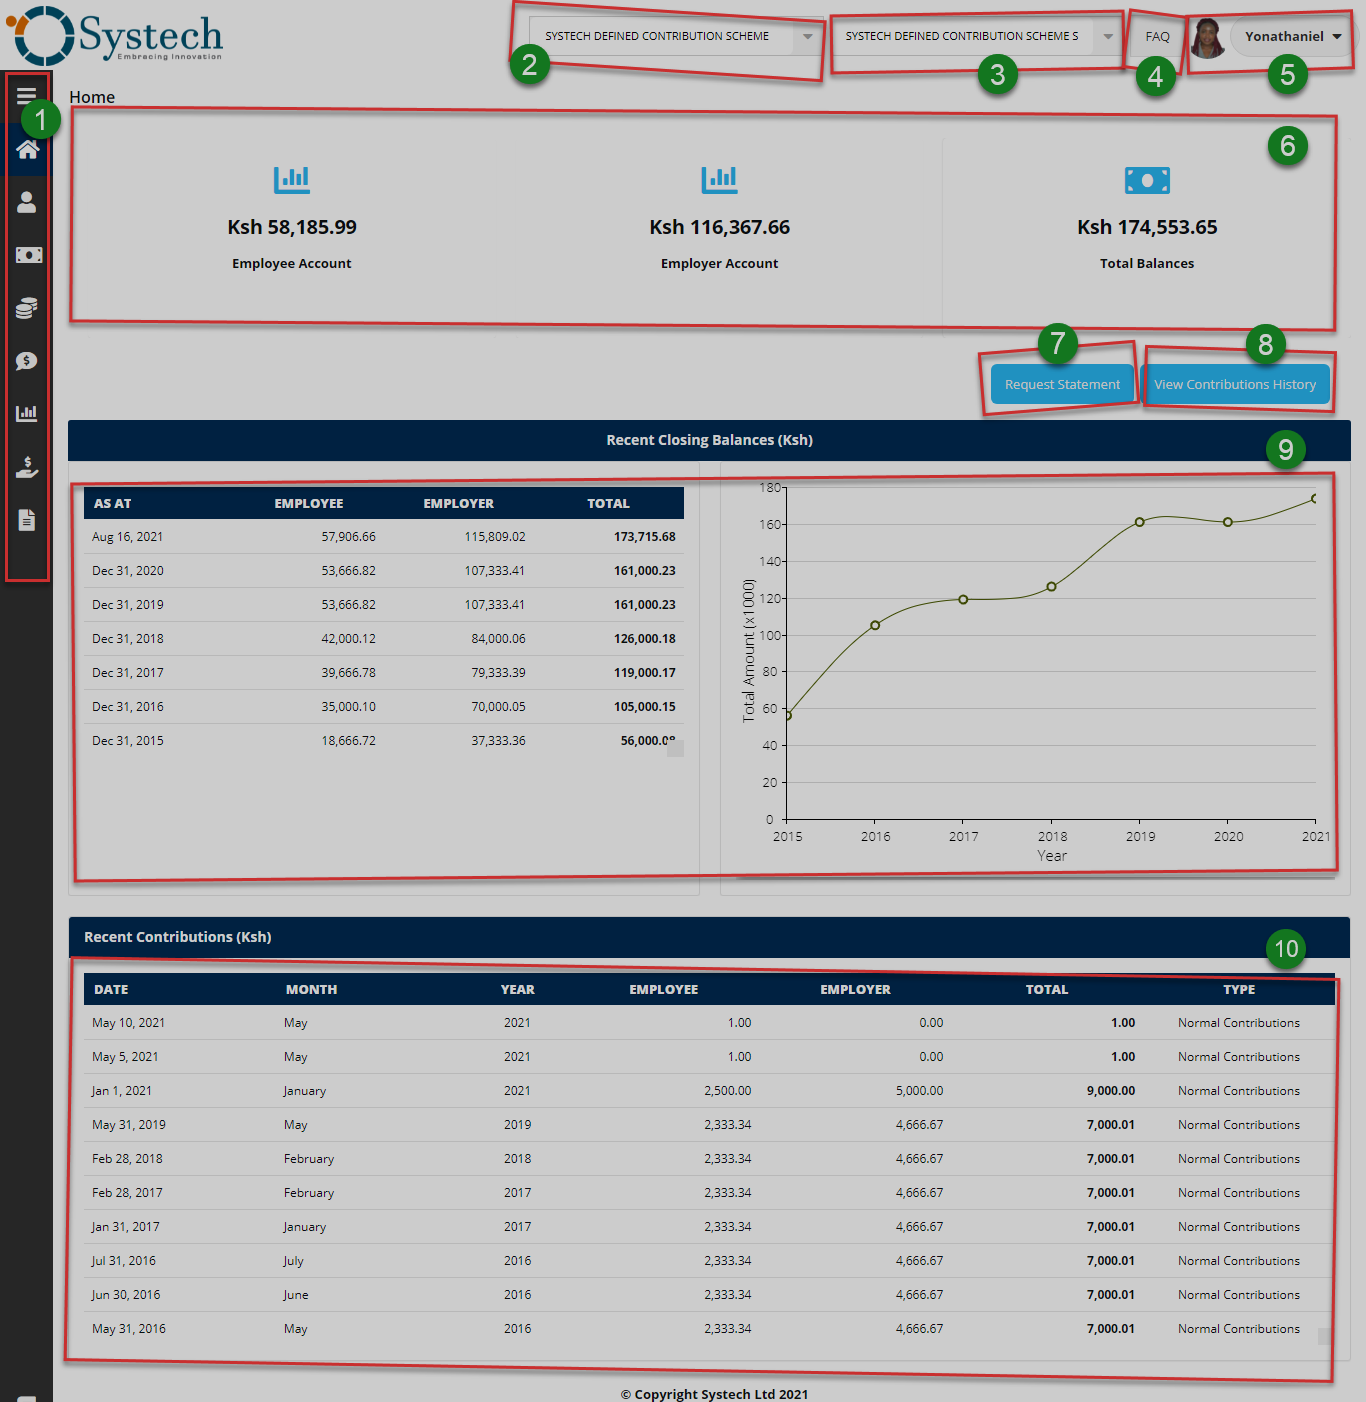
The numbered sections in this illustration above correspond to the numbers in the following table that describe the key components of the member's dashboard.
| Part | Description |
|---|---|
| 1. Menu Bar | This is the menu bar from which various menu items can be accessed quickly. Click on the menu bar icon on the top to expand it. |
| 2. Pension Scheme Name | This drop-down menu allows one to select the contribution scheme. |
| 3. Employer Name | This is a drop-down menu for selecting the employer/sponsor's name. |
| 4. FAQ | This link will open another page displaying the frequently asked questions in the portal. |
| 5. Member Account | This is where the member's account profile picture and name are displayed on the dashboard. |
| 6. Figures Summary | This section gives a summary of a member's pension contribution standings i.e., contributions on the employee account, employer account, and the total balance. |
| 7. Request Statement | Clicking on this button will initiate the process of compiling a statement report from the system that is automatically downloaded on the device used. |
| 8. View Contribution History | Clicking this button will initiate the process of downloading a report from the FundMaster system. |
| 9. Recent Closing Balance | This section displays a summary of the recent closing balance in form of a tabulation on the left side and a graph projection on the right side. |
| 10. Recent Contribution | This section of the page shows the recent contributions table. |
# Dashboard Menu
Clicking the menu bar icon will expand the panel to reveal menu items as shown in the illustration below. The user can click each item to open a specific page. The menu comprises links to the following pages:
i. Personal info
ii. Contributions
iii. Balances
iv. Claims
v. Benefits
vi. Banks
vii. Documents
viii. Forms
ix. Tickets
x. Manage Accounts
xi. Activity Logs
xii. Log Out Button
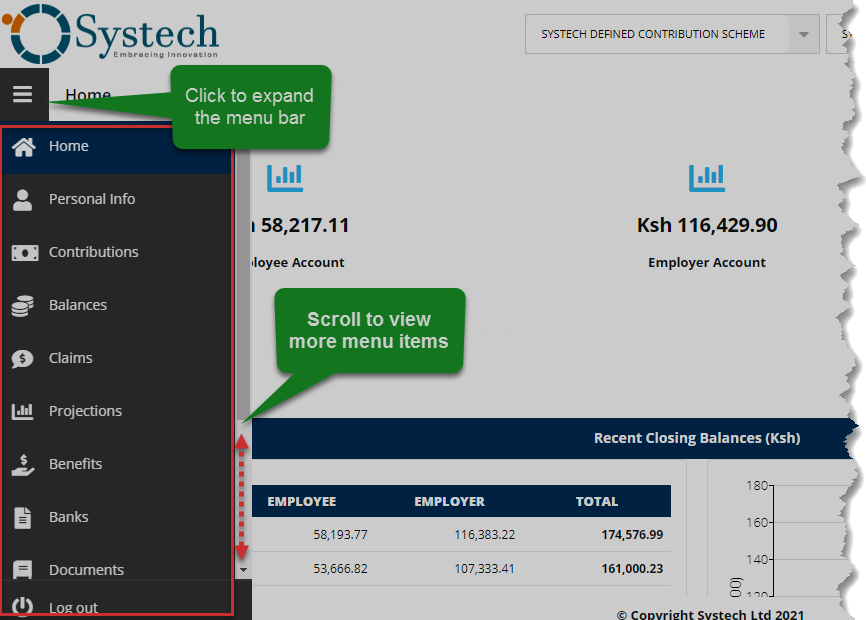
Action: Click the Home tab to expand the menu bar. Otherwise, click on a menu item to open the respective page.
# Personal Info
Clicking the profile info menu will display the member's personal information as shown in the following illustration.
Bio and Contact details
From the left side of the page section, the member can see his/her personal information (bio) as captured in the system. On the right side is the member's contact details. Scroll down to display the lower hidden section.
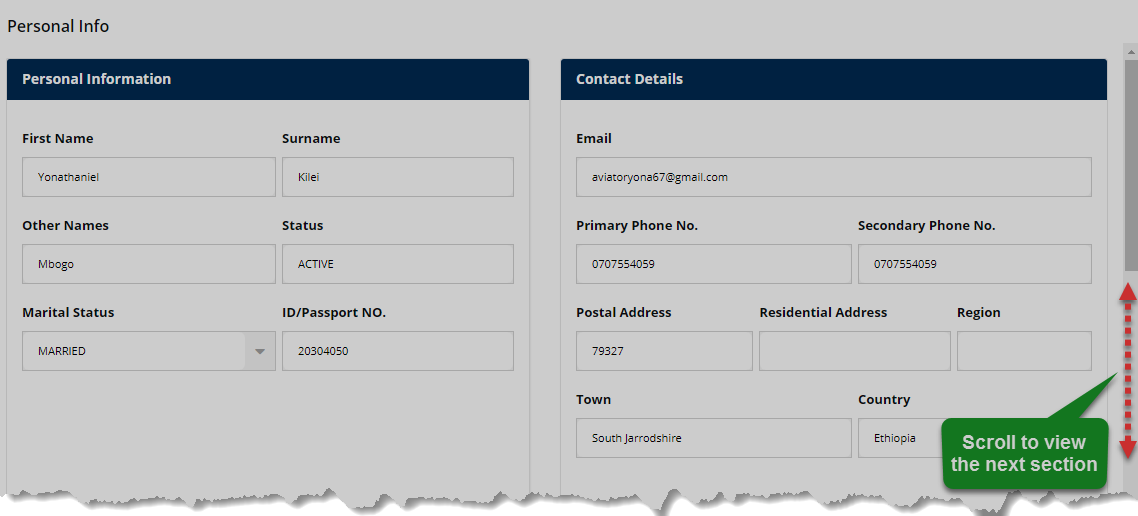
Action: Use the Scroll Bar on the right to view the hidden part of the page.
Beneficiaries' details
From the left side, we have the member's beneficiaries presented in a table while on the right side a chart of the beneficiaries' entitlement is displayed.
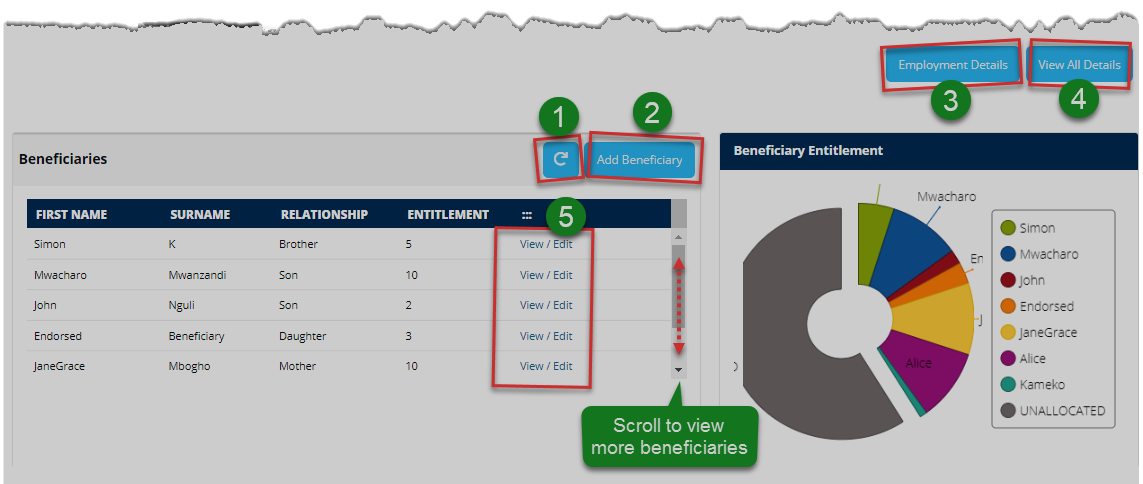
Action: Click on the buttons labeled with green numbered circles to do the following:
Label 1: click to repopulate the table.
Label 2: click to open a new form to add more beneficiaries.
Label 3: click to view employment details.
Label 4: click to view all the details.
Label 5: click to view and edit individual's details.
The Illustrations below demonstrate how to achieve the click events listed above:
Adding more beneficiaries
Clicking the add beneficiary button as shown in the previous illustration, will launch a form prompting the user to fill in text fields with all the details of a beneficiary. See the illustration below.
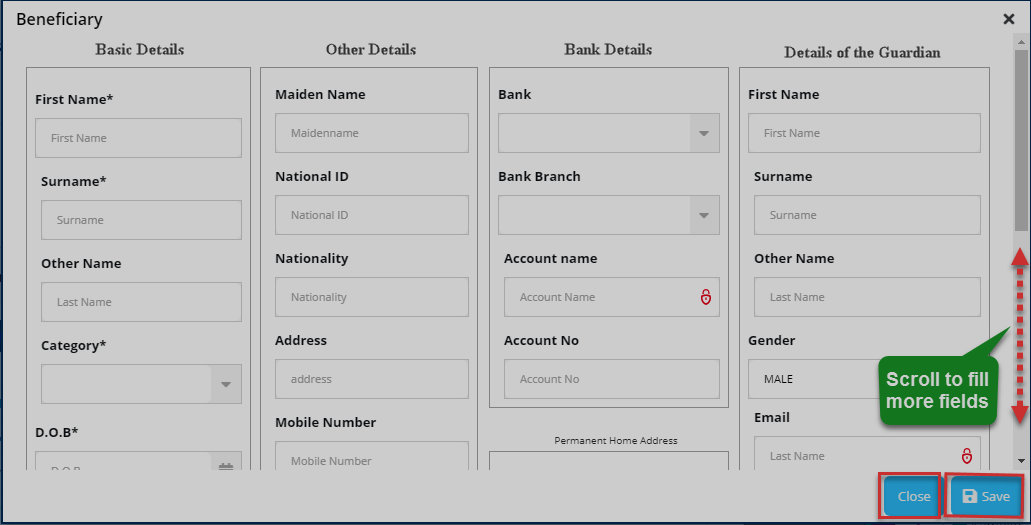
Action: Click the Save button to add a new person. Otherwise, click the Close button exit the window.
Employment details
Clicking the employment details button as shown in a previous illustration, will launch a form displaying the user's employment details as shown in the illustration below.
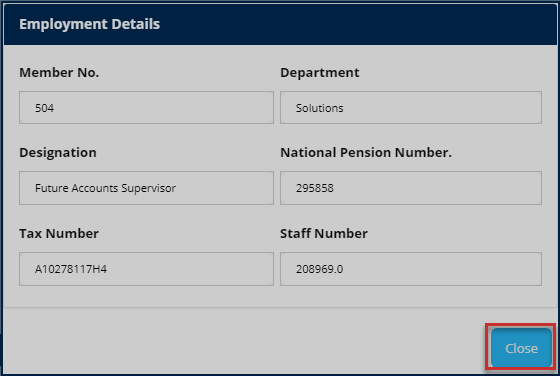
Action: Click the Close button to exit the window.
Viewing all details
Clicking the view all details tab will display a page with tabs that can be clicked to display sections with all details of a member. See the illustration below.
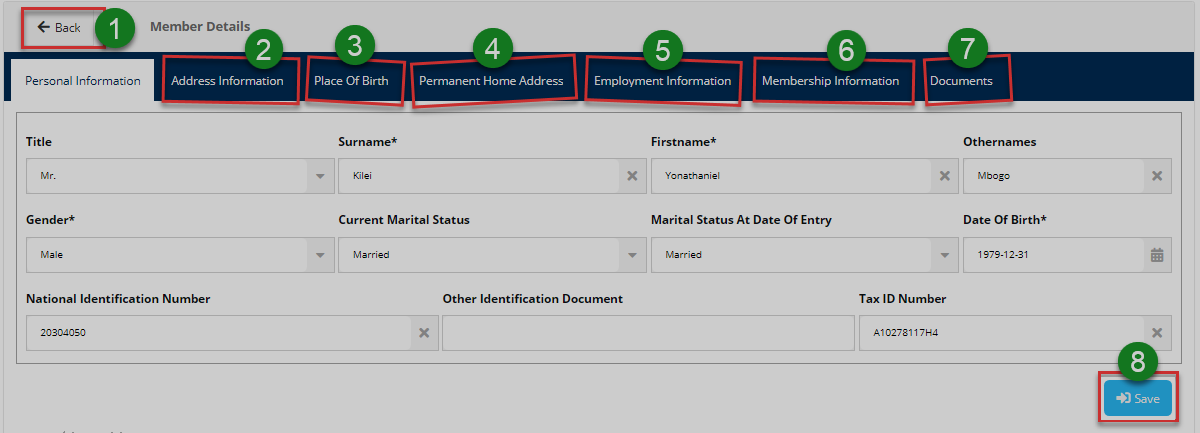
Action: Click on the menu items labeled with green numbered circles to do the following:
Label 1: click to go back to the previous page.
Label 2: click to view and edit address information.
Label 3: click to view and edit place of birth information.
Label 4: click to view and edit permanent home address information.
Label 5: click to view and edit employment information.
Label 6: click to view and edit membership information.
Label 7: click to upload new documents.
Label 8: click to commit modified details.
Address information
Click to view a member's address information as shown in the illustration below.
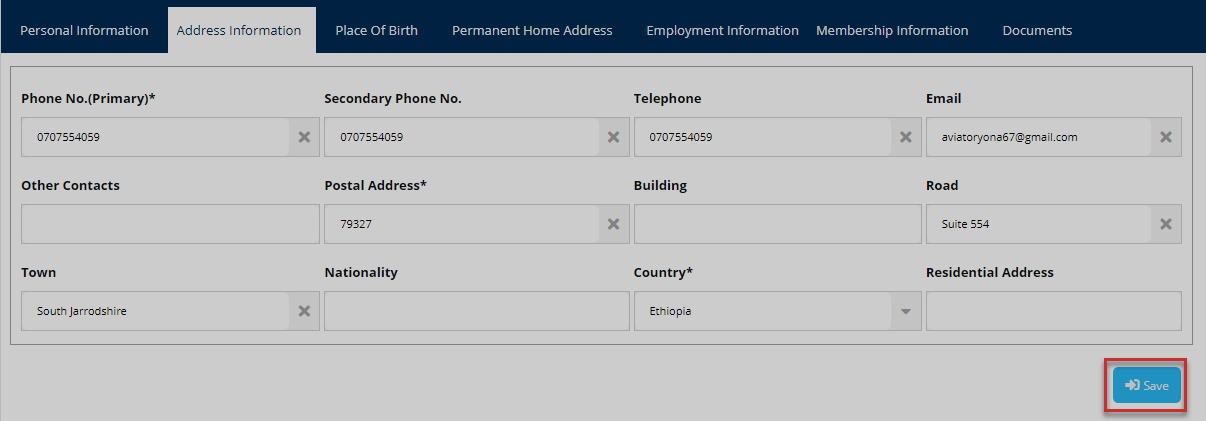
Action: Click the Save button to commit the captured details
Place of birth information
Click to view a member's place of birth info as shown in the illustration below.
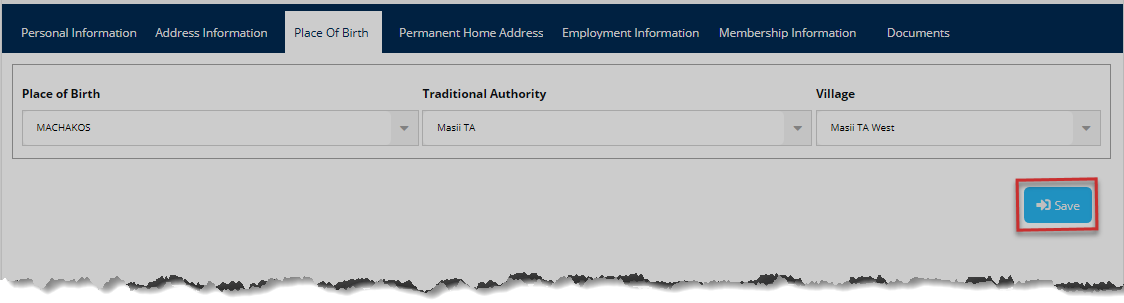
Action: Click the Save button to commit the edited details
Permanent home address information
Click to view a member's home address information as shown in the illustration below.
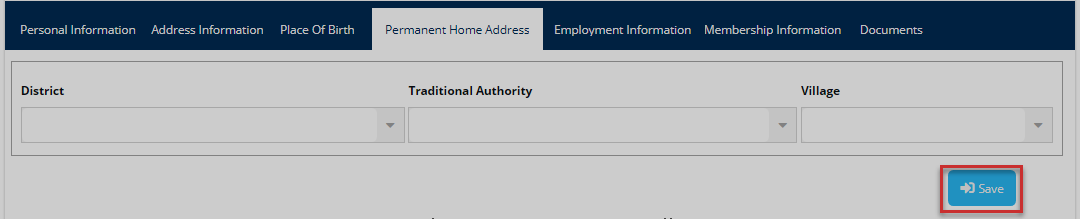
Action: Click the Save button to commit the edited details
Employment information
Click to view a member's employment information as shown in the illustration below.
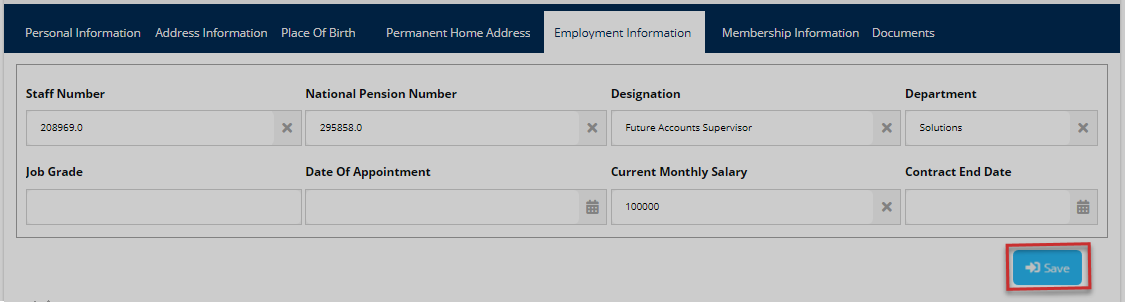
Action: Click the Save button to commit the edited details
Membership information
Click to view a member's membership information as shown in the illustration below.
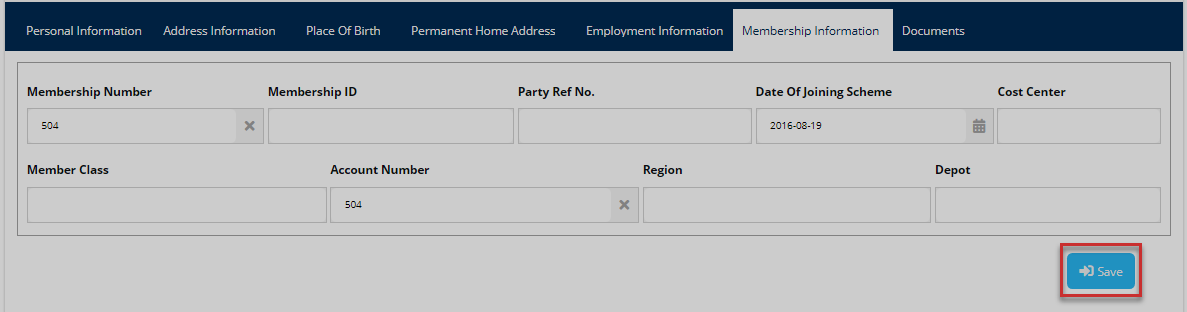
Action: Click the Save button to commit the edited details
Upload documents
Click to upload membership required documents as shown in the illustration below.
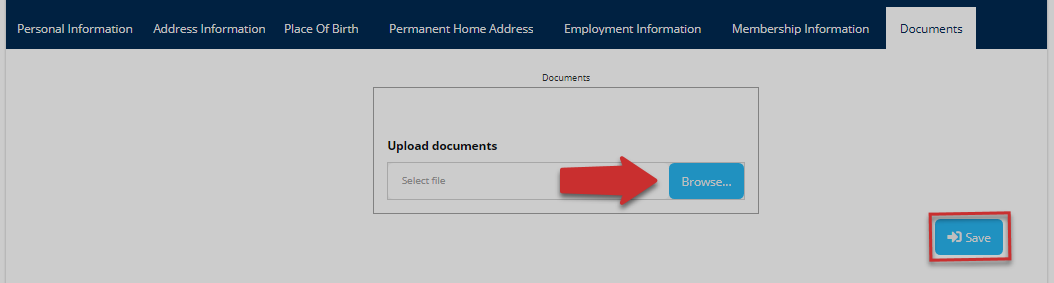
Action: Click the Browse button to upload documents, Otherwise, click the Save button.
# Contributions
Clicking the contributions menu will open the member's contributions page allowing the user to view records of the contributions they have made in the past as well as make new contributions. Note that contributions for a specified period can be viewed using the filter button.
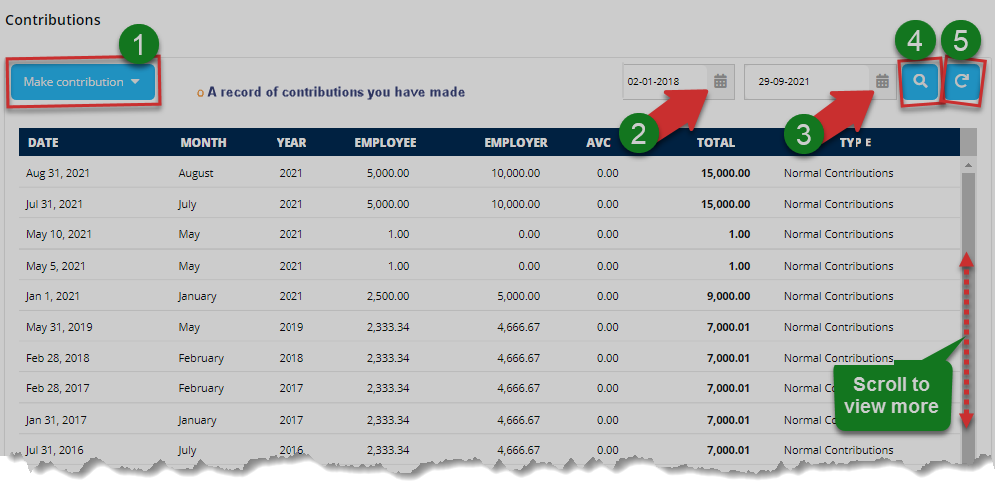
Action: Click on the buttons labeled with green numbered circles to do the following:
Label 1: click to go open a form window and make a contribution; see the next illustration.
Label 2: click to specify the start date for filtering contribution records view.
Label 3: click to specify the end date for filtering contribution records view.
Label 4: click to display filtered records.
Label 5: click to repopulate the records without filtering.
Make contributions
On clicking the Make contributions button labeled 1, a drop-down menu is displayed to allow a user to select the preferred method of payment e.g., Mobile Money, as illustrated below. Fill the form with details to commit a new contribution.
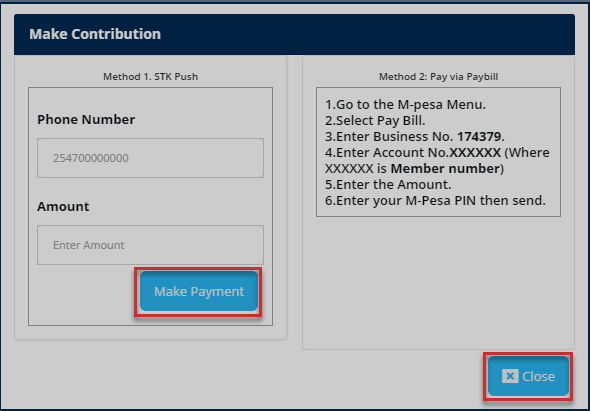
Action: Click the Make Payment button to initiate the transaction. Otherwise, click on the Close button to exit the window.
Note
When a user inputs his/her Phone Number and Amount and clicks the Make Payment button, The Mobile Service Provider will prompt one to enter pin number to complete the transaction. A confirmation message will finally be sent to the user's phone number.
# Balances
Clicking the balances menu will open the member's balances page allowing the user to view records of balances for different accounting periods. On the right side is a button that allows the user to view her/his recent contributions through a pop-up window within the page. See the next illustration.
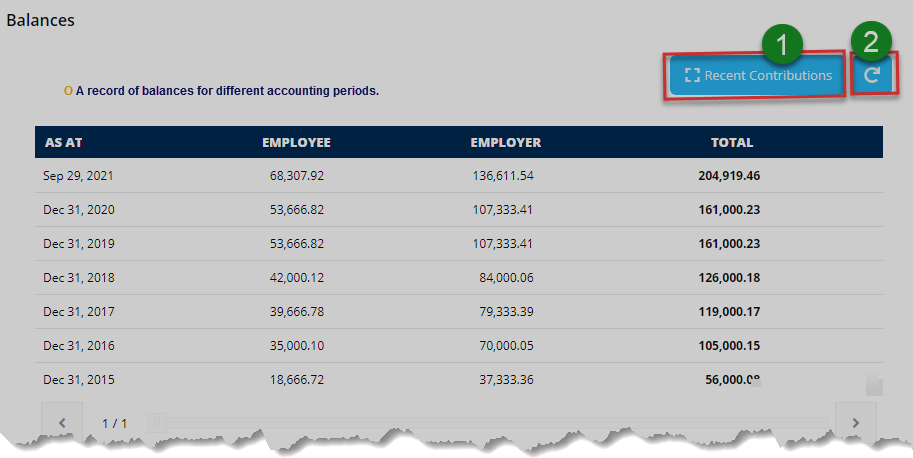
Action: Click the Recent Contributions button labeled 1 to open the recent contributions window. Otherwise, click on the Refresh button labeled 2 to repopulate the records.
Recent contributions
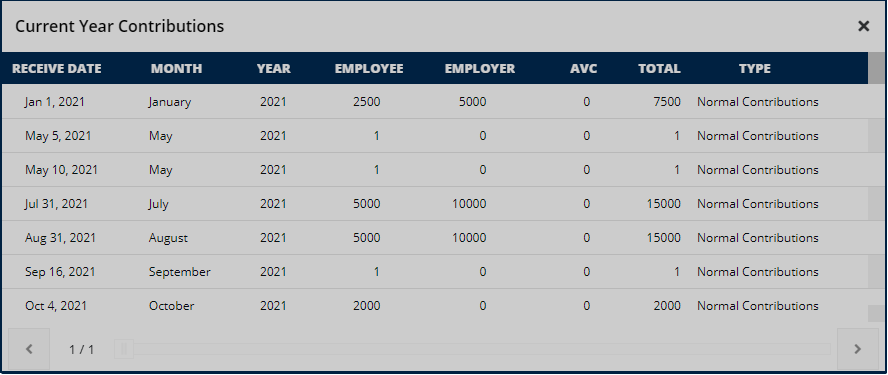
Action: Click the Exit button to close the recent contributions window.
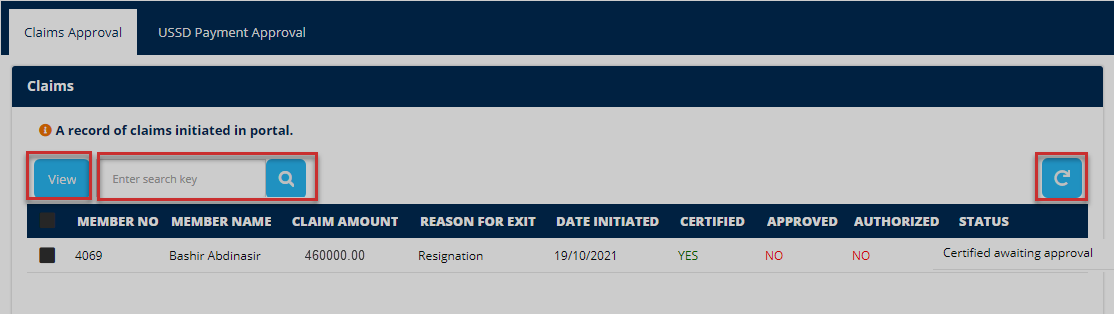
# Claims
Clicking the claims menu will open the claims page shown in the illustration below, allowing the user to initiate a claim towards making benefits request withdrawal. There is a button on the right side that enables the user to open a wizard for making the request.
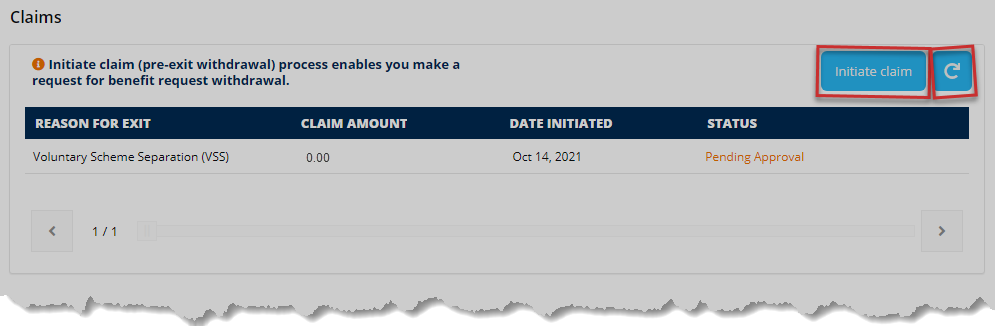
Action: Click the Initiate Claim button to open a claim wizard window Otherwise, click the refresh button to populate the claim records.
Initiating claim
When a user clicks the initiate claims button, a pop-up window opens, welcoming the member to a claim process. See the illustration below.
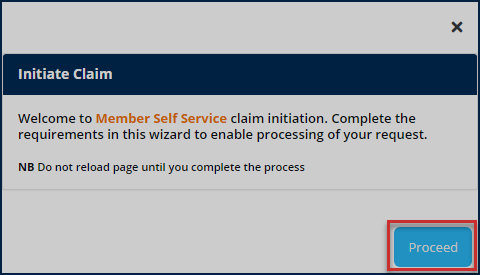
Action: Click the Proceed button to open a claim wizard window Otherwise, exit the window.
When a user clicks the Proceed button, a wizard is triggered to populate the user's details if he/she is a registered member. See the illustration below.

Action: Click the Next button to proceed, otherwise, click the Cancel button to terminate the process.
Clicking the Cancel button will prompt the user to confirm his/her decision to discard the claim. Otherwise, the user is given another chance to continue with the claim process as shown below.

Action: Click the Yes button to discard the claim or the No button to continue with the claim process.
Pending claims
On the other hand, if a user, who is initiating a claim, has another pending claim not yet approved, when he/she clicks the Next button as shown in a previous illustration, the system informs the member of a pending claim as shown in the illustration below.

Action: Click the Ok button to exit the wizard.
Otherwise, if a non-member clicks the next button, the following message will be displayed.

Action: Click the Ok button to quit.
Note
The following are some of the reasons why members of a scheme may initiate claims for exit. These reasons are provided as a configuration from the FundMaster by the administrator.
Resignation
retirement on ill-health,
Normal retirement
Medical discharge
Others
# Projections
Clicking the projections menu will display the projections page. Here members can use the Benefits Projection Calculator to know how much they could get were they to exit a scheme at a certain age.
They can also use What If Analysis function to know how much AVC they can add on top of monthly contribution to achieve a certain retirement lump sum.
Calculating benefits projection
The illustrations below show the steps taken to calculate the benefits projection. The form shown below prompts the user to fill in the required details to show the results.
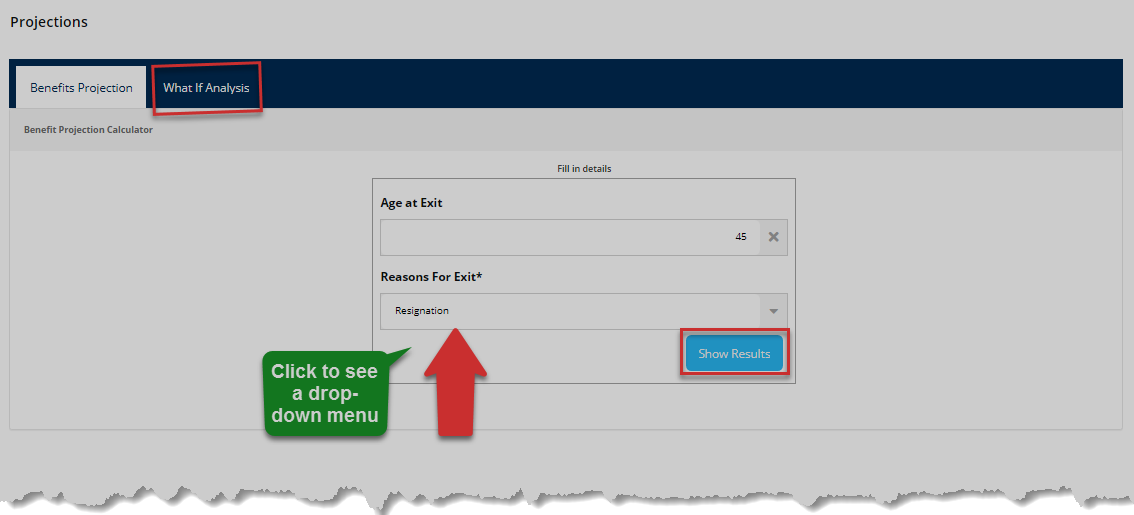
Action: Fill in details and click the Show Results button, otherwise, click What If Analysis tab to open the calculator page.
Note
If a given age and the selected reason for exit are agreeable, clicking the Show Results button will trigger the benefits projection calculator to return some results as shown in the illustration below.
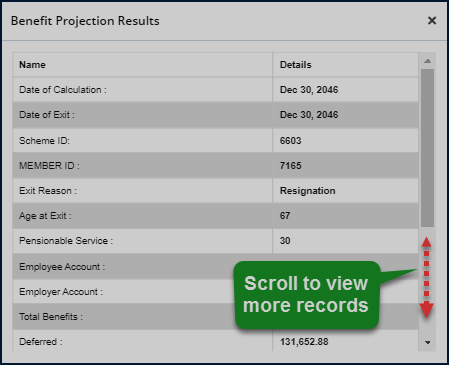
Action: Use the Scroll Bar on the right to view the extra information.
What If Analysis function
Below is the section of the page with What If Analysis function. Members can calculate their expected benefits result after filling the provided form with their details and future assumptions to calculate and predict future withdrawable balance.
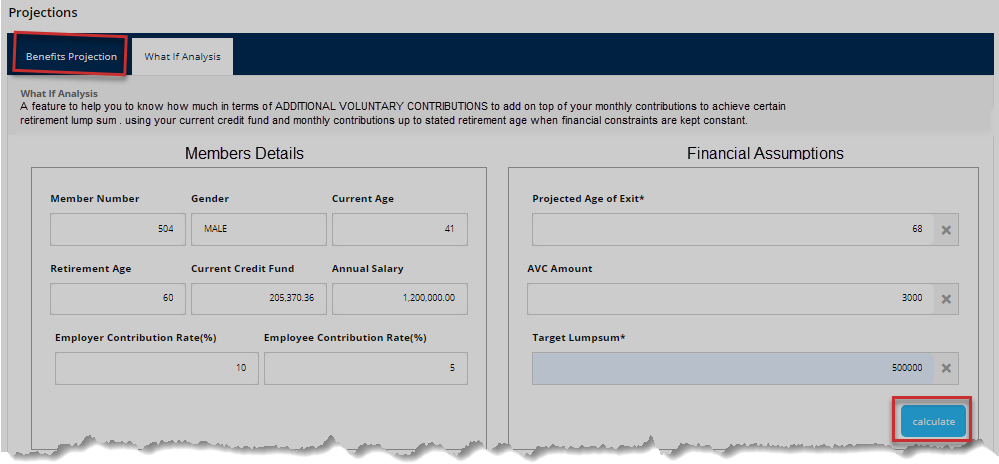
Action: Click on the Calculate button to launch the function.
The following illustrations demonstrate how to get projections with the What If Analysis function. Note that the calculations thereof are done with sampled member data. Also, if this function is not visible on the projections page, it is configured to be hidden and can be activated from the admin profile within the portal.
Calculator interface
On clicking the Calculate button, the following page will load, wait till a green message is displayed "saying calculator is ready...'. Now you can adjust parameters for projections. Consider guidance from the illustration below.
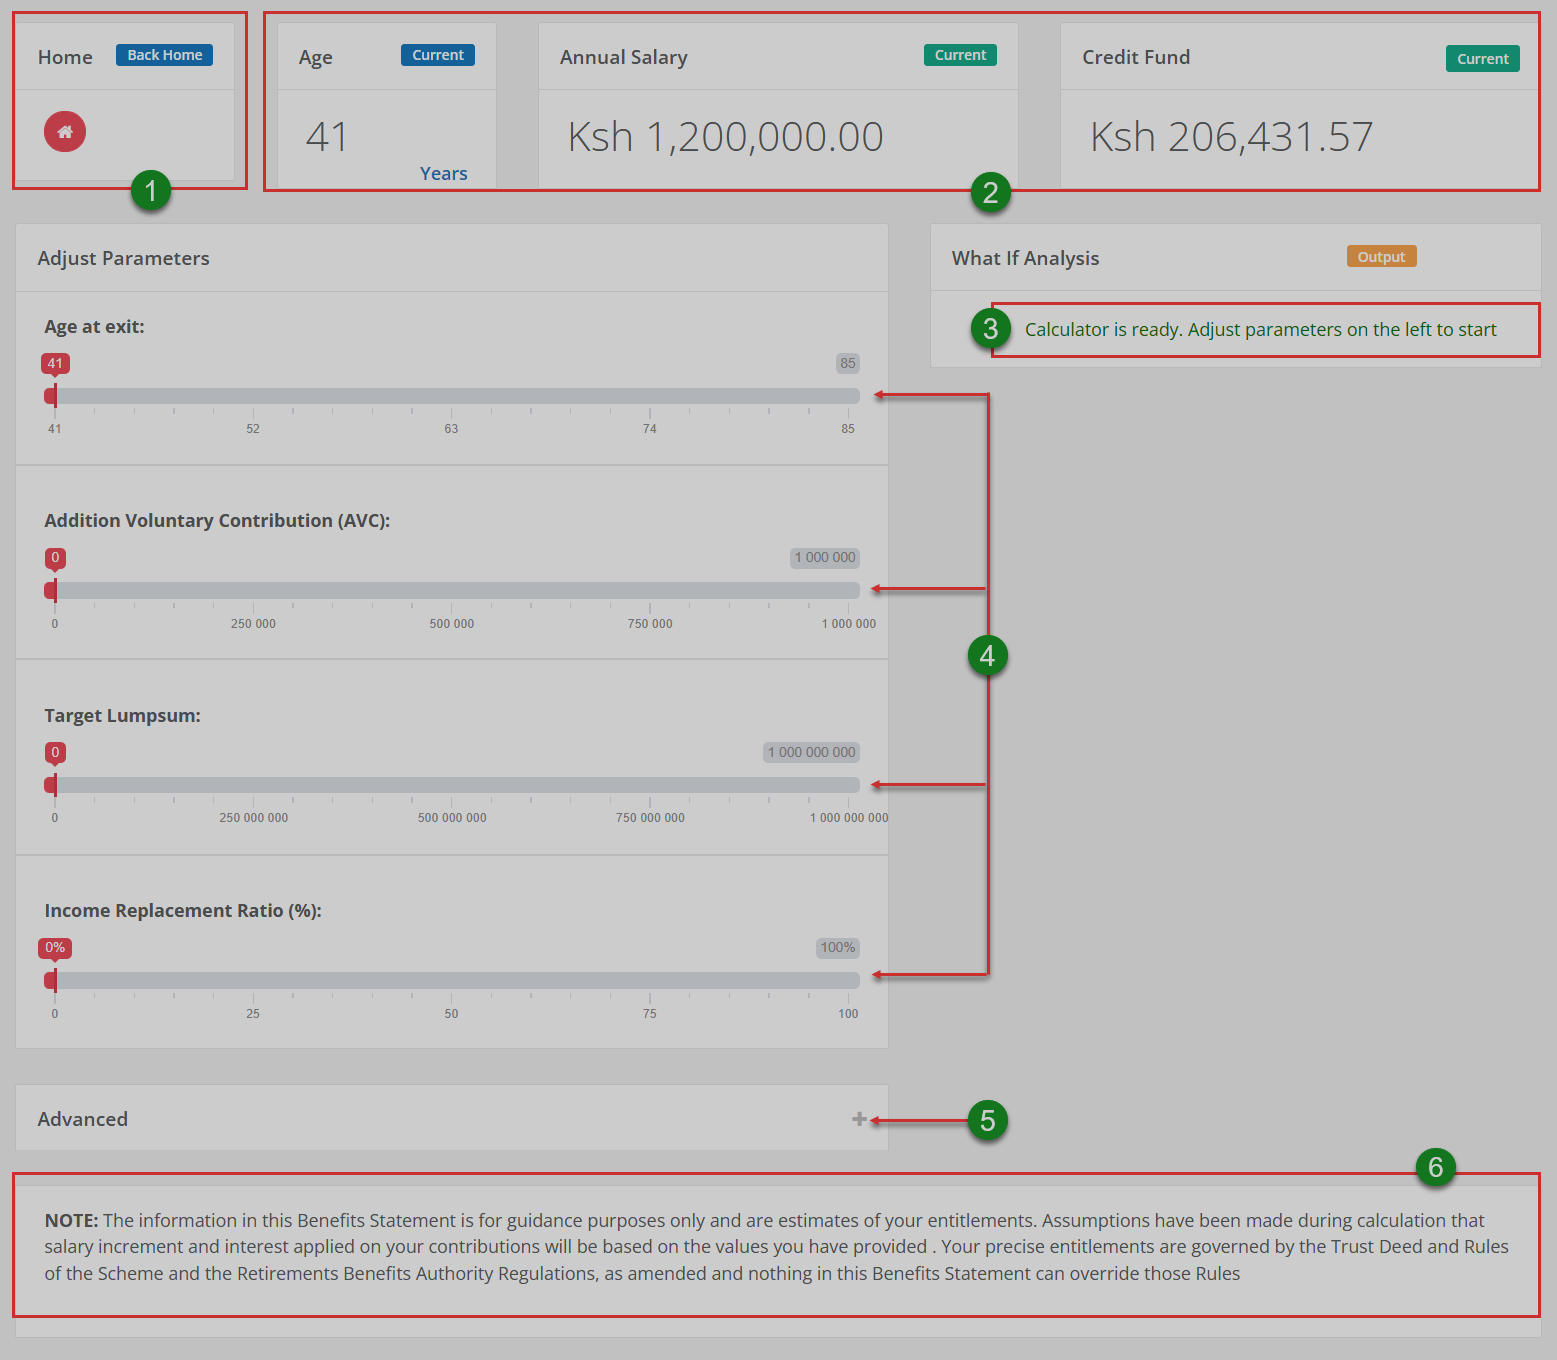
Action: Consider the appropriate action on the areas labeled with green numbered circles as follows:
Label 1: click the home button to go to the projections page.
Label 2: view to confirm your background data.
Label 3: view to see if the calculator is ready.
Label 4: click to adjust parameters appropriately for wide-ranging projections.
Label 5: click to display another section where you can do advanced projections.
Label 6: read the disclaimer message
Note
The following are some of the basics that a user needs to grasp in order to use this tool effectively:
At first, adjusting the age leaving the other parameters default will display current account funds, similar to Addition Voluntary Contribution (AVC).
Adjusting the Target lump sum will calculate the AVC required to achieve the target at the given age of exit and if you have already surpassed the target.
Adjusting the Income Replacement Ratio (IRR) will calculate the target lump sum and AVC that will enable you to achieve the target IRR for at least 10 years.
Adjusting parameters
The calculator uses your recent contributions (EE+ER+AVC) to project and determine the amount of lump sum package and IRR that you may receive at the specified exit age. The financial constraints passed will be applied accordingly. See the next illustration.
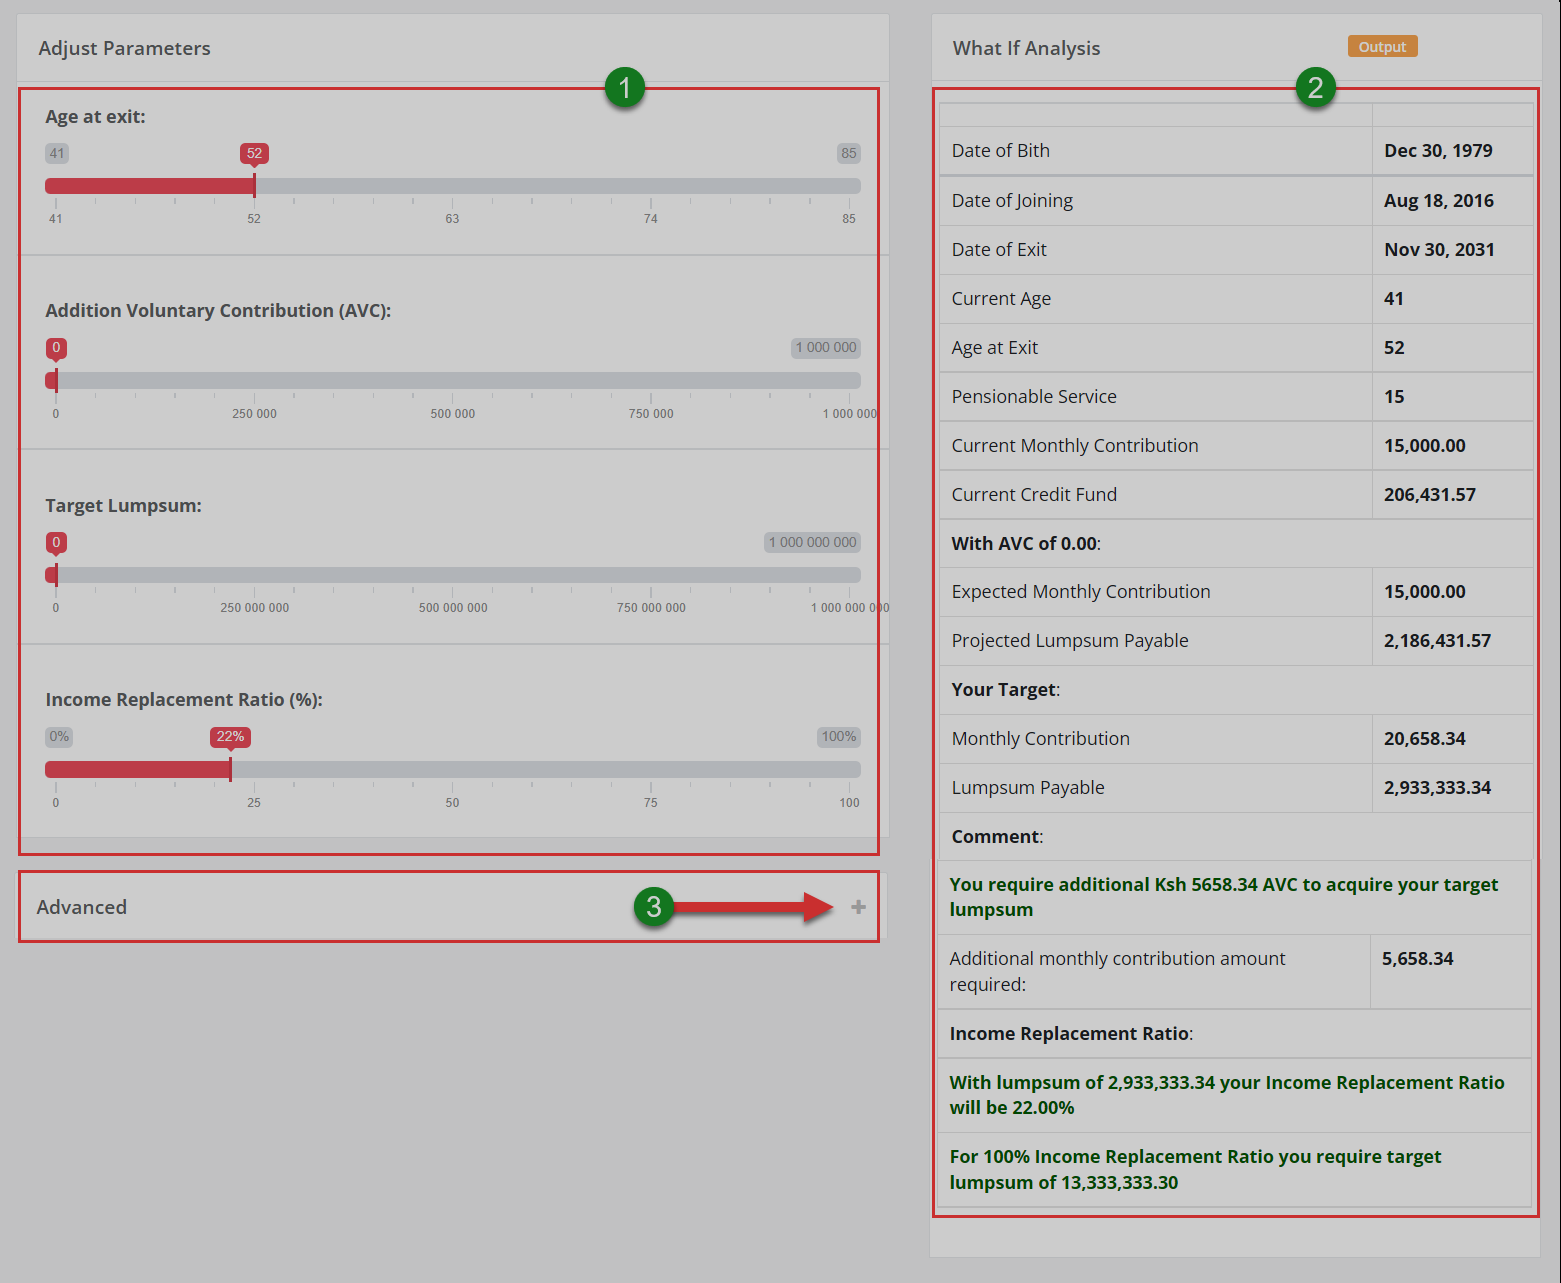
Action: Consider the appropriate action on the areas labeled with green numbered circles as follows:
Label 1: click and drag the slider to adjust parameters appropriately for wide-ranging projections.
Label 2: see the outcome of parameter adjustments
Label 3: click to toggle button to unhide parameter adjustments for advanced projections
Advanced projections
Clicking on the advanced toggle button will unhide a section with advanced parameters that a user can adjust to project Future Investment Return Per Annum (%), Future Inflation Per Annum (%), and Future Salary Increases Per Annum (%). See the illustration below.
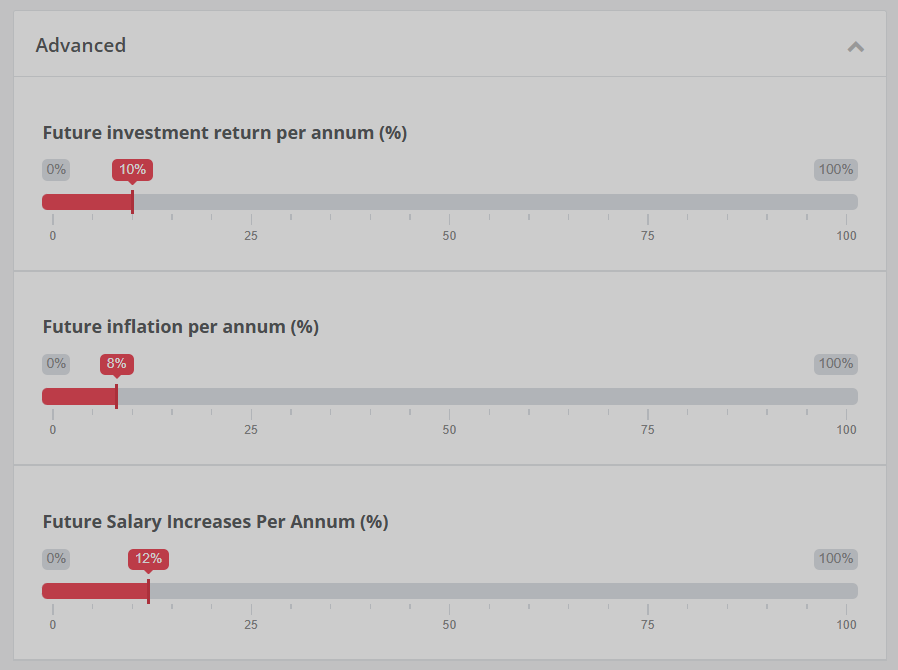
Action: Click on the red-colored sliders to adjust different parameters and see the output on the right side of the page as shown above.
Note
After adjusting the parameters as shown in the illustration below, consider the right column of the previous illustration to see changes in projections.
# Documents
Clicking the documents menu will display the documents page that consists of three sections namely: Unsubmitted documents, submitted documents, and D.M.S. See the illustration below.
Unsubmitted documents sections shows those that a member is supposed to upload to the FundMaster for approval.
Submitted documents section show those that the member has uploaded to FundMaster. These are labeled as either rejected, pending, approved, etc.
D.M.S on the other hand is a section for easily managing and sharing documents.
Unsubmitted documents
From this page, a user can also open the submitted documents or D.M.S pages by clicking the tabs on the top panel. Otherwise, a member can pick a document from those that are already uploaded or upload a new one as illustrated below.
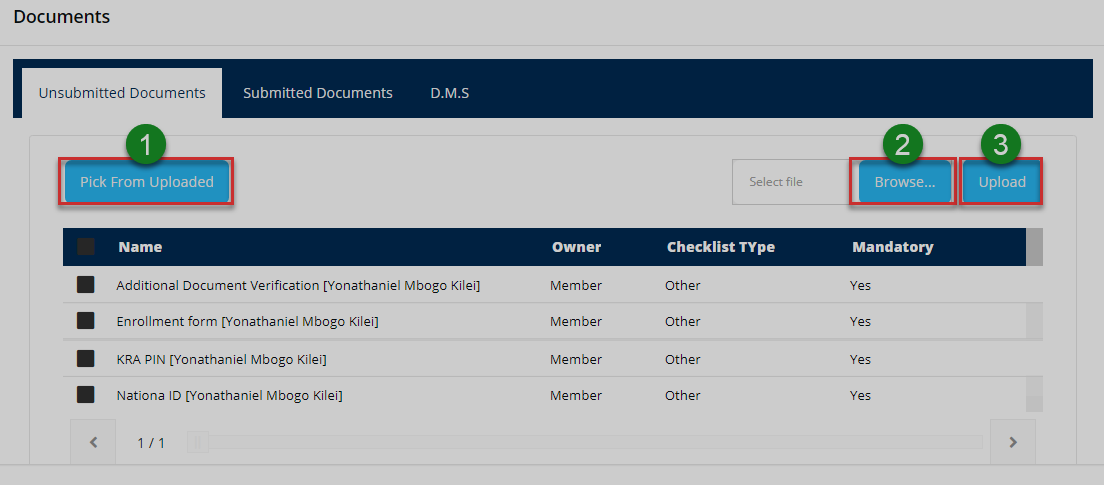
Action: Click on the tabs and buttons labeled with green numbered circles to do the following:
Label 1: click to select a document from the uploaded list.
Label 2: click to select documents to upload from your device
Label 3: click to upload a new document.
Submitted documents
Clicking the submitted documents tab will display the list of all the documents already submitted to the system towards initiating a claim. The user can also open the unsubmitted documents page again or the D.M.S pages. The illustration below shows the page whose member has no submitted documents.
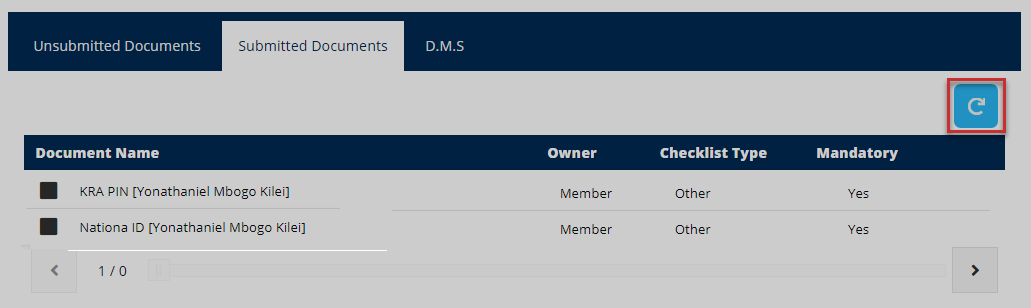
Action: click the Refresh button to repopulate the records.
Document management system
Clicking the D.M.S tab will display the list of all the documents that the member has already uploaded to the system towards initiating a claim. The user can also open the received documents page to see a list of documents received by the FundMaster system.
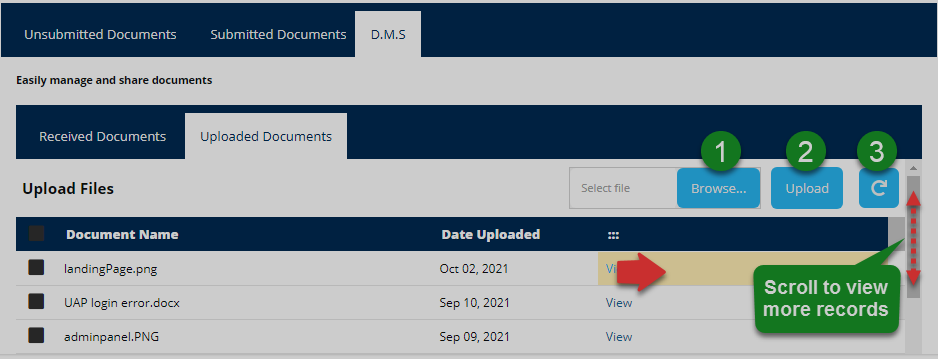
Action: Click on the tabs and buttons labeled with green numbered circles to do the following:
Label 1: click view unsubmitted documents.
Label 2: click to view submitted documents.
Label 3: click to view received documents.
Label 4: click to select documents to upload from your device
Label 5: click to upload a new document.
Label 6: click to repopulate the records
Received documents
Clicking the Received Documents tab will display the list of all the documents that the system has already received towards initiating a claim.
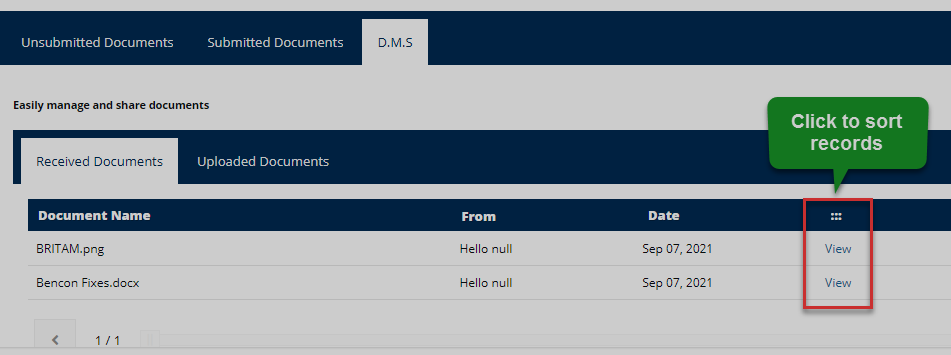
Action: Click the Sort button to display records in the desired order.
# Ticket
Clicking the ticket menu will display the tickets page shown below. From this page, users can raise problems pertaining to usage of the portal. The system will route the issue to the relevant profile user. For example, whenever a user raises a ticket for a forgotten password, seeing that the resetting of passwords is handled from the admin profile, the portal admin will see the ticket query and address it, giving a response thereafter.

Action: Click on the tabs and buttons labeled with green numbered circles to do the following:
Label 1: click to view a selected ticket's details.
Label 2: click and type a ticket ID to do a quick search.
Label 3: click to view documents accompanying a selected ticket
Label 4: click to refresh records.
Label 5: click to add a new ticket
View ticket
If a user wants to view all the details of a particular ticket, he/she is supposed to select by clicking on the check box as shown in the previous illustration.
After the ticket is selected, clicking the view ticket button will open a page displaying the ticket's details: Ticket title, ticket status and message and the replays to the message showing the name of the person who handled the ticket and the date. On the lower section of the page, the user can replay the message from the ticket handler. See the illustration below.
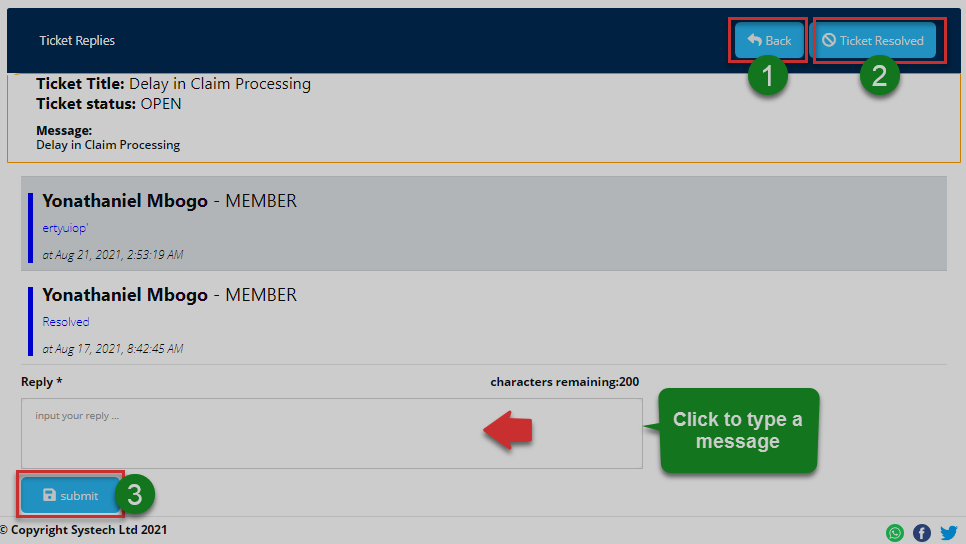
Action: Click the tabs and buttons labeled with green numbered circles to do the following:
Label 1: click to return to the previous page.
Label 2: click to view if the ticket issue has been resolved.
Label 3: click to submit a replay message.
Note
Using the search by ID text box will allow you to quickly find a particular ticket record. On the other hand, clicking on the view documents button will open the documents page to show all documents attached to a ticket.
# Banks
Clicking the bank menu will display the page where a member can add bank details. If one has more than one bank account, setting one has the default bank is done here.
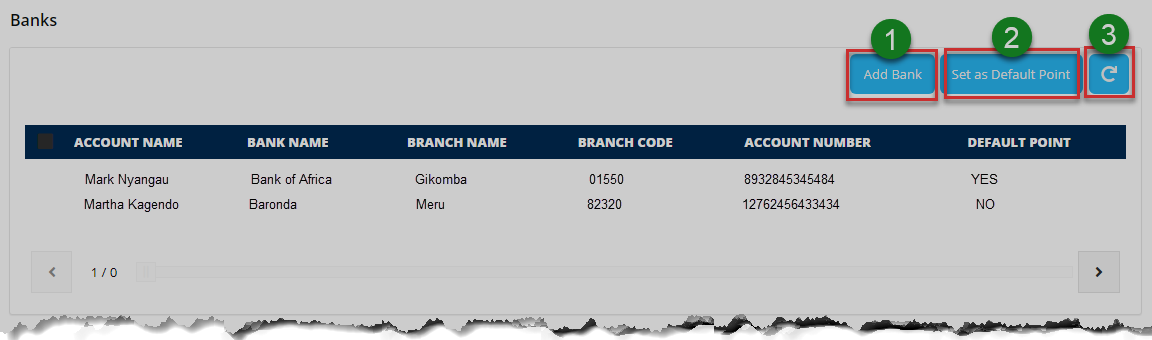
Action: Click the buttons labeled with green numbered circles to do the following:
Label 1: click to add bank details.
Label 2: click to set a selected bank as default.
Label 3: click to repopulate records.
# Forms
Clicking the form menu will display a page showing all uploaded forms for member's profile in the portal. A member can download the form to fill in and submit appropriately. See the illustration below.
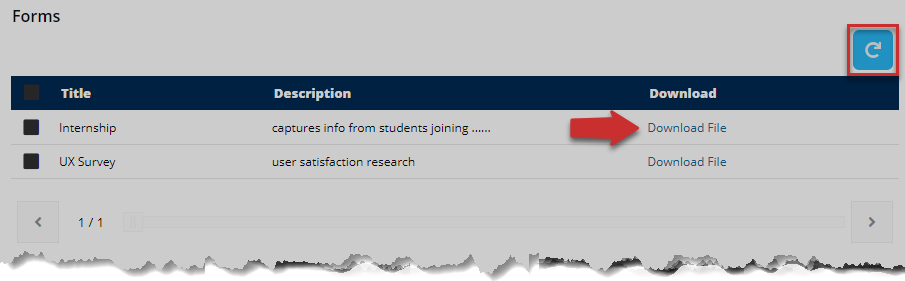
Action: Click the Refresh buttons to repopulate the list of forms. Otherwise, click on the Download file link to have a copy of the form on your device.
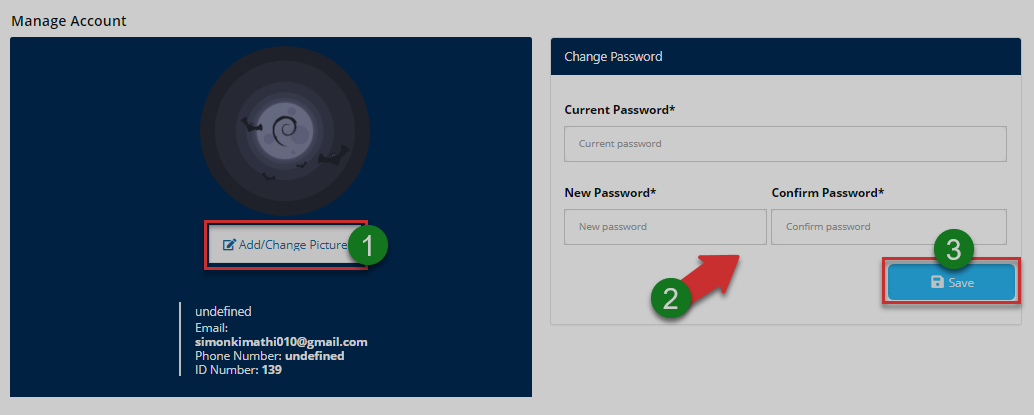
# Manage Account
Clicking the manage account menu will open a page showing the personal details of the logged-in member. One can also change his/her profile picture, download membership certificate besides changing password details as shown in the illustration below.
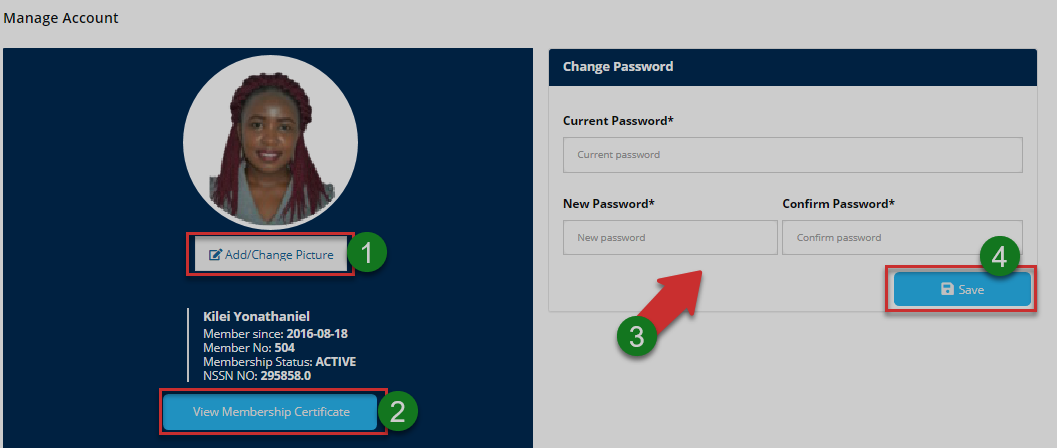
Action: Click the buttons labeled with green numbered circles to do the following:
Label 1: click to change profile picture.
Label 2: click to download membership certificate.
Label 3: click to fill in new password details.
Label 4: click to confirm all changes.
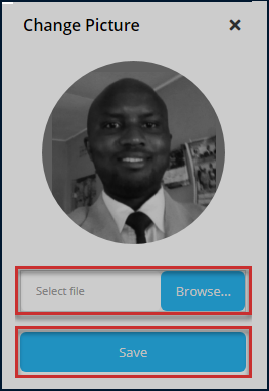
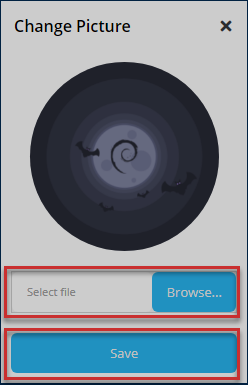
Account picture
Clicking Add/Change Picture button will open a window as shown in the illustration below. One can navigate to the folders or other locations to upload a new picture.
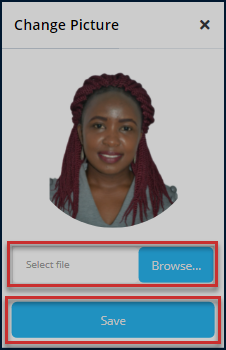
Action: Click the Browse button to select a new picture from your device then click the Save to confirm change of images. Otherwise, close the window.
Membership certificate
Clicking the view membership certificate button will open a window as shown in the illustration below, asking one to confirm his/her intention to view the report.
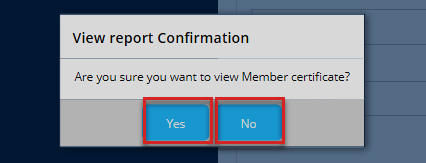
Action: Click the Yes button to have the report downloaded to your device, Otherwise, click the No button to abort the procedure.
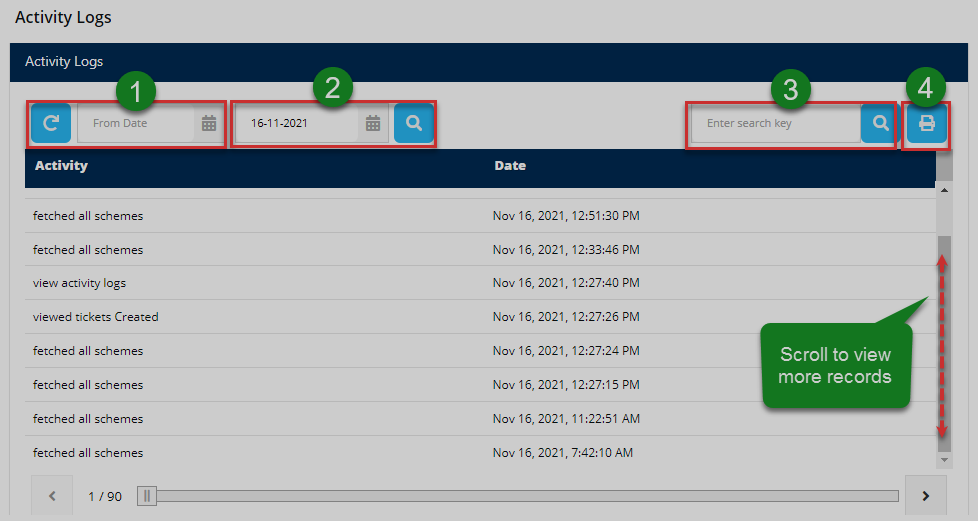
# Activity Logs
Clicking the activity logs menu will open a page showing a record of all the activities of a logged-in member in the portal. One can search records for specific periods through filtering by date and print a copy.

Action: Click the buttons labeled with green numbered circles to do the following:
Label 1: click to reload the activity records.
Label 2: click to set start and end dates for filtering.
Label 3: click to filter.
Label4: click to type keywords to search records quickly.
Label 5: click to print records.
# Admin Profile
This profile serves as an interface to the portal users who take the role of administration. Admins have many privileges in the system that allows them to more functions thus can carry out several activities as will be demonstrated throughout this section.
# Dashboard components
When a user login as an admin, he/she will be welcomed into the admin home (dashboard) as shown in the illustration below.
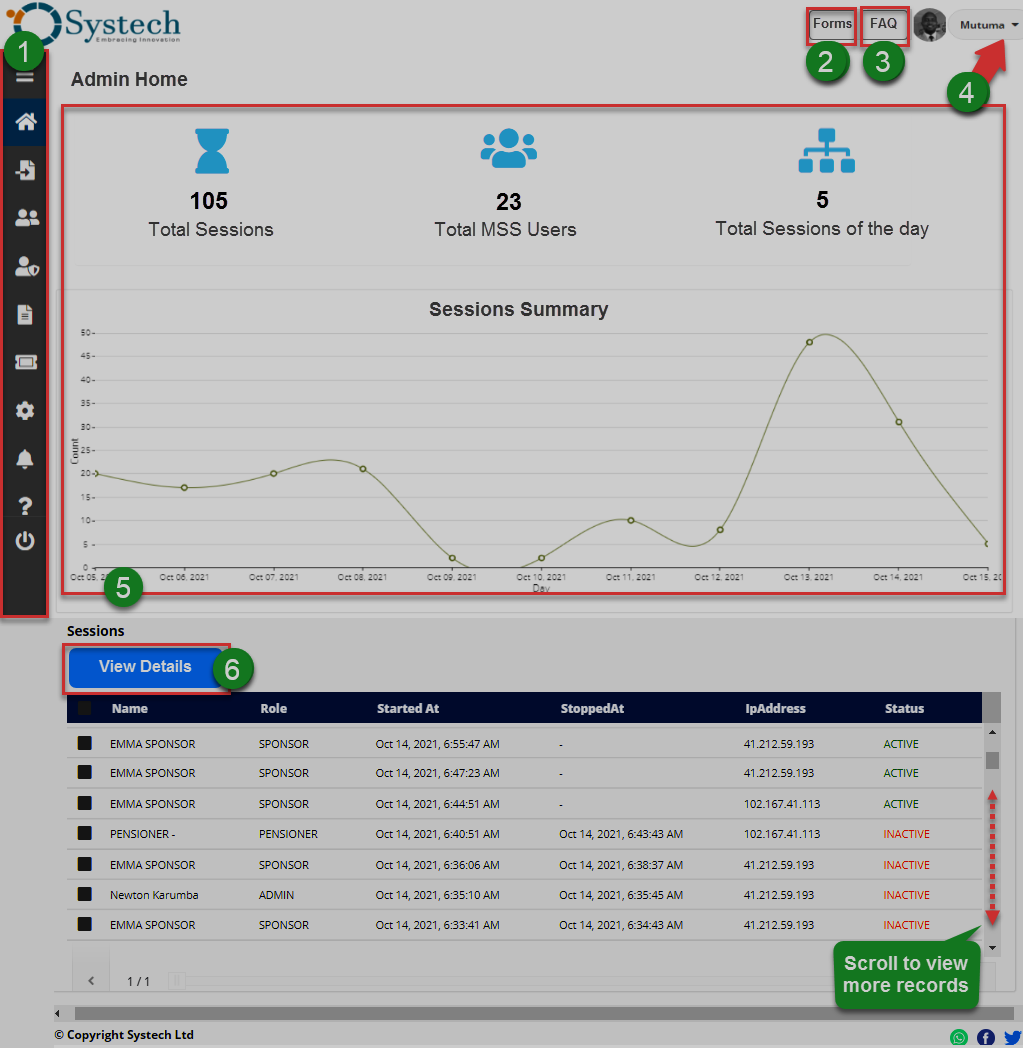
The numbered sections in this illustration above correspond to the numbers in the following table that describe the key components of the member's dashboard.
| Part | Description |
|---|---|
| 1. Menu Bar | This is the menu bar from which various items can be accessed quickly. Click on the menu bar icon on the top to expand it. |
| 2. Forms | A shortcut to view all form documents in the system. |
| 3. FAQs | A shortcut to view all frequently asked questions |
| in the portal. | |
| 4. User Account | This is where the member's selfie and name are displayed on the dashboard. Here, a drop-down menu is also provided with links to user profile, notifications and log out button. |
| 5. Sessions Summary | This section gives a summary of all sessions in the portal: summaries in figures and a graph plotted with the same data. |
| 6. View Details | This section gives a summary of the portal: Details of all users logged in are provided. |
# Dashboard menu
Clicking the menu bar icon will expand the panel to reveal menu items as shown in the illustration below. The user can click each item to open a specific page. The menu comprises links to the following pages:
i. System Config Files
ii. Users
iii. Manage Admins
iv. Files
v. Manage Tickets
vi. Settings
vii. Notifications
viii. FAQs
ix. Log Out Button.

Action: Click the Home tab to expand the menu bar. Otherwise, click on a menu item to open the respective page.
# System Config Files
Clicking the system config files menu will open a page showing all configurable settings groups under different tabs on the menu bar as shown in the illustration below.
Note
From this page, an admin can configure different settings allowing close platform integration through APIs. A good example is integrating the MSS portal with mobile money platforms such as MPESA etc. The settings also allow hiding off (can be made visible again) some functionalities on different profiles as will be demonstrated in this section.
Changing landing page content
The landing page of every deployment of the MSS portal can vary from another by simply editing the various elements of the page e.g. logo, images, address details among others. The following illustration shows an example of landing page configuration settings.
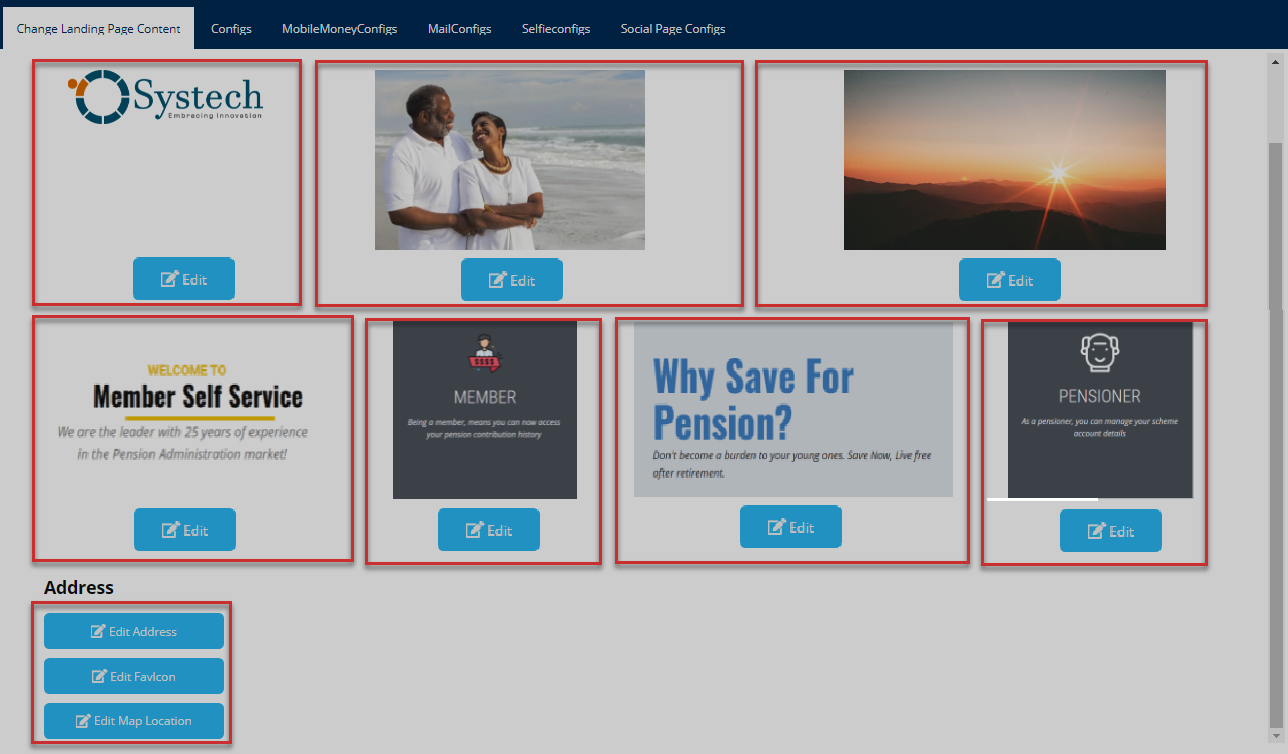
Action: Click the Edit buttons inside every enclosed section to modify the content appropriately.
Configs
Clicking the configs tab will open a section where a user can select between creating a mobile configuration, viewing a configuration's settings (which will be displayed on a new window form), or removing a configuration. See the illustration below.
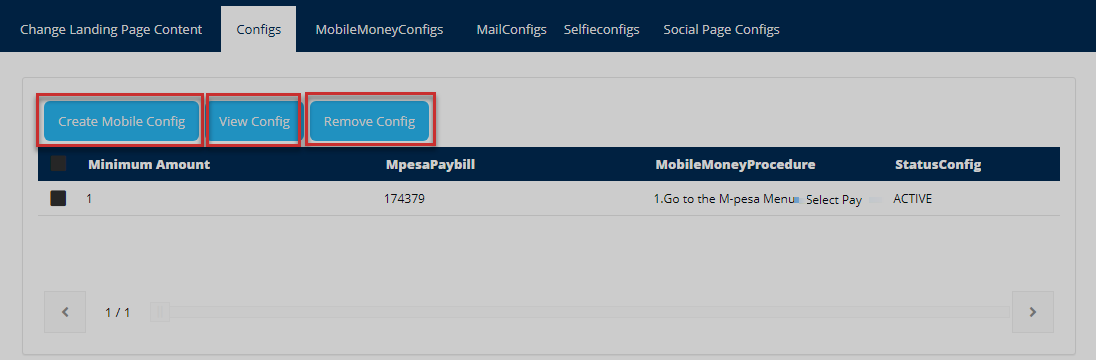
Action: Click on each enclosed tab to carry out the appropriate action.
MobileMoney Configs
Clicking this tab will open a section where a user can configure settings for integration with mobile money service providers. A user can also view an existing mobile money configuration or remove one from the system. See the illustration below.
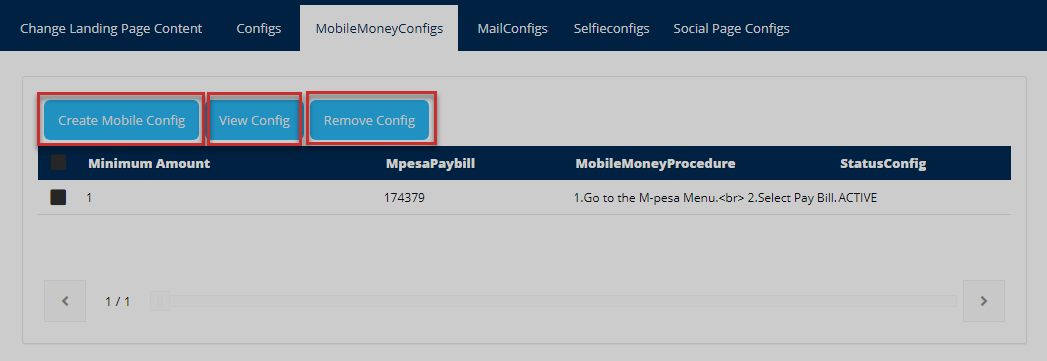
Action: Click on each enclosed tab to carry out the appropriate action. To view a configuration, first select a record by clicking the appropriate check box to select and then click view configs button.
Mail Configs
Allows a user to configure settings for working with various email service providers. A user can also view an existing email configuration or remove one from the system. See the illustration below.
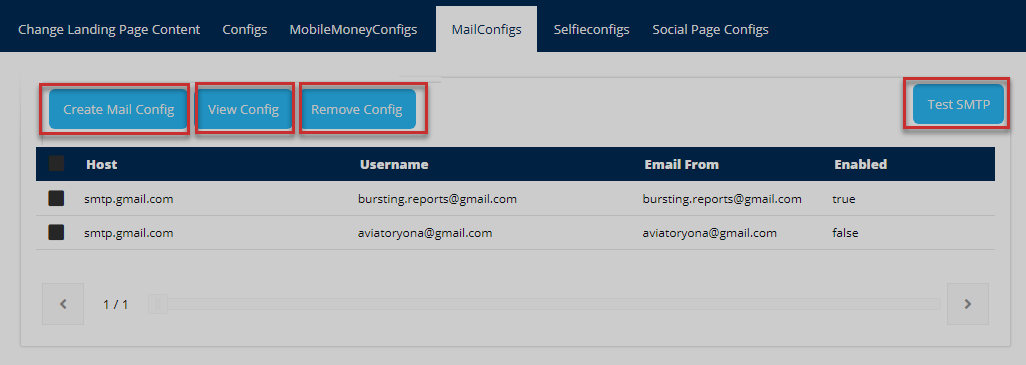
Action: Click on each enclosed tab to carry out the appropriate action. Otherwise, click the Test SMTP button.
Note
Clicking the test SMTP button will launch a form prompting the user to enter an email address for the purposes of testing if the simple mail transfer protocol is working. See the illustration below.

Action: Click the Send button to send a test mail to the provided email account as shown above. After sending, check your email inbox to see if the mail was successfully delivered.
SelfieConfigs
Allows a user to configure settings for selfie identification from the chosen service provider. A user can also view existing configuration settings or remove one from the system. See the illustration below.
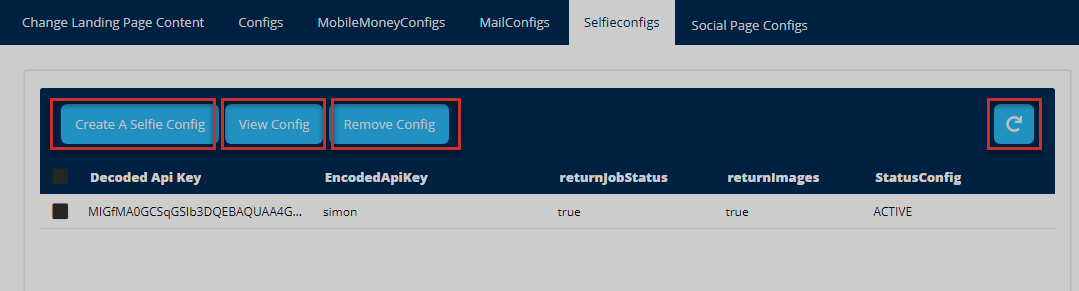
Action: Click on each enclosed tab to carry out the appropriate action. Otherwise, click the Refresh button to reload all the records.
Social Page Configs
Allows a user to configure settings for linking the MSS portal with various social media websites. A user can also view existing configuration settings or remove one from the system. See the illustration below.
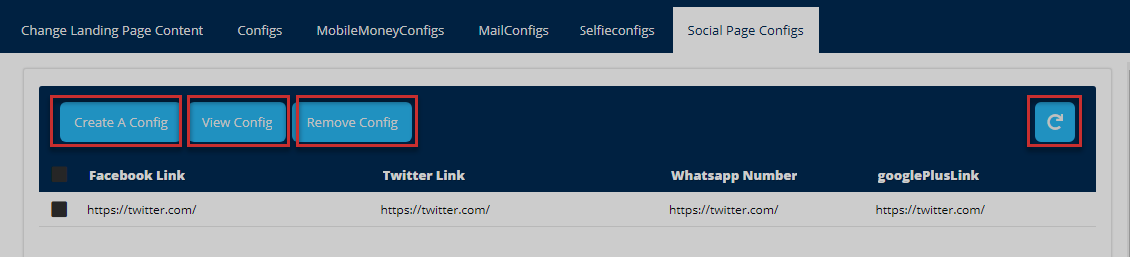
Action: Click on each enclosed tab to carry out the appropriate action. Otherwise, click the Refresh button to reload all the records.
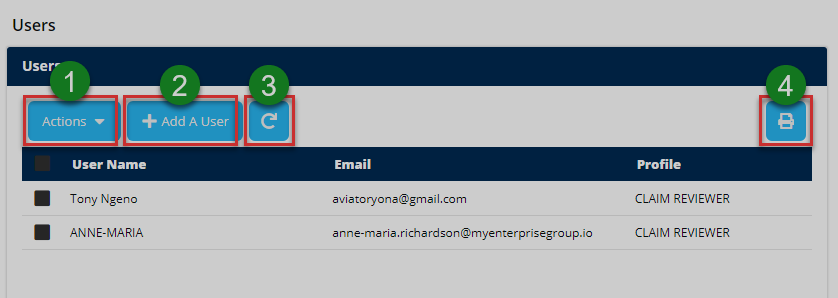
# Users
Clicking the user's menu will open a page showing a record of all the portal users. One can search records for specific periods through filtering by date. From this page, an admin can carry out several activities e.g., register new users, lock a user account, filter records, etc. as will be demonstrated in this section.
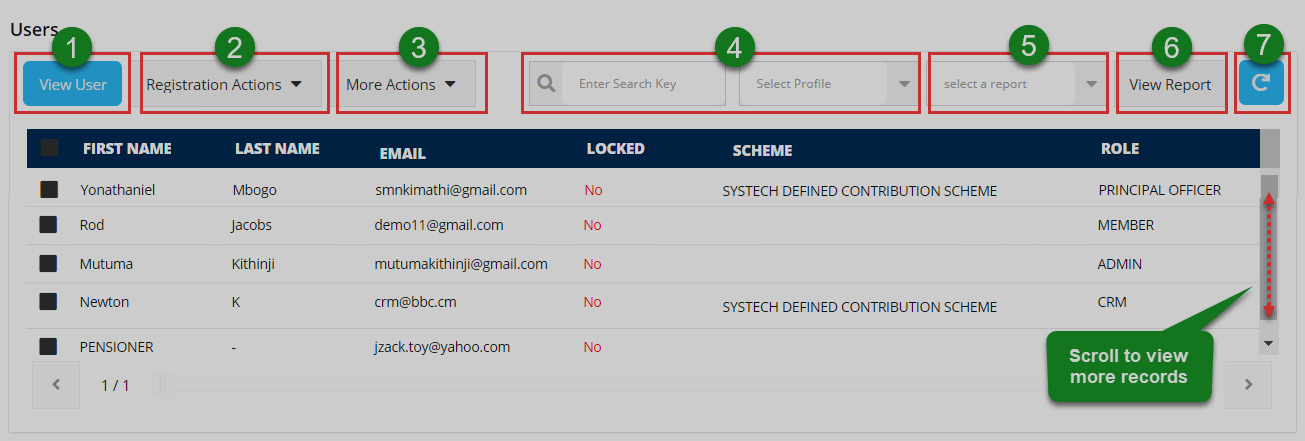
Action: Click on the text fields and buttons labeled with green numbered circles to do the following:
Label 1: click to open a window with the selected user's details.
Label 2: click to display a drop-down menu and select a registration action to take.
Label 3: click to display a drop-down menu of actions that can be taken on a selected user.
Label 4: click to do a quick search of the records.
Label 5: click to do filter and display users by their profiles.
Label 6: click select a criterion to filter users and then click view report.
Label 7: click to refresh records to default.
View a user
Clicking the view users after selecting a record from the list will open a new window with a form populated with the user's (admin account) details. See the illustration below.
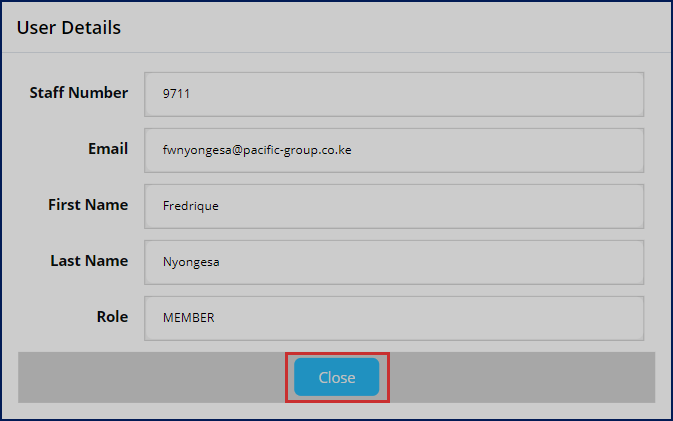
Action: Click the Close button to shut the form.
Registration actions
Clicking the Registration Actions tab will open a drop-down menu from which a user can select an action to take as shown in the illustration below.
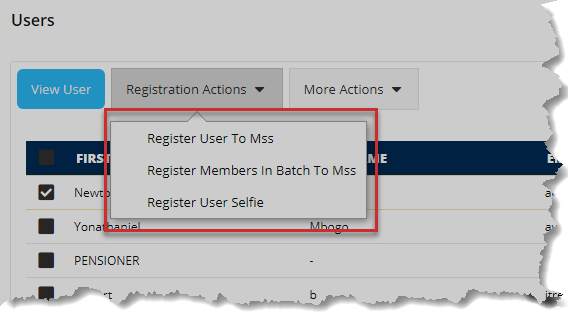
Action: Click on a text link to take the appropriate action, e.g., to register a user to MSS
Registering a user to MSS
When a user clicks the Register a User to MSS link, a form is displayed prompting for the new user's role and email address as shown below:
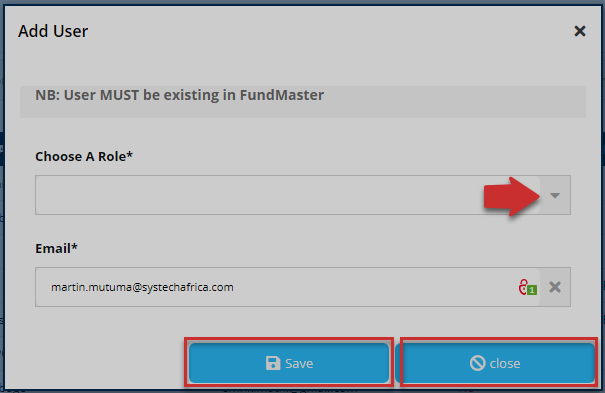
Action: Click to choose a role, type email address then click the Save button. Otherwise, click Close button.
Registering members in batch
When a user clicks the Register Members in Batch to MSS link, a new window is opened prompting the user to download a template to fill in new members details and upload it. The user can view the successful and unsuccessful executions. See the illustration below:
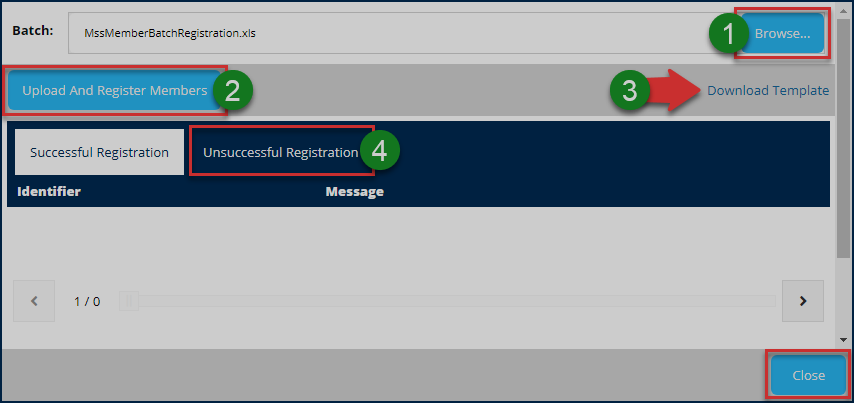
Action: Click on the text fields and buttons labeled with green numbered circles to do the following:
Label 1: click the Browse button to select the filled template file from your device.
Label 2: click the Upload and Register Members button to render records
Label 3: click the Download Template text link to get the template on your device.
Label 4: click the Unsuccessful tab to view exception messages
Otherwise, click the close button to exit the window.
Unsuccessful registrations
Clicking on the unsuccessful registration tab will display a list of failed registrations identified by email used together with an exception message -- the reason for failed registration. See the illustration below.
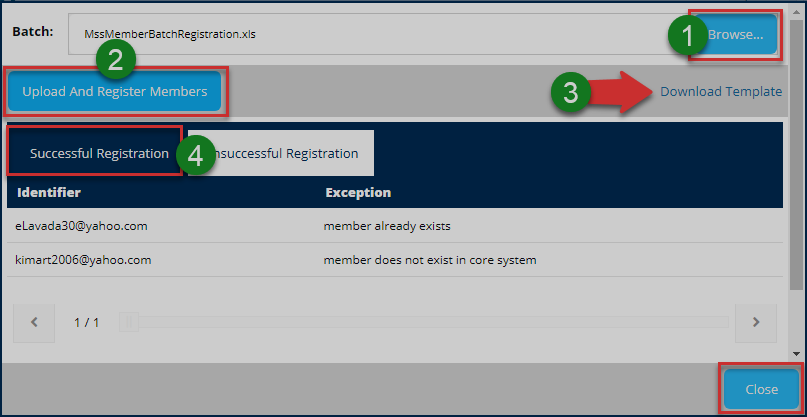
Action: Click on the text fields and buttons labeled with green numbered circles to do the following:
Label 1: click Browse button to select the filled template file from your device.
Label 2: click the Upload and Register Members button to render records
Label 3: click the Download Template text link to get the template on your device.
Label 4: click the Successful tab to view messages
Otherwise, click the Close button to exit the window.
Register user selfie
When a user clicks the Register User Selfie link, a new window is opened, launching the process. One can register a selfie, re-register and reset authentication trials. To register a member, search using a phone number, member number, account number, or national ID. See the illustration below.
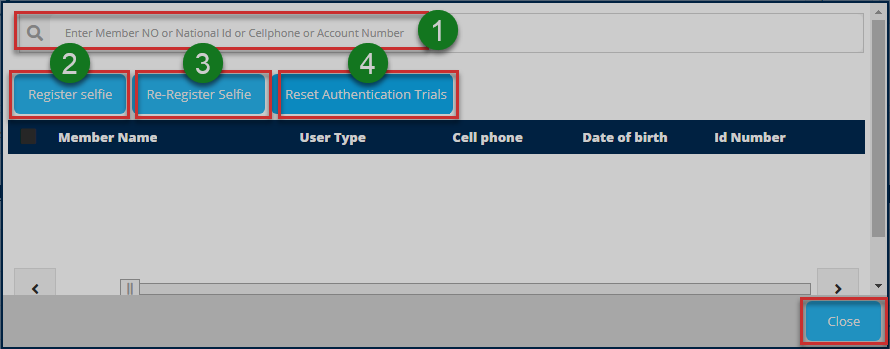
Action: Click on the text fields and buttons labeled with green numbered circles to do the following:
Label 1: click to type a member identification method e.g., phone number, and press enter on the keyboard.
Label 2: click the begin the registration process
Label 3: click the re-register
Label 4: click the reset authentication trails
Step by step registration process
To register a member for selfie identification, begin by searching the members and complete the process by making payments. The process is demonstrated by following the steps shown in the following illustrations.
Step 1
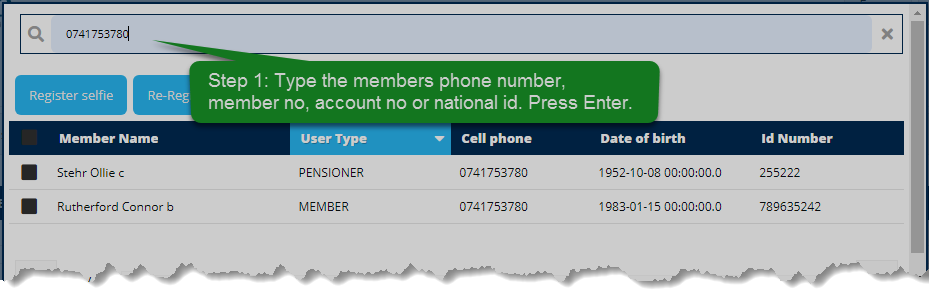
Action: click to type the identification method e.g., phone number
Step 2:
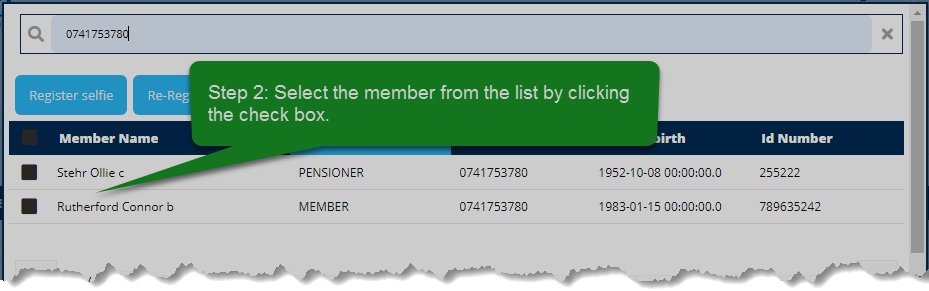
Action: click a check box to select the member
Step 3:

Action: click to register the selfie
Step 4:
Once a user clicks the Register Selfie button, the system checks if the member is already registered if not registered it proceeds to check payments. It begins by checking if the user had previously paid for the service else it prompts a user with a stk push via which a payment is done using any mobile money service e.g., Mpesa. See the illustration below:

Action: click the Yes button to proceed to payment, otherwise, click the No button to terminate the process.
In case of a pending payment, the user is notified and prompted to continue by utilizing that payment or cancel as shown below:

Action: click the Yes button to proceed to payment, otherwise, click the No button to terminate the process.
Step 5
After clicking the Yes button as shown previously, another window opens prompting the user to take a selfie as shown below:
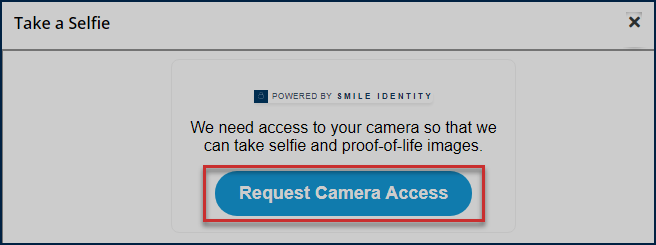
Action: click the Request Camera Access button to take a selfie from your device, otherwise, the exit window.
Take a selfie as shown in the illustration below:
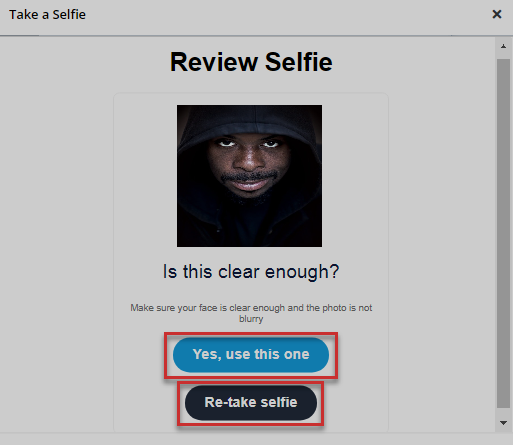
Action: click the Yes, use this one button to upload the picture, or click Re-take selfie button to have a better shot**.** Otherwise, close the window.
Finally, if the picture was uploaded successful, the following message will be displayed to the user.
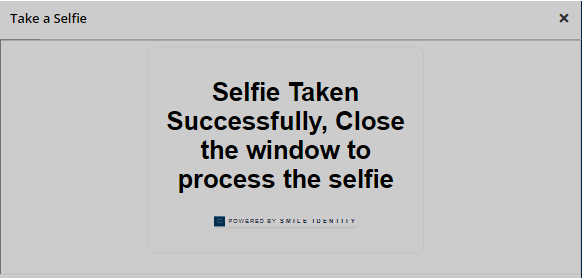
Action: click the close button to exit the window.
Note
Re-register a Selfie process is the same as the registration process demonstrated above. On the other hand, reset authentication trails will restart the trail counts for the selfie registration process as shown below.

Action: click the OK button to close the window.
More Actions
Clicking the More Action drop-down menu will list actions that an admin can take on a selected user account.
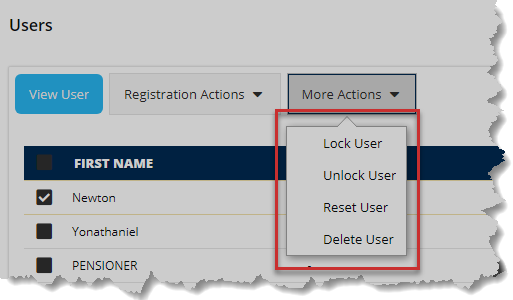
Action: Click on the text links highlighted above to take the appropriate action
Lock User: Clicking on lock User will freeze an account

Action: Click the OK button to close the window
Unlock User: Clicking Unlock User will unfreeze an account

Action: Click the OK button to close the window
Reset User: Clicking Reset User credentials

Action: Click the OK button to close the window
Delete User: Clicking Delete User will remove an account from the records. However, a user will have to confirm the action first.

Action: Click the Yes button to proceed or the No button to cancel the process
The following message will be displayed when a user is successfully deleted as shown in the illustration below.

Action: Click the OK button to close the window
# Manage Admin
Clicking the manage admin menu will open a page showing a record of all the users who play the role of portal administration. One can create a new admin account, view an account detail, or lock an account. See the illustration below:

Action: Click on the text fields and buttons labeled with green numbered circles to do the following:
Label 1: click to create an admin account.
Label 2: click to view a checked admin details.
Label 3: click to lock a checked admin account.
Label 4: click to repopulate records.
Create Admin
To create an admin account, fill the provided form with the required details. See the illustration below:
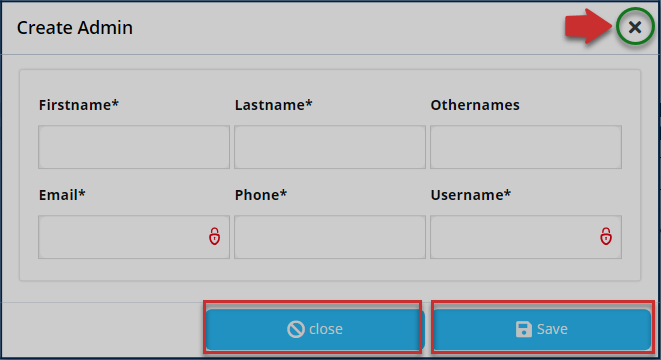
Action: Click the Save button to create an account, Otherwise, click the Close button to exit the window.
A successful account creation process will return the following message as shown below.

Action: Click the OK button close the window.
View Admin
Clicking on the view admin button will open a dialogue window with the selected admin's details. The details of the account can also be edited for updates. See the illustration below:
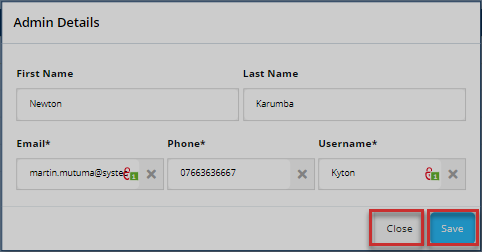
Action: Click the Save button to commit changes if the details were edited. Otherwise, click Close button to shut the window.
A successful edited account will return the following message as shown below:

Action: Click the OK button close the window
Lock admin account
Selecting an account to lock from the list of accounts and clicking the lock admin account will return the message shown below:

Action: Click the OK button close the dialogue box
# Files
Clicking the files menu will open a page showing a list of all the files sent to and from the admin account. The files are grouped into Inbox and Outbox. From the Outbox, one can send a file to a specified profile in the portal. See the following illustration.
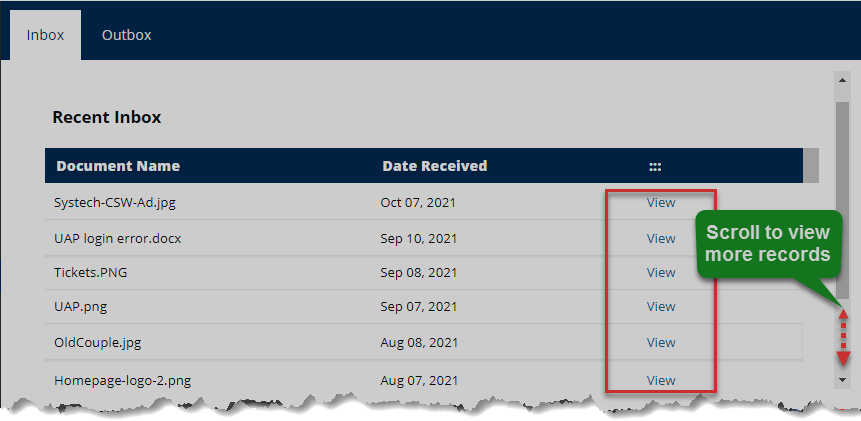
Action: click the view text link to download a specific file and see all the details. Otherwise, scroll to see all the records.
Outbox
Clicking the outbox tab will open a window listing all the files sent from a user's account. See the illustration below.
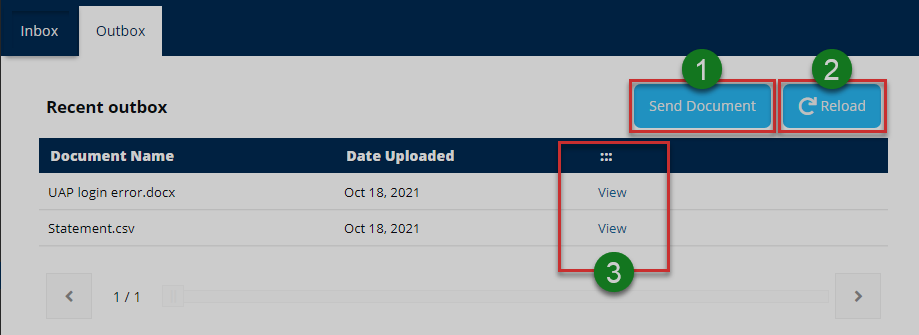
Action: Click on the text fields and buttons labeled with green numbered circles to do the following:
Label 1: click the send a document to a specified profile within the portal.
Label 2: click to repopulate the records
Label 3: click a selected file to download it for viewing.
Sending files
Clicking the send document button will open a send docs dialogue window prompting the user to select from a drop-down menu the profile to send the file to, type a description and upload a file to send. See the illustration below:
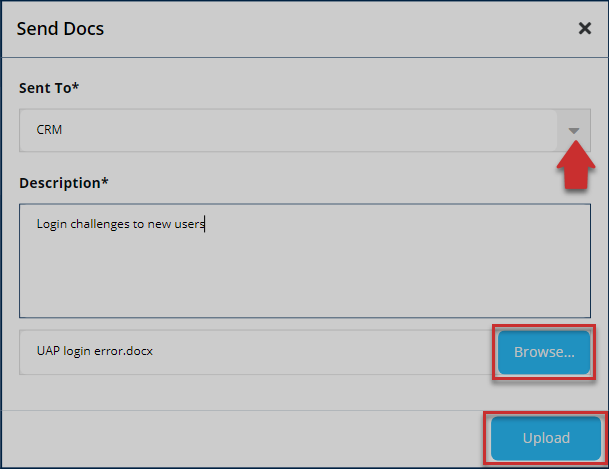
Action: Click the Browse button to select a file from your device and the Upload button to save the file in the portal. Otherwise, exit the window.
# Manage Tickets
Clicking the manage tickets menu will open a page showing a list of all the tickets sent to and from the admin account. From this page, the management of tickets is realized: from searching for tickets from a list using keywords to adding new tickets among other activities as demonstrated in this section. See the illustration below:

Action: Click on the text fields and buttons labeled with green numbered circles to do the following:
Label 1: click to see all details of a selected ticket.
Label 2: click to type a ticket ID to search it quickly.
Label 3: click to see all documents attached to a ticket.
Label 4: click to repopulate all records.
Label 5: click to add a new ticket.
View tickets
Clicking the View Ticket button will open a new window showing more details about the ticket as shown in the illustration below.
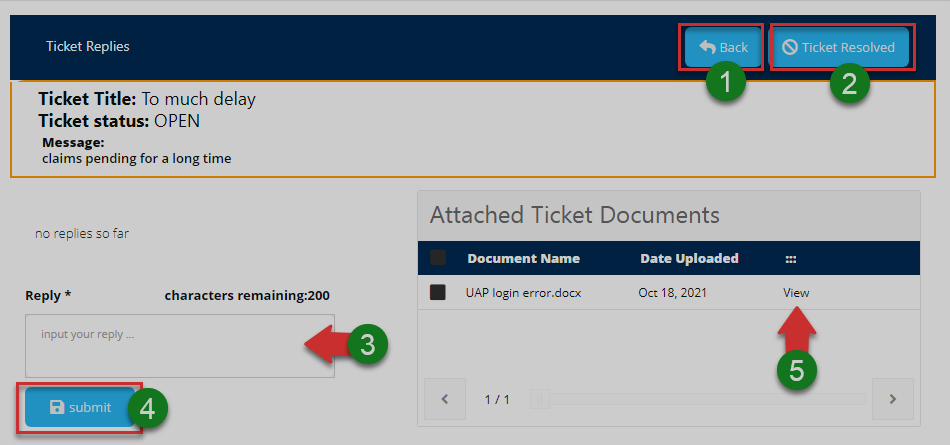
Action: Click on the text fields and buttons labeled with green numbered circles to do the following:
Label 1: click to go back to your tickets page.
Label 2: click to mark a selected ticket as resolved.
Label 3: click to type a replay message.
Label 4: click to submit the replay message.
Label 5: click to select and view an attached ticket document.
Resolved tickets
Clicking the ticket resolved button will mark the selected ticket as closed

Action: Click the OK button to exit the window.
Clicking a closed ticket will display the following page
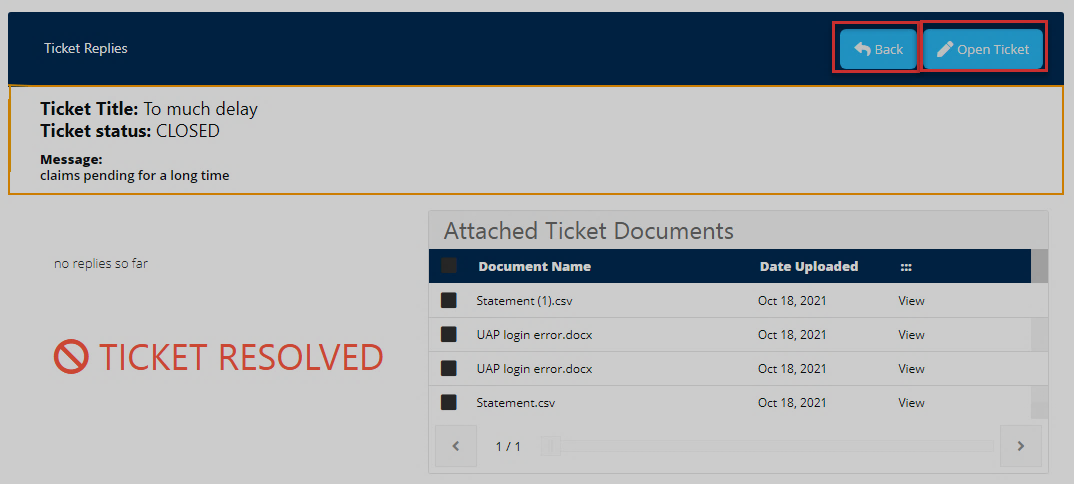
Action: Click the Back button to go to the tickets page, otherwise, click Open Ticket button to mark the ticket as unresolved.
Below is the message that is generated when a user clicks on the Open Ticket button:

Action: Click the OK button to exit.
Support tickets
Clicking the support tickets tab display a list of all support tickets raised for admins to respond to within the portal. A user can select a ticket record from the list and view details. Besides being able to search for a ticket using ticket ID, a user can also forward a ticket to another profile to be handled there. See the illustration below.
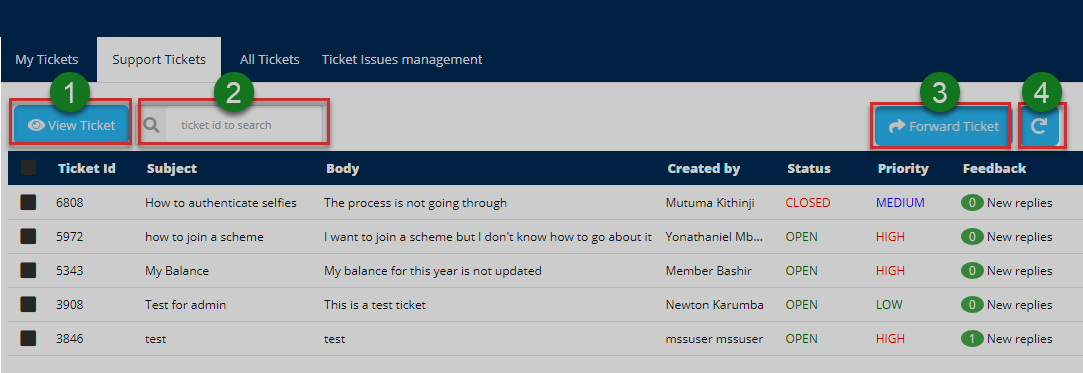
Action: Click on the text fields and buttons labeled with green numbered circles to do the following:
Label 1: click to see all details of a selected ticket.
Label 2: click to type a ticket ID to search it quickly.
Label 3: click to see all documents attached to a ticket.
Label 4: click to repopulate all records.
All tickets
Clicking All Tickets tab will open a window displaying a list of all tickets raised giving more details about every ticket as shown in the following illustration.
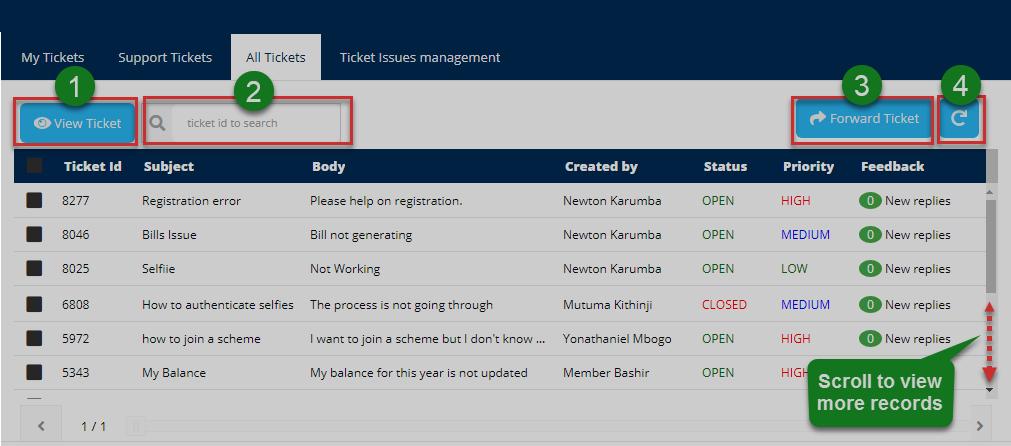
Action: Click on the text fields and buttons labeled with green numbered circles to do the following:
Label 1: click to go back to your tickets page.
Label 2: click to see all support tickets.
Label 3: click to forward a ticket to a particular profile.
Label 4: click to repopulate all records.
Forwarding tickets
Clicking the Forward Ticket button will generate the following dialogue box prompting the user to select the target profile from a drop-down menu.
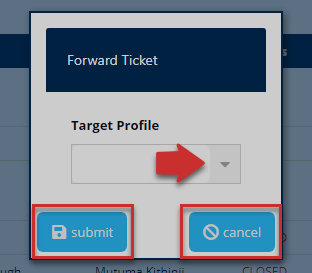
Action: Click the Submit button to send the ticket, Otherwise, click the Cancel button.
Tickets Issues Management
Clicking the Ticket Issue Management tab will display a list of tickets and their handlers. A user can also add a ticket among other actions as shown in the illustration below.
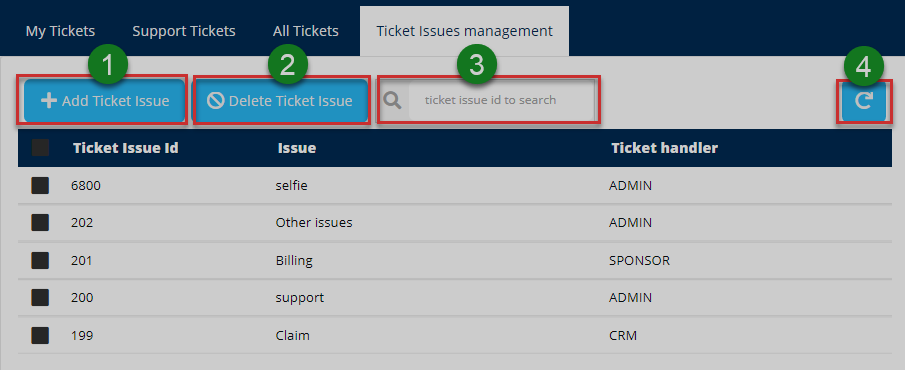
Action: Click on the text fields and buttons labeled with green numbered circles to do the following:
Label 1: click to add a ticket issue.
Label 2: click to delete a selected ticket.
Label 3: click to search a ticket by ID number quickly.
Label 4: click to repopulate all records.
# Mail outbox
Clicking the mail Outbox menu will open a page showing a list of all messages received. One can select a message from the list and view its details or resend. See the illustration below.
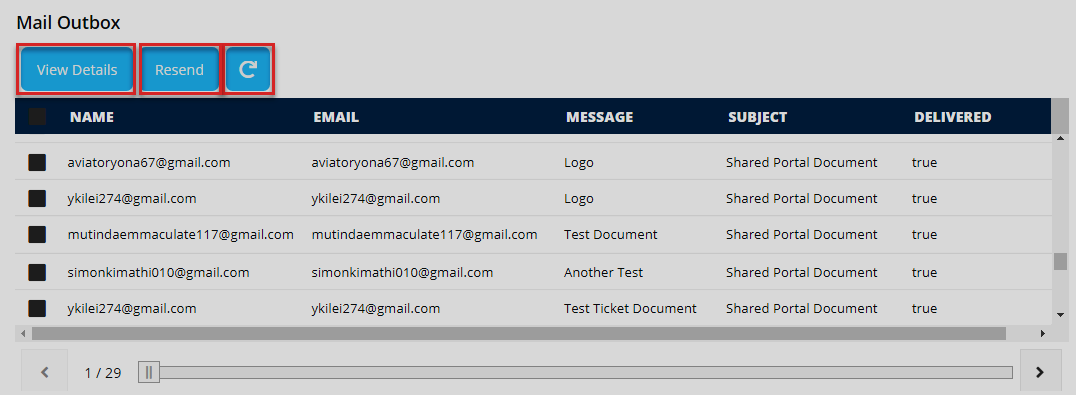
Action: Click the View Details button to see all the details of a selected message. Click Resend button to resubmit a message again or the Refresh button to repopulate the records.
Message details
Clicking the View Details button will open a window showing the details of a selected message in the Outbox. See the illustration below.

Action: Click the Close to exit the window.
# FAQs
Clicking the FAQs tab, on the upper right corner, will open a page showing a list of the frequently asked questions in the portal. One can click a record to view full details of frequently asked question and add a question too. See the illustration below.
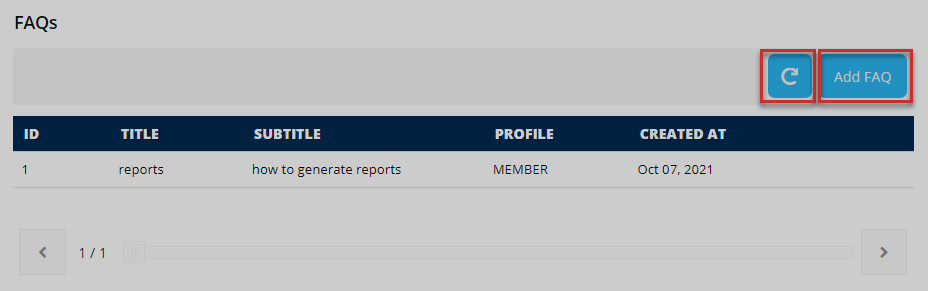
Action: Click the Add FAQ button to type and submit one. Otherwise, click the Refresh button to repopulate the records.
Adding a FAQ
Clicking the Add FAQ button will trigger a dialogue window prompting the user for details pertaining to the question i.e., the title, subtitle, and the profile to send the question and the explanation. See the illustration below.
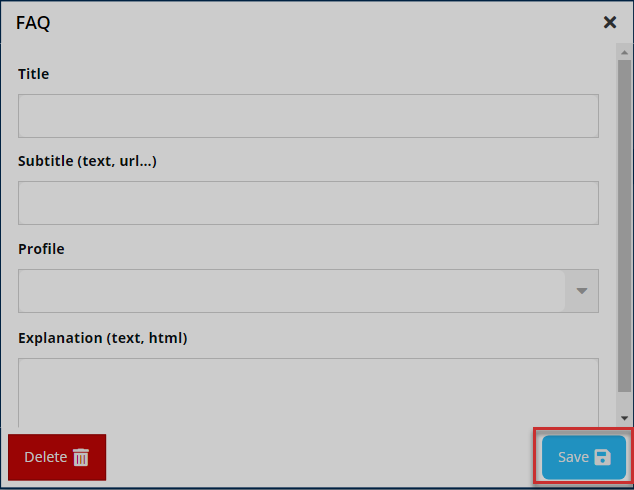
Action: Click the Save button to send the question. Click the Delete button to discard the process. Otherwise, close the window.
# Activity Logs
Clicking the activity logs menu will open a page showing a record of all the activities by all users who logged into the portal in the recent past. One can search records for specific periods through filtering by date.
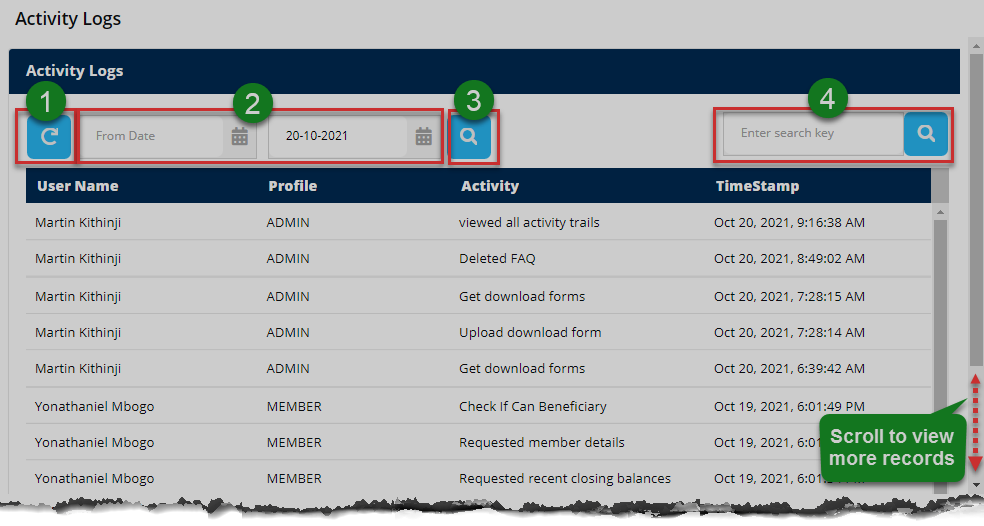
Action: Click the buttons labeled with green numbered circles to do the following:
Label 1: click to reload the activity records.
Label 2: click to set start and end dates for filtering.
Label 3: click to filter.
Label4: click to type keywords to search records quickly.
# Manage Account
Clicking the manage account menu will a page showing the personal details of the logged-in user. One can also change the profile picture and password details as shown in the illustration below.
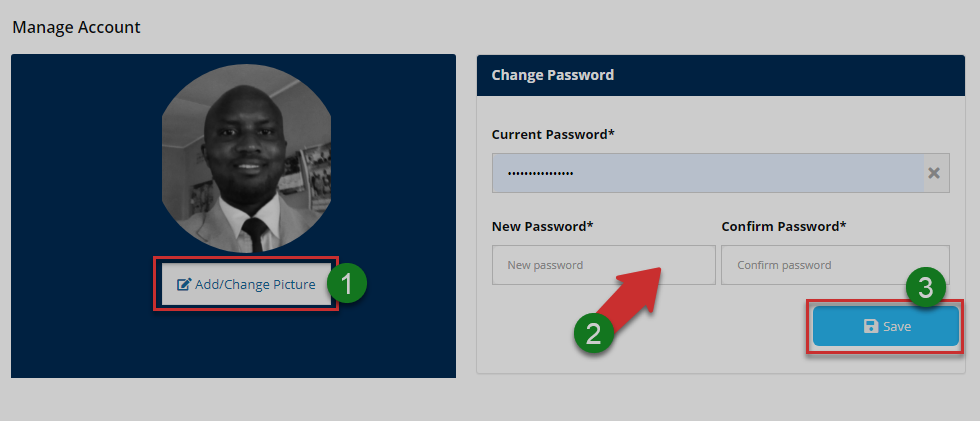
Action: Click the buttons labeled with green numbered circles to do the following:
Label 1: click to change profile picture.
Label 2: click to fill in new password details.
Label 3: click to confirm all changes.
Account picture
Click the add/change picture button as shown in the previous illustration to upload a picture as shown below.
Action: Click the Browse button to select a picture from your device. Then click the Save button to upload the image. Otherwise, close the window.
# Settings
Clicking settings on the menu bar will open a page showing types of configurations that an administrator can set for different user profiles in the portal. New profiles can also be added from this page. The illustrations below demonstrate how different configurations are done.
The following illustration shows the different categories of setting possible in the portal.
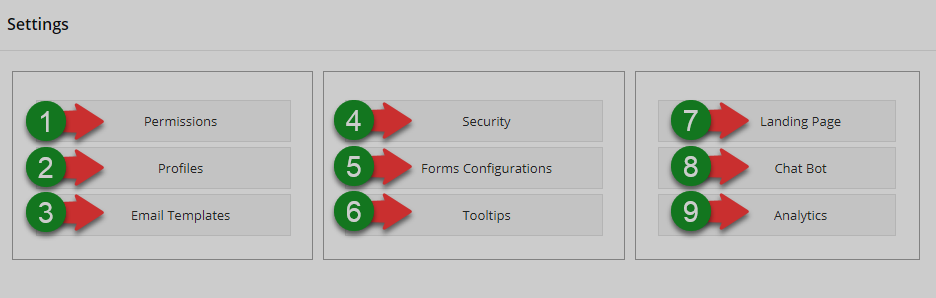
Action: Click on the Text links labeled with green numbered circles to do the respective configurations.
# Permissions
This form enables admins to determine access to various elements that are configured to be either visible or hidden to the different profile users. This is simply done by selecting yes or no from the form select fields for every item listed. The illustration below shows the settings for a member profile on the portal.
Clicking other tabs, e.g. Principal Officer, on the menu bar will allow one to modify settings for other profiles. See the illustration below.
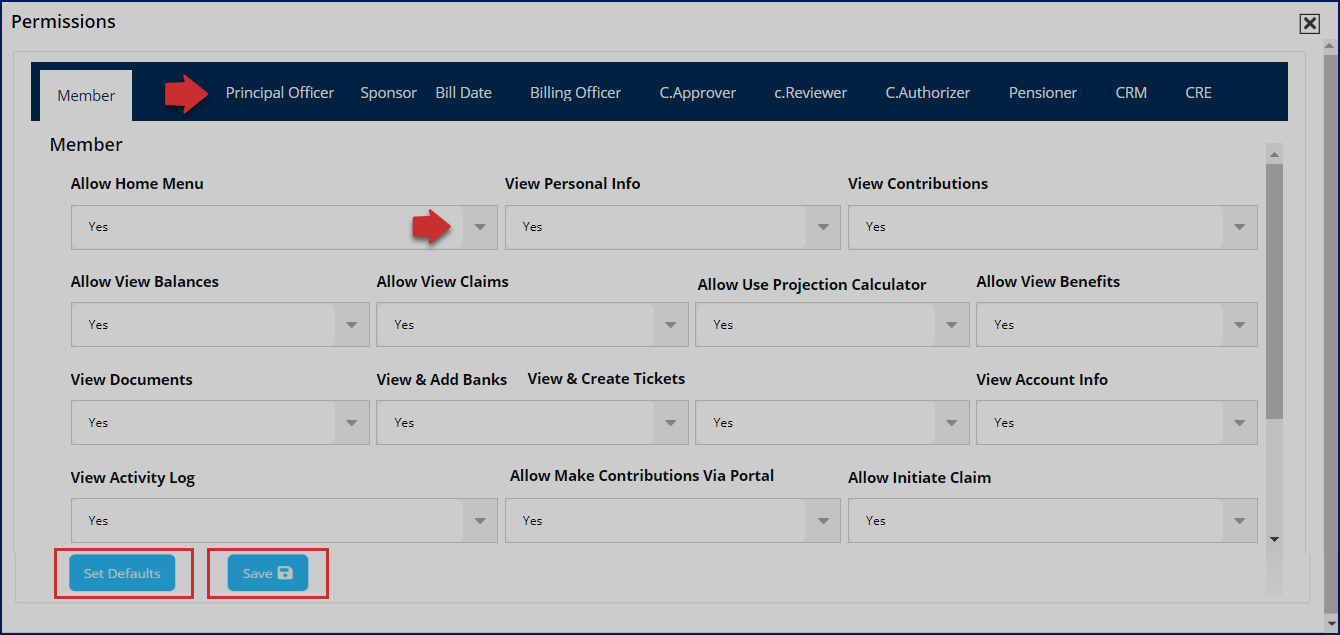
Action: Click on the Set Default button to retain standard settings or the Save button to commit the new changes, if any.
# Profiles
This form allows the admin to determine the form of identification method for accessing the different profiles in the portal. A user needs to select a profile from a list and then choose the login identifier as shown in the illustration below.
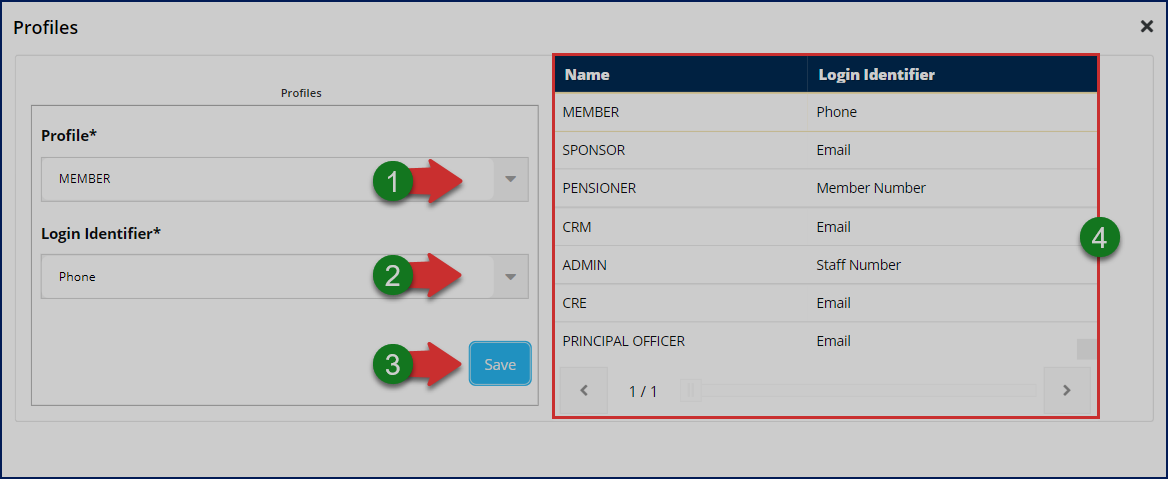
Action: Consider the appropriate action on the areas labeled with green numbered circles as follows:
Label 1: click the select a profile.
Label 2: click to select preferred login identification method.
Label 3: click to save the changes.
Label 4: confirm by viewing if the changes have been reflected.
# Email templates
This form allows the admin to view a list of all email templates created in the portal and also create a new template that can be used to aid in communication from within and outside of the portal. See the illustration below.
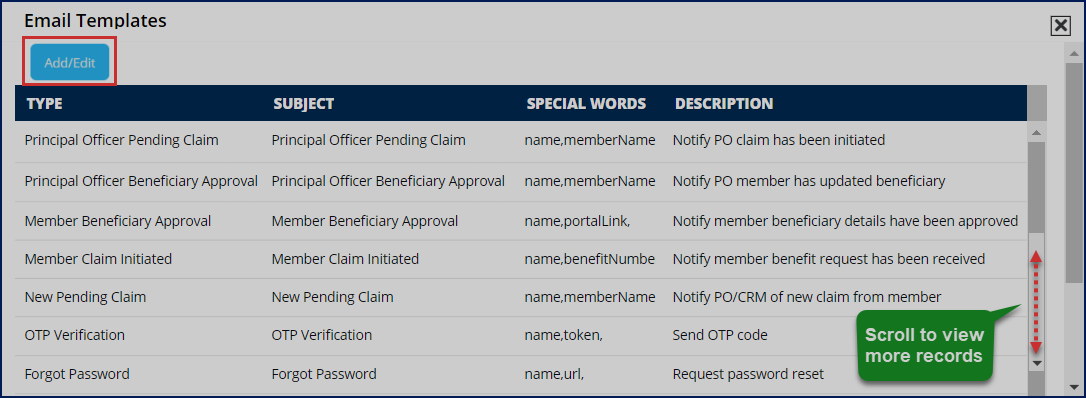
Action: Click on the Add/Edit button to configure a new email template
Adding a template
Clicking the add/edit template button on the previous illustration will launch a form that allows the user to configure how a new email template should look like. See the illustration below.
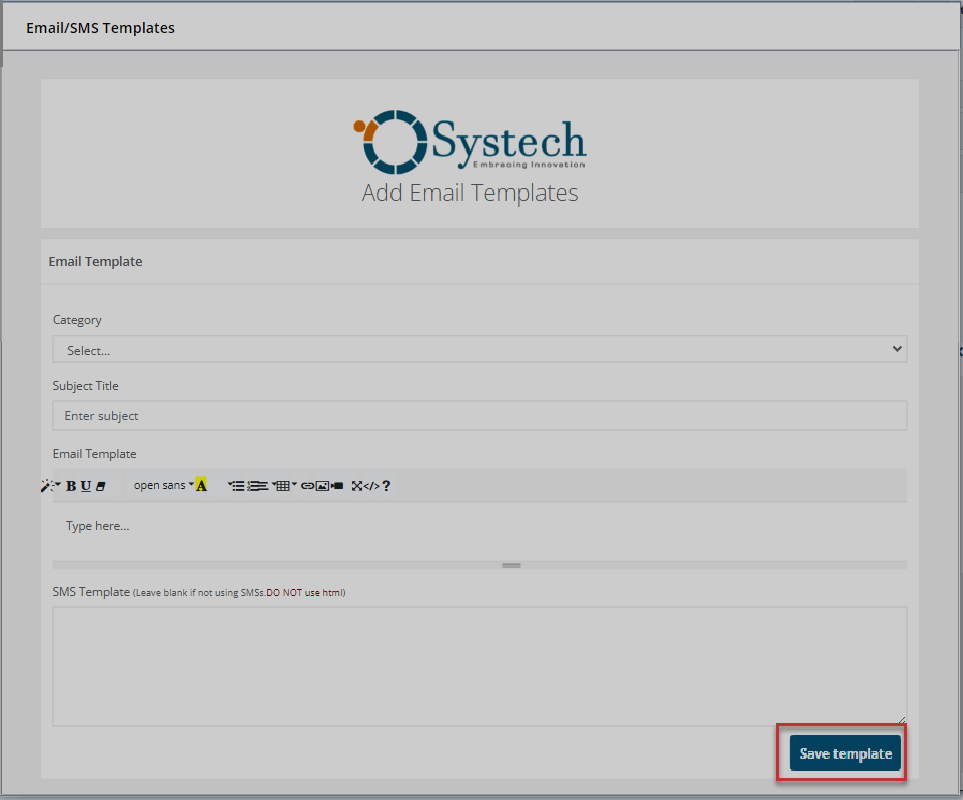
Action: Click accordingly to set the configurations for a new email template. Finally, click the Save template button to save the new template.
# Security
This form allows the admin to configure security settings for user login into the portal. Through this form, one is able to enhance login security by enabling two factor authentication. This is done by selecting yes or no on the form select fields. The illustration below shows settings done to activate two factor authentication.
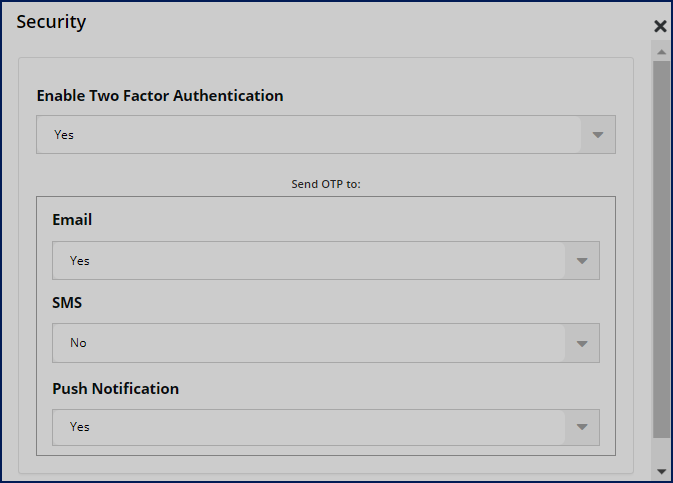
Action: Click to select yes or no on the select fields accordingly.
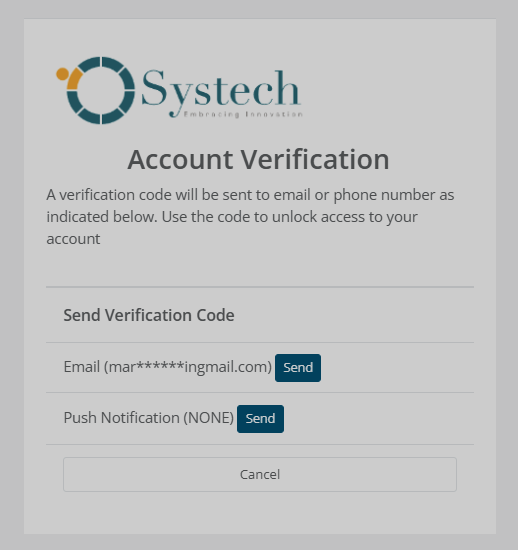
Note
If the security settings above are configured as shown above, any user who tries to log into the profile will be confronted with the need to authenticate by keying in a verification code sent through his/her email account. See the illustration below.
# Form Configuration
Through this form, the portal admin is able to determine the items (specific info details) to include on a member form that is used to correct new member's details as required for one to access the portal. One can make this determination by just selecting yes or no for every item listed on the form. The illustration below shows the settings for a member profile on the portal.
Clicking the beneficiary tab will allow settings for a beneficiary form -- a form used to capture a pensioner's select beneficiary in the event he/she dies without receiving all benefits from a pension scheme. The process is exactly the same as demonstrated for members form. See the illustration below.
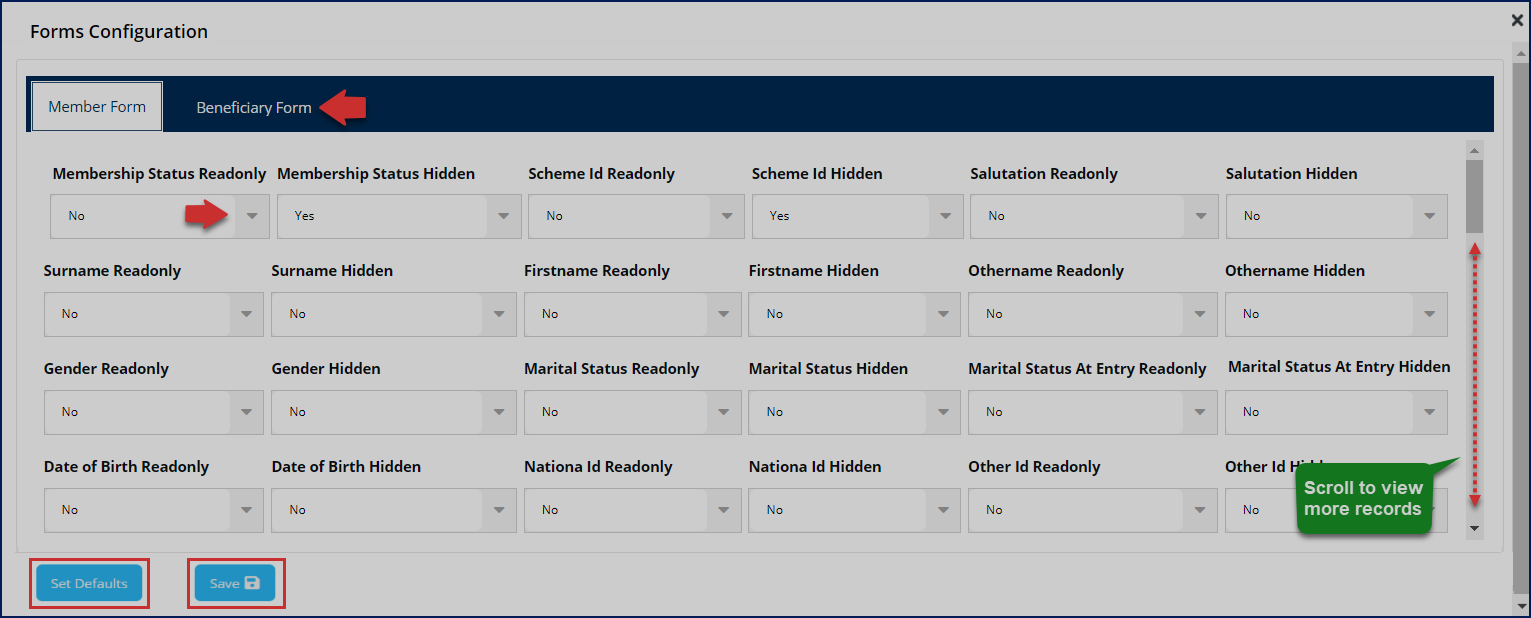
Action: Click on the Set Default button to retain standard settings or the Save button to commit the new changes, if any.
# Tooltips
This form allows the admin to determine how toolstip (a pop-up window giving a piece of advice on how to use a tool on the interface) should be shown on a profile's dashboard when a user logs in.
The configurations can be set to allow the tooltips to show only the first time a new user logs into the portal profile or show them randomly. See the illustration below.
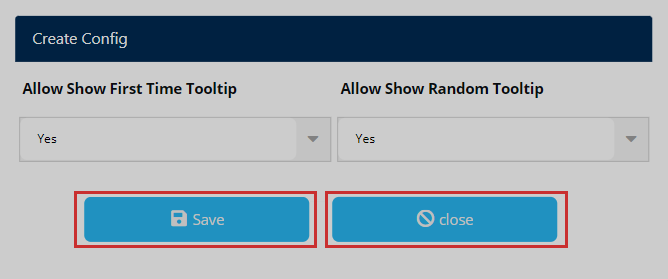
Action: Click to select yes or no on the select fields accordingly.
Note
The lading page settings have been covered under system configs file menu item under the title 'changing landing page content'. Otherwise, for the Chat Box and Analysis functionalities, our developers are still working to avail them in due time. Keep checking.
# Forms
Clicking the form link on the upper right corner opens the forms page listing all forms in the portal. A user can identify a form on the list by title and description. A button for starting the process of uploading a form to the portal is provided together with one for deleting unwanted ones, downloading, and refreshing the records. See the illustration below:
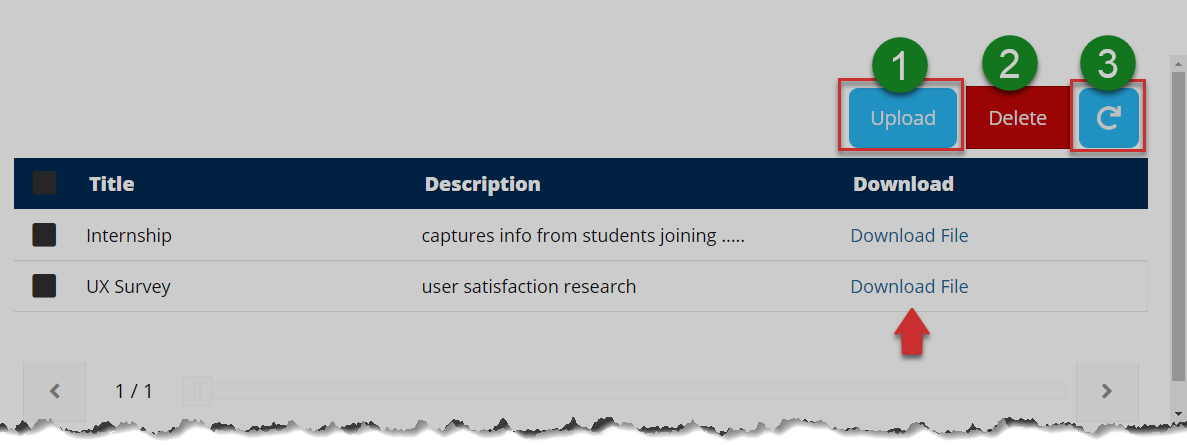
Action: Click the buttons labeled with green numbered circles to do the following:
Label 1: click start the process of adding a form.
Label 2: click to delete a selected form on the list
Label 3: click to repopulate all records.
Clicking the Upload button will load a dialogue box prompting the user for the title, file attachment, and the description of the form to be created. See the illustration below:
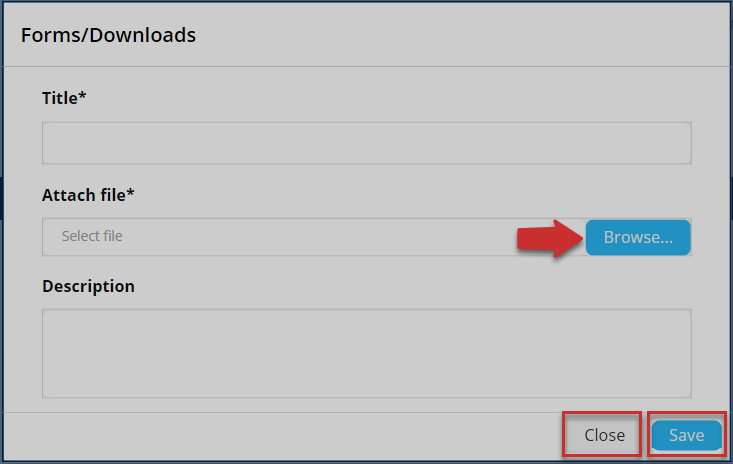
Action: Click the Browse button to select a file from your device. Then click the Save button to upload it to the portal, Otherwise, click the Close button.
A successful form creation process will display a message as shown in the illustration below.

Action: Click the OK button to exit.
On the other hand, a failed process will return the message shown in the illustration below:

Action: Click the OK button to exit.
# FAQs
Clicking the FAQs tab, on the upper right corner, will open a window showing a report of the frequently asked questions in the portal. See the illustration below.
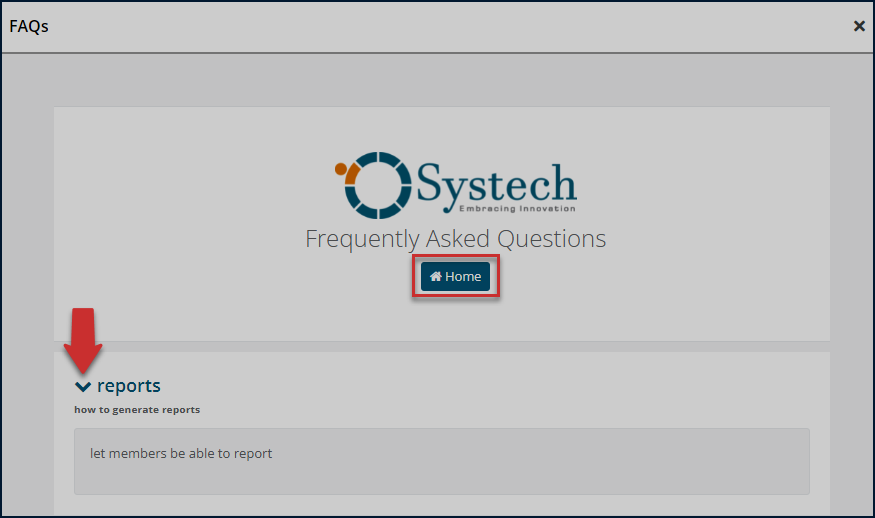
Action: Click the text links to display the list of questions in accordion style. Click the Home tab to return to the portal home page. Otherwise, close the window.
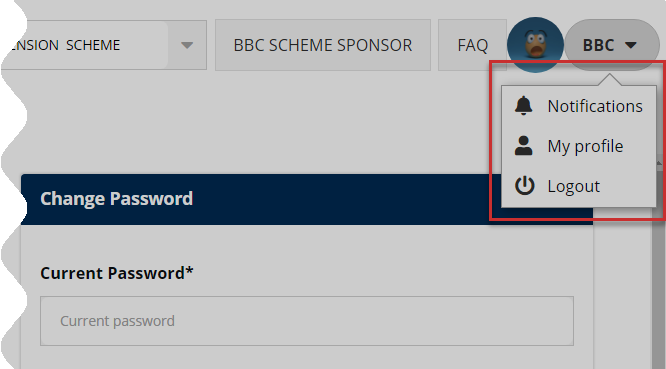
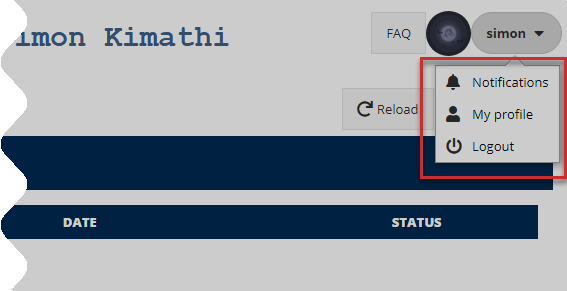
# User Account
The logged-in users' details are displayed through a drop-down menu that provides a shortcut access to notifications, user profile, and a button to log out of the portal.
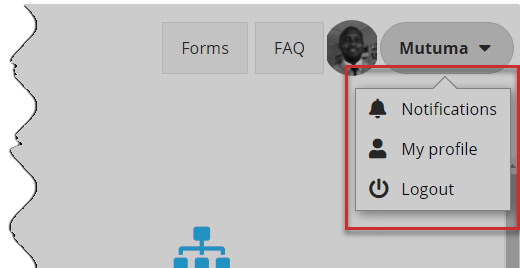
Action: Click on the enclosed text links to open respective pages. Otherwise, click the Logout button to exit the portal.
# Notifications
Clicking the notifications text link from the profile drop-down menu, located in the upper right corner, will open a page showing a list of messages sent from within the portal. They are grouped into Inbox and Outbox messages. One can select to read individual messages and compose. See the illustration below.
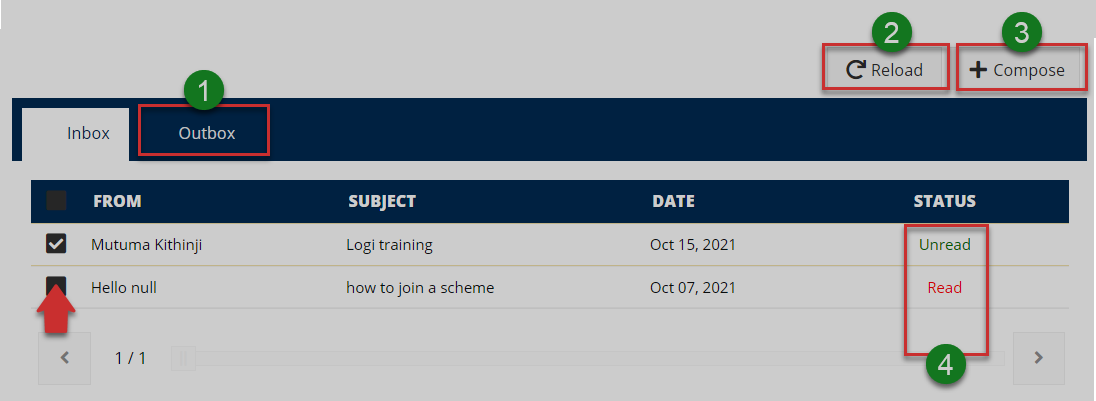
Action: Click on the text fields and buttons labeled with green numbered circles to do the following:
Label 1: click to open view Outbox messages.
Label 2: click to repopulate records.
Label 3: click to compose a message.
Label 4: click to read a message.
*
*
Read a notification
Check the box of the record with the message you want to read, then click the status text link on the right to open a new window displaying the message details as shown below. You can also download the message.
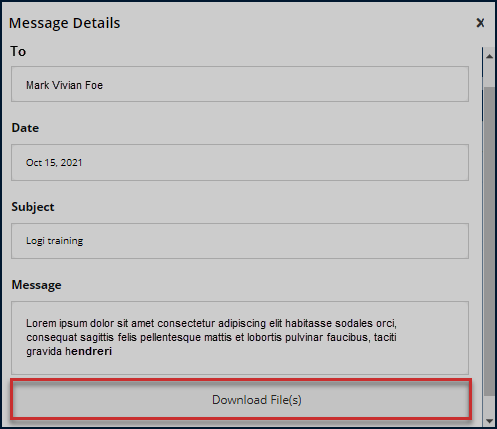
Action: Click the Download File link to save the message file on your device. Otherwise, close the window.
Compose a notification
You can also type a new message by clicking the Compose button as shown in a previous illustration. This will launch the window where you can provide the required details for the message as shown below.
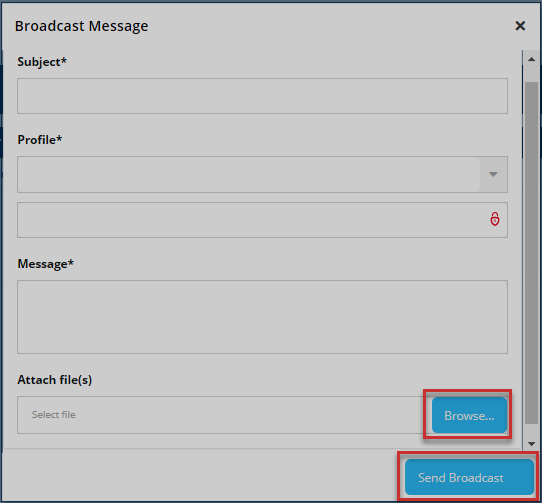
Action: click the Browse button to attach a file from your device and then click the Send Broadcast button to upload the message. Otherwise, close the window.
# My profile
Clicking the profile link text will open a Manage Account page (which can also be accessed on the menu bar) showing the personal details of the logged-in user. One can change profile picture and change password details. Refer to the Manage Account menu for the illustration.
# Sponsor Profile
This profile serves as an interface to the portal users who log in as sponsors - employers. Sponsors can request for billing and perform other activities, as will be demonstrated throughout this section.
# Dashboard components
When a user login as an admin, he/she will be welcomed into the sponsor home page (dashboard) as shown in the illustration below.
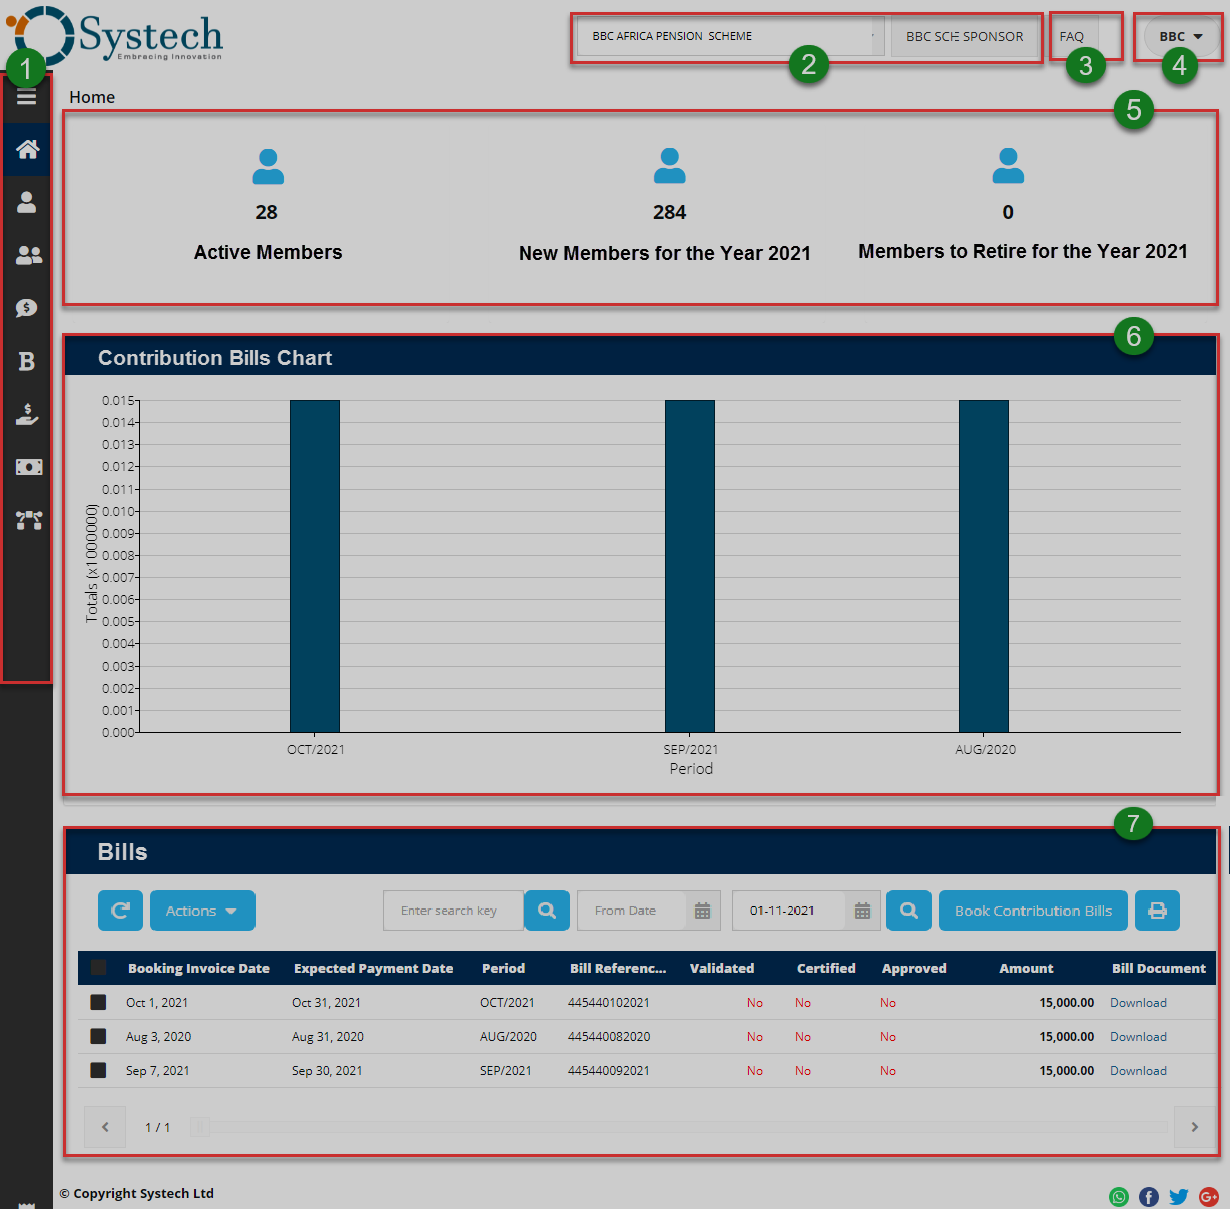
The numbered sections in this illustration above correspond to the numbers in the following table that describe the key components of the member's dashboard.
| Part | Description |
|---|---|
| 1. Menu Bar | This is the menu bar from which various items can be accessed quickly. Click on the menu bar icon on the top to expand it. |
| 2. Scheme Selector | A drop-down menu to select scheme. |
| 3. FAQs | A shortcut to view all frequently asked questions in the portal. |
| 4. User Account | This is where the member's selfie and name are displayed on the dashboard. Here, a drop-down menu is also provided with links to user profile, notifications and log out button. |
| 5. Scheme Membership Summary | This section gives details in summary form for all scheme members under a sponsor. |
| 6. Contribution Billing Summary | A contribution billing graph plotted to show contributed amount per month. |
| 7. Bill records | Lists all the billing records requested by the sponsor. |
# Dashboard Menu
Clicking the menu bar icon will expand the panel to reveal menu items as shown in the illustration below. The user can click each item to open a specific page. The menu comprises links to the following pages:
i. Sponsor Information
ii. Members
iii. Claims
iv. Benefits
v. Staged contribution
vi. Billing
vii. Receipts
viii. Documents
ix. Tickets
x. Users
xi. Manage Accounts
xii. Activity Logs
xiii. FAQs
xiv. User Account
xv. Notifications
xvi. My Profile
xvii. Log Out Button.
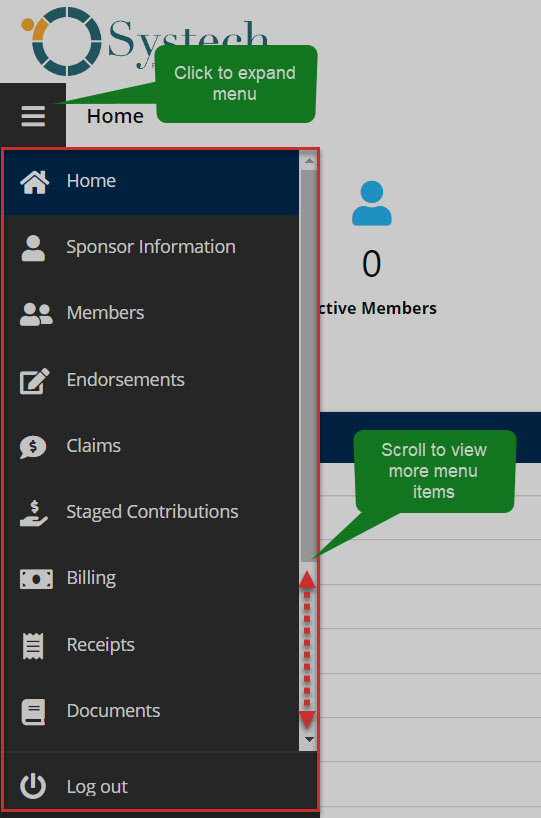
Action: Click the Home tab to expand the menu bar. Otherwise, click on a menu item to open the respective page.
# Sponsor Information
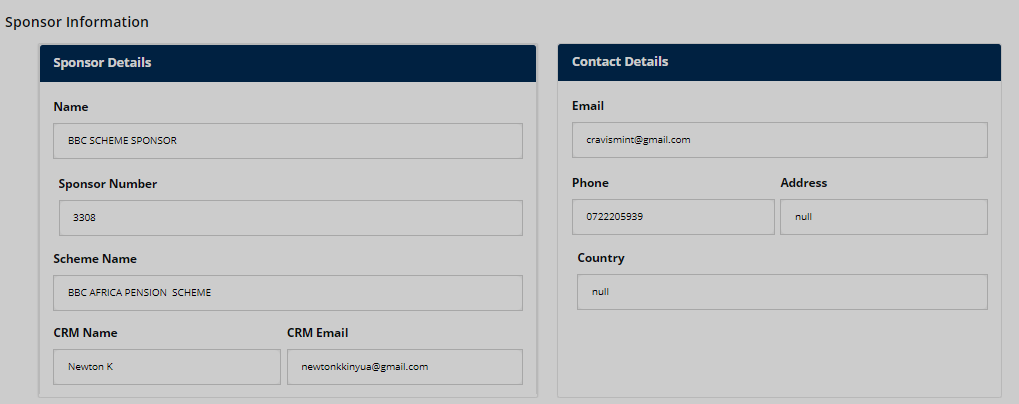
Clicking the Sponsor Information menu will display the sponsor's personal information and contact details as shown in the following illustration. From the left side of the window, sponsor details are displayed as captured in the system. On the right side are the sponsor's contact details.
# Members
Clicking the Members menu item will display a page listing a sponsor's members in a selected scheme. From this page, through the member list tab, sponsors can add members one by one or in batches. A function to search members from the records via a search key and selecting identifier is provided to speed up the process. See the illustration below:
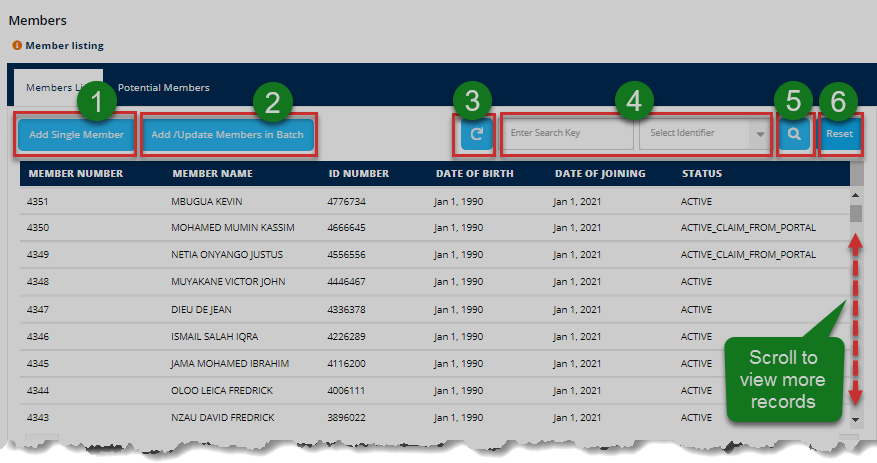
Action: Click on the text fields and buttons labeled with green numbered circles to do the following:
Label 1: click to add a single member.
Label 2: click to add and update members in batches.
Label 3: click to refresh records.
Label 4: click to define how to search for members records.
Label 5: click to perform the search.
Label 6: click to set back the records to the default display.
Adding a single member
Clicking the Add Single Member tab will trigger a dialogue window prompting the user to enter details for the new member. See the illustration below:
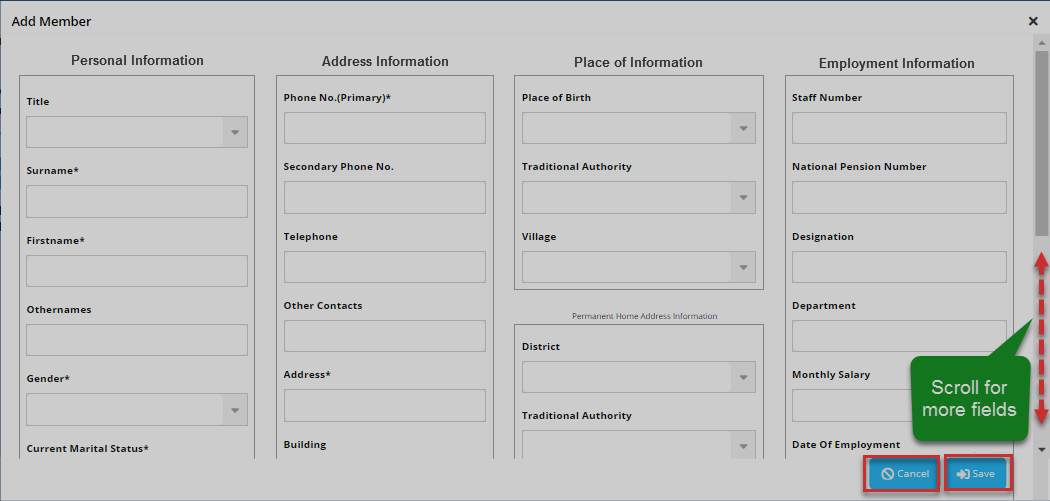
Action: Click the Save button to commit the records, Otherwise, click Cancel to terminate the process.
Adding/Updating members in batch
Clicking the Adding/Updating members in batch tab will trigger a dialogue window prompting the user to upload members in batch. In case a user does not have the template already, he/she can download it and use it. See the illustration below.
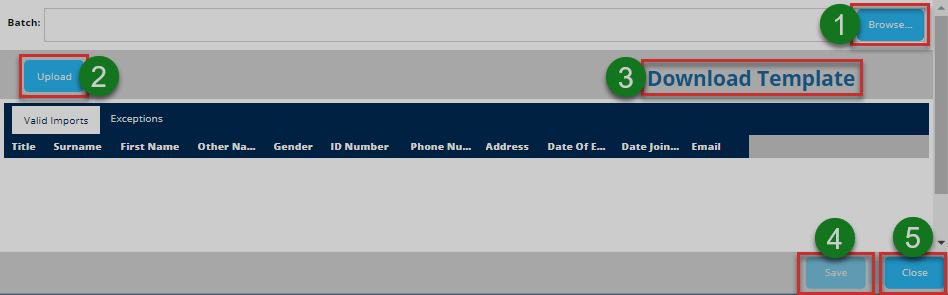
Action: Click on the text fields and buttons labeled with green numbered circles to do the following:
Label 1: click the Browse button to select the filled template file from your device.
Label 2: click the Upload template
Label 3: click the Download Template text link to get the template on your device in case you don't have a copy.
Label 4: click the Save button to commit the new member's records.
Otherwise, click the close button to exit the window.
Potential members
Clicking the Potential members tab will open a page displaying a list of all members who have submitted their request to join a scheme under your sponsorship. To check a members details, click a checkbox preceding a record and then view details button as shown in the illustration below.
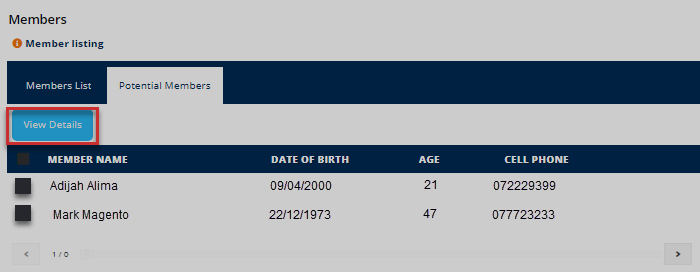
Action: select a record by clicking the checkbox, then click View Details button to see all the details of a selected member.
Claims
Clicking the Claims menu item will open the claims page, allowing the sponsor to see a list of all claims launched by scheme members.
Action: Click the View button to see all the details of a selected claim record. You can also type a keyword in the Search box to retrieve particular records quickly. Otherwise, click the Refresh button to repopulate the list.
Viewing claim details
Clicking the view button as shown in the previous illustration will open a window displaying the claim details as shown in the illustration below. The sponsor can also see the documents submitted to support a claim. Finally, after evaluating the claim, the sponsor can make a decision by declining the claim or certifying and approving it.
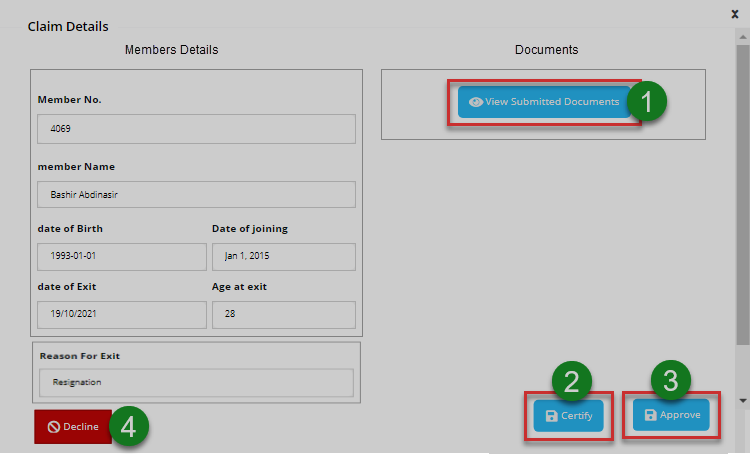
Action: Click on the text fields and buttons labeled with green numbered circles to do the following:
Label 1: click to view claim support documents.
Label 2: click to certify the claim.
Label 3: click to approve the claim.
Label 4: click to decline the claim.
Claim Payment via USSD
After the sponsor has verified and approved the claim as demonstrated in the previous illustration, the portal offers a USSD functionality that allows the sponsor to make payments within the system using mobile money services as shown in the following illustration.
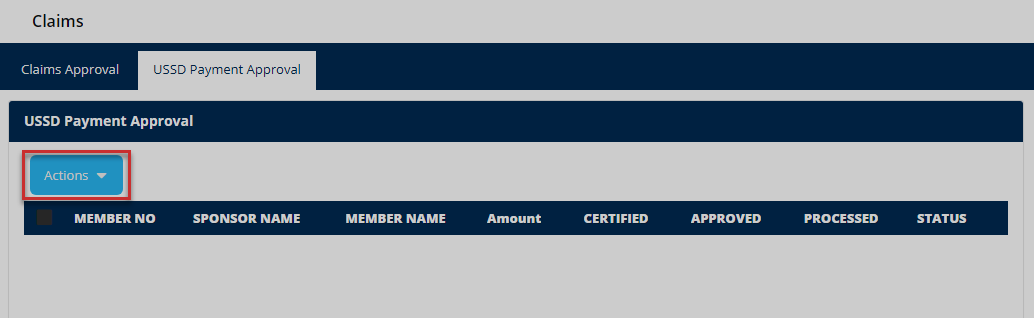
Action: Click the Checkbox preceding a claim record and then click on the Action button to open a drop-down menu to choose an action to execute. See the next illustration.
Payment approval
USSD payment is successfully executed after a sponsor approves it by clicking the benefits button, as shown in the illustration below. Otherwise, terminating the process at this stage is also allowed by clicking the decline benefits button.
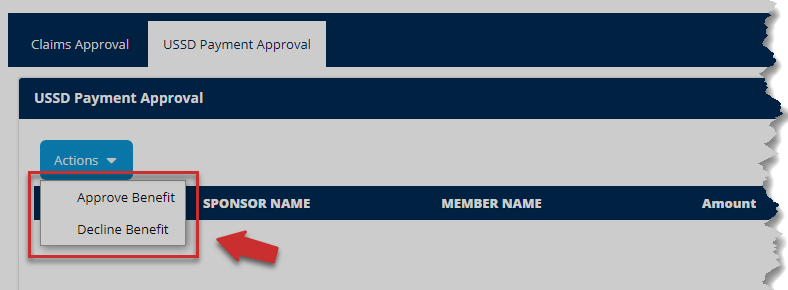
Action: Click the Approve Benefits button to commit the payment, Otherwise, click the Decline Benefits button to terminate the process.
Benefits
Clicking the benefits menu will open a page displaying a list of members with their benefits-related details. You can search a member's details quickly using keywords. See the illustration below.
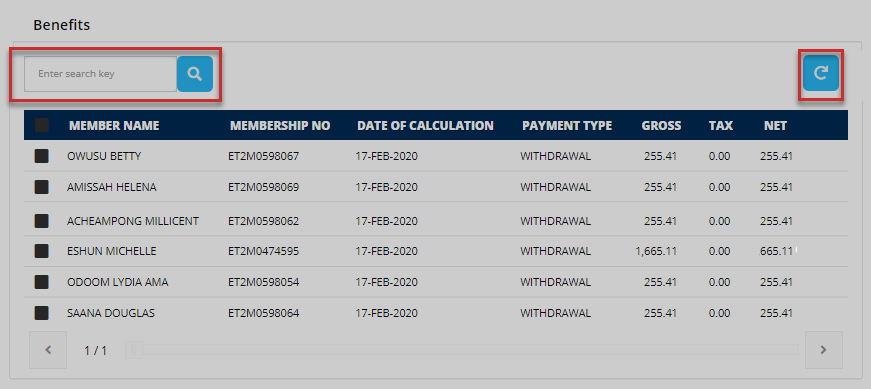
Action: Click to type a keyword in the Search box to retrieve particular records quickly. Otherwise, click the Refresh button to repopulate the list.
Staged Contributions
Clicking the staged contributions menu will open a page displaying all the contributions made through the portal by the scheme members via USSD on their mobile phones. A sponsor can see the status of different contributions and select a record on the list to commit the contributions to the FundMaster. See the following illustration.
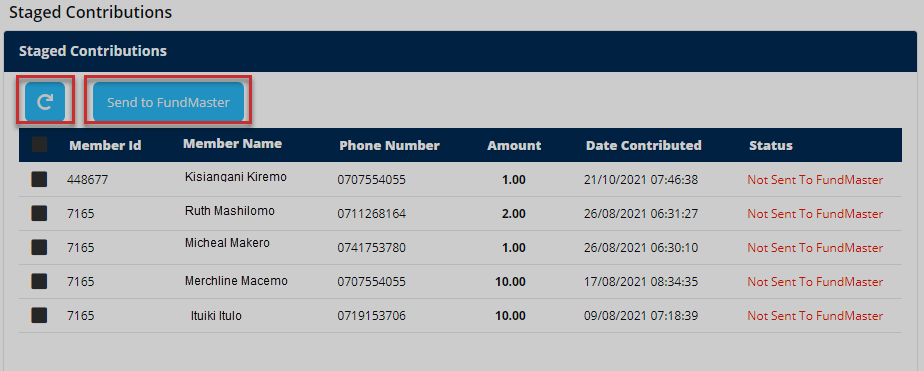
Action: Click the Send to FundMaster button to commit the contributions of a selected record to the FundMaster. Otherwise, click on the Refresh button to repopulate records.
Billing
Clicking the billing menu will open a page listing all the billing records from the sponsor. Bills received by the sponsor can be validated or canceled from this page. Otherwise, the sponsor can book for new contribution bills and download a billing record, as shown in the illustration below.
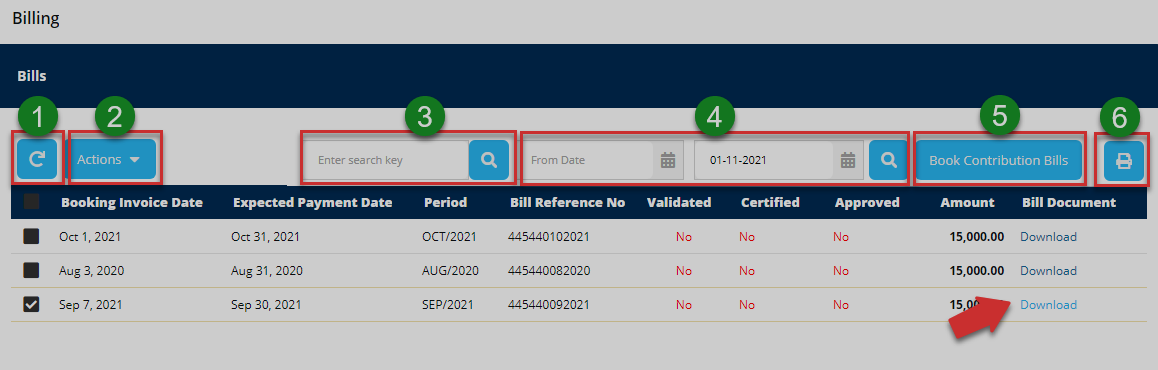
Action: Click the buttons labeled with green numbered circles to do the following:
Label 1: click to reload the activity records.
Label 2: click to open a drop-down menu to select an action.
Label 3: click to type keywords to search records quickly.
Label 4: click to set start and end dates for filtering.
Label 5: click to book contribution bills.
Label 6: click to print a copy.
Billing process
Clicking on the action button, as shown above, will allow the sponsor to validate a bill or cancel a selected bill from the list.
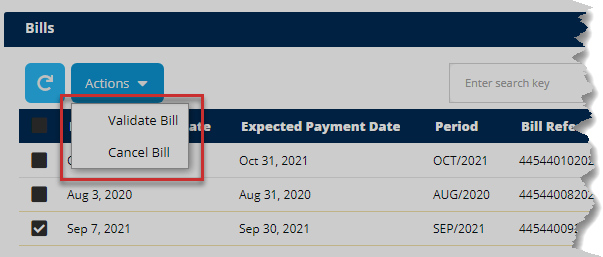
Action: Click the Validate Bill button to approve the bill details, otherwise, click the Cancel Bill button to terminate the process.
TPFA
Clicking the TPFA menu will open a page with Temporary Pension Fund Account (TPFA) fund transfer details within a selected sponsor's scheme. See the illustration below.
Action: Click the buttons labeled with green numbered circles to do the following:
Label 1: click to reload the receipt records.
Label 2: click to type keywords to search records quickly.
Label 3: click to view the status of a selected record.
Label 4: click to print a copy.
Receipts
Clicking the receipts menu will display a page with a list of records showing all receipted transactions for the open account. See the illustration below.
Action: Click the buttons labeled with green numbered circles to do the following:
Label 1: click to reload the receipt records.
Label 2: click to type keywords to search records quickly.
Label 3: click to print a copy.
Documents
Clicking the documents menu will open a page listing all documents that have been sent to the sponsor's account from other profiles within the portal. A user can select a document from the list to approve or download. See the illustration below.
Action: Click Approve Document button for approval, otherwise, click the Refresh button to repopulate the records.
Ticket
Clicking the manage tickets menu will open a page showing a list of all the tickets sent from the sponsor profile. From this page, a user can quickly search for tickets from the list using keywords, adding new tickets among other activities as demonstrated in this section. See the illustration below:

Action: Click on the text fields and buttons labeled with green numbered circles to do the following:
Label 1: click to see all details of a selected ticket.
Label 2: click to type a ticket ID to search it quickly.
Label 3: click to see all documents attached to a ticket.
Label 4: click to repopulate all records.
Label 5: click to add a new ticket.
Activity Logs
Clicking the activity logs menu will open a page showing a record of all the activities by all users who logged into the portal in the recent past. One can search records for specific periods through filtering by date.
Action: Click the buttons labeled with green numbered circles to do the following:
Label 1: click to reload the activity records.
Label 2: click to set start and end dates for filtering.
Label4: click to type keywords to search records quickly.
Label4: click to print a copy.
Users
Clicking the user's menu will open a page showing a record of all the portal users under the sponsor profile. A user can take actions over the accounts listed, such as editing details and adding a new one among other activities. See the illustration below.
Action: Click on the text fields and buttons labeled with green numbered circles to do the following:
Label 1: click to display a drop-down window for actions.
Label 2: click to add a user.
Label 3: click to repopulate all records.
Label 4: click see print the records.
Clicking on the Action button will display a drop-down window from which a selected record can be modified. Click to drop a user, edit user or reset a password appropriately as shown below.
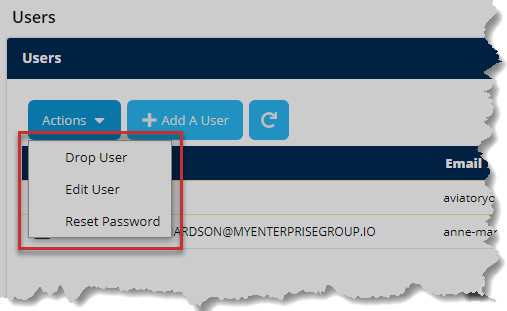
Action: Click an item on the drop-down menu to execute an action.
Manage Account
Clicking the manage account menu will a page showing the personal details of the logged-in user. One can also change the profile picture and password details, as shown in the illustration below.
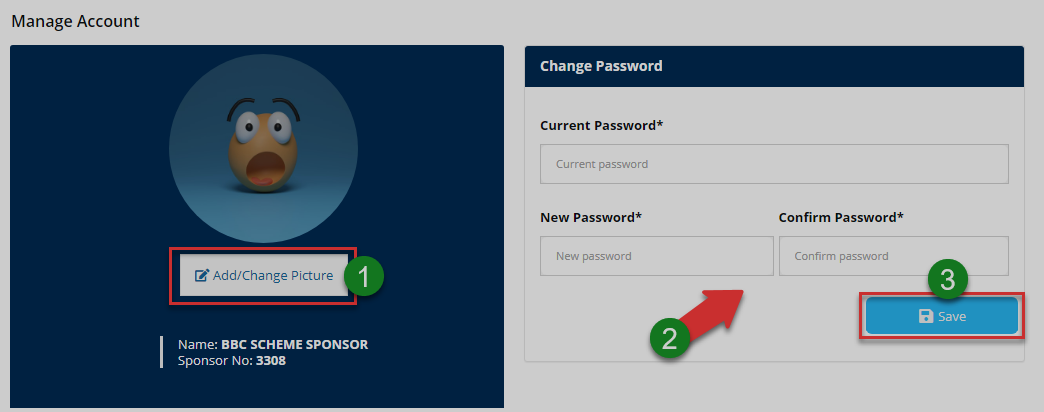
Action: Click the buttons labeled with green numbered circles to do the following:
Label 1: click to change profile picture.
Label 2: click to fill in new password details.
Label 3: click to confirm all changes.
Account picture
Click the add/change picture button as shown in the previous illustration to upload a picture as shown below.
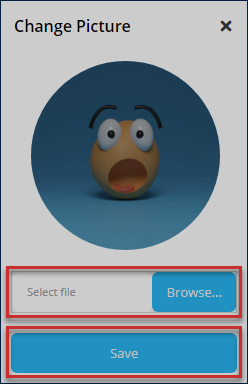
Action: Click the Browse button to select a picture from your device. Then click the Save button to upload the image. Otherwise, exit the window.
FAQs
Clicking the FAQs tab, in the upper right corner, will open a window showing a report of the frequently asked questions in the portal. See the illustration below.
Action: Click the text links to display the list of questions in accordion style. Click the Home tab to return to the portal home page. Otherwise, close the window.
User Account
The logged-in users' details are displayed through a drop-down menu that provides shortcut to access notifications, user profile, and a button to log out of the portal.
Action: Click on the enclosed text links to open respective pages. Otherwise, click the Logout button to exit the portal.
Notifications
Clicking the notifications text link from the profile drop-down menu, located in the upper right corner, will open a page showing a list of messages sent from within the portal. They are grouped into Inbox and Outbox messages. One can select to read individual messages and compose. See the illustration below.
Action: Click on the text fields and buttons labeled with green numbered circles to do the following:
Label 1: click to view Outbox messages.
Label 2: click to repopulate records.
Label 3: click to compose a message.
Label 4: click to read a message.
Read a notification
Check the box of the record with the message you want to read, then click the status text link on the right to open a new window displaying the message details as shown below. You can also download the message.
Action: Click the Download File link to save the message file on your device. Otherwise, close the window.
My profile
Clicking the Profile link text will open a Manage Account page (which can also be accessed on the menu bar) showing the personal details of the logged-in user. One can change profile picture, download membership certificate, and change password details. Refer to the Manage Account menu for the illustrations.
# Client Relationship Executive (CRE) Profile
This profile serves as an interface to the portal users who take the role of CREs. These users work under the authority of a sponsor and are concerned with the client's welfare. Basically, these users interact with the schemes of a particular sponsor. Thus, can carry out several activities, as will be demonstrated throughout this section.
# Dashboard components
When a user login as a CRE, he/she will be welcomed into the CRE's home page (dashboard) as shown in the illustration below.
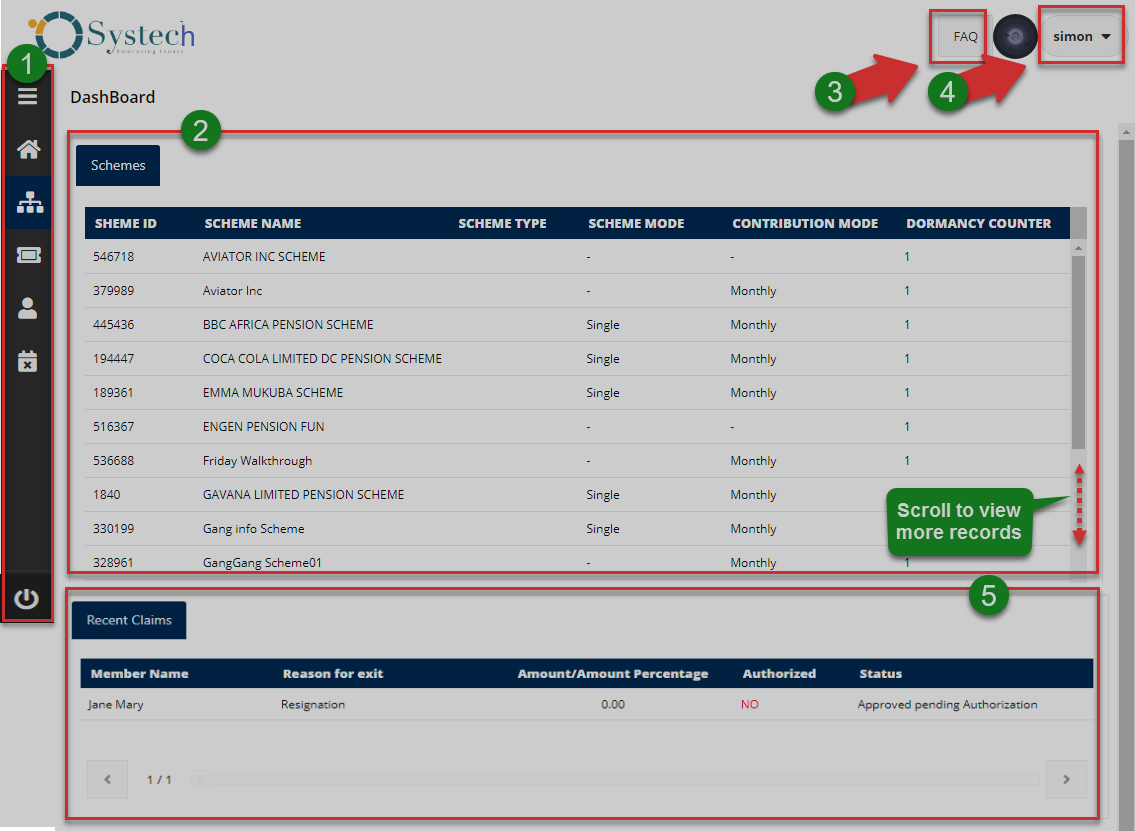
The numbered sections in this illustration above correspond to the numbers in the following table that describe the key components of the member's dashboard.
| Part | Description |
|---|---|
| 1. Menu Bar | This is the menu bar from which various items can be accessed quickly. Click on the menu bar icon on the top to expand it. |
| 2. Schemes | A list of all schemes under a sponsor's account. |
| 3. FAQs | A shortcut to view all frequently asked questions in the portal. |
| 4. User Account | This is where the account's profile picture and name are displayed on the dashboard. A drop-down menu is also provided with links to user's profile, notifications, and log-out button. |
| 5. Recent Claims | This section list claims initiated. |
# Dashboard Menu
Clicking the menu bar icon will expand the panel to reveal menu items as shown in the illustration below. The user can click each item to open a specific page. The menu comprises links to the following pages:
i. Schemes
ii. Tickets
iii. Manage Account
iv. Activity Logs
v. Log Out Button.
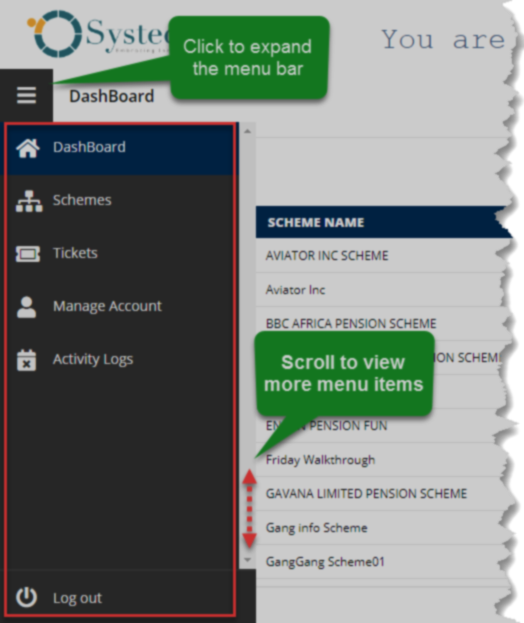
Action: Click the Home tab to expand the menu bar. Otherwise, click on a menu item to open the respective page.
# Scheme
Clicking the schemes menu will open a page showing a list of all the schemes under that specific sponsor account. See the illustration below.

Action: Click and scroll down to view more listed scheme records
# Ticket
Clicking the manage tickets menu will open a page showing a list of all the tickets sent from the CRE profile. From this page, a user can quickly search for tickets from the list using keywords, adding new tickets among other activities as demonstrated in this section. See the illustration below:
Action: Click on the text fields and buttons labeled with green numbered circles to do the following:
Label 1: click to see all details of a selected ticket.
Label 2: click to type a ticket ID to search it quickly.
Label 3: click to see all documents attached to a ticket.
Label 4: click to repopulate all records.
Label 5: click to add a new ticket.
Add ticket
Clicking the add ticket button as seen in a previous illustration will open a form whereby one is able to prepare a ticket by providing details such as selecting the issue, priority, subject, and attaching a document if need be. See the illustration below.
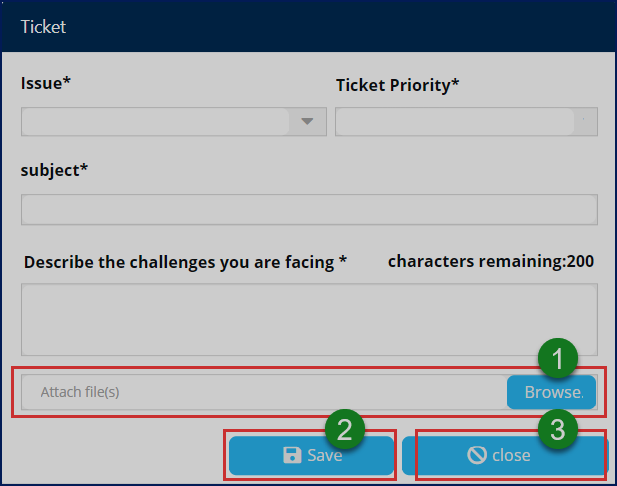
Action: After identifying the issue, ticket priority and typing in the subject, click on the buttons labeled with green numbered circles to do the following:
Label 1: click to select a document from your device to accompany the ticket.
Label 2: click to save the ticket for routing within the system.
Label 3: click to close the form.
# Manage Account
Clicking the manage account menu will open a page showing the personal details of the logged-in user. Through the provided form, one can change the account profile picture and password details, as shown in the illustration below.
Action: Click the buttons labeled with green numbered circles to do the following:
Label 1: click to change profile picture.
Label 2: click to fill in new password details.
Label 3: click to confirm all changes.
Account picture
Click the add/change picture button as shown in the previous illustration to upload a picture as shown below.
Action: Click the Browse button to select a picture from your device. Then click the Save button to upload the image. Otherwise, exit the window.
# Activity Logs
Clicking the activity logs menu will open a page showing a record of all the activities by all users who logged into the portal in the recent past. One can search records for specific periods through filtering by date.
Action: Click the buttons labeled with green numbered circles to do the following:
Label 1: click to reload the activity records.
Label 2: click to set start and end dates for filtering.
Label4: click to type keywords to search records quickly.
Label4: click to print a copy.
# FAQs
Clicking the FAQs tab, in the upper right corner, will open a window showing a report of the frequently asked questions in the portal. See the illustration below.
Action: Click the text links to display the list of questions in accordion style. Click the Home tab to return to the portal home page. Otherwise, close the window.
# User Account
The logged-in users' details are displayed through a drop-down menu that provides shortcut access to notifications, user profile, and a button to log out of the portal.
Action: Click on the enclosed text links to open respective pages. Otherwise, click the Logout button to exit the portal.
# Notifications
Clicking the notifications text link from the profile drop-down menu, located in the upper right corner, will open a page showing a list of messages sent from within the portal. They are grouped into Inbox and Outbox messages. One can select to read individual messages and compose. See the illustration below.
Action: Click on the text fields and buttons labeled with green numbered circles to do the following:
Label 1: click to view Outbox messages.
Label 2: click to repopulate records.
Label 3: click to compose a message.
Label 4: click to read a message.
Read a notification
Check the box of the record with the message you want to read, then click the status text link on the right to open a new window displaying the message details as shown below. You can also download the message.
Action: Click the Download File link to save the message file on your device. Otherwise, close the window.
# My profile
Clicking the Profile link text will open a Manage Account page (which can also be accessed on the menu bar) showing the personal details of the logged-in user. One can change profile picture, download membership certificate, and change password details. Refer to the Manage Account menu for the illustrations.
# Pensioner Profile
This profile serves as an interface to the portal users who take the role of pensioners. Authenticated users (Pensioners) can access important information concerning their payrolls, deductions, and beneficiaries among other forms of interactions.
# Dashboard components
When a user logins as a pensioner, he/she will be welcomed into the pensioner's home page (dashboard) as shown in the illustration below.
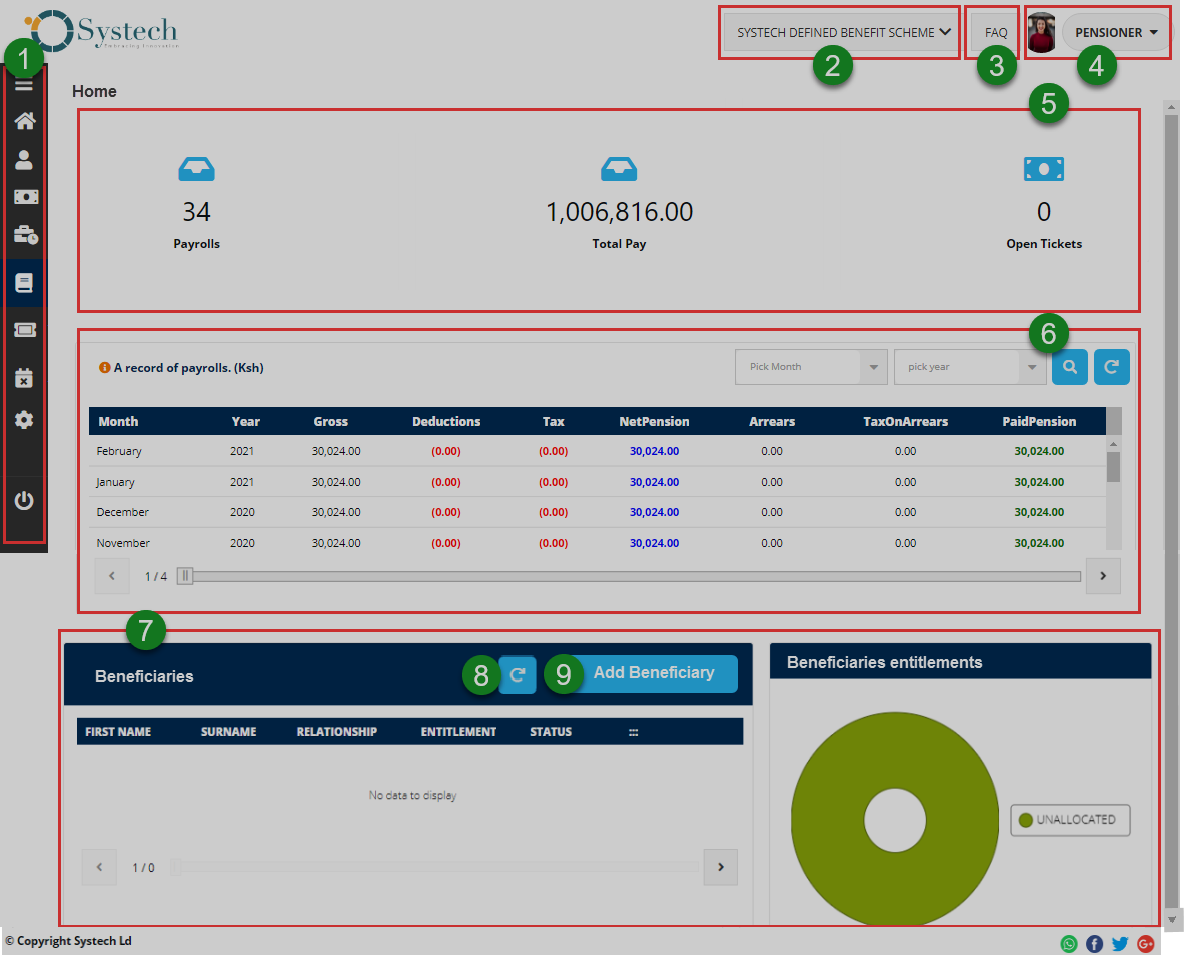
The numbered sections in this illustration above correspond to the numbers in the following table that describe the key components of the dashboard.
| Part | Description |
|---|---|
| 1. Menu Bar | This is the menu bar from which various items can be accessed quickly. Click on the menu bar icon on the top to expand it. |
| 2. Scheme Selector | A drop-down menu to select scheme. |
| 3. FAQs | A shortcut to view all frequently asked questions in the portal. |
| 4. User Account | This is where the pensioner's picture and username are displayed on the dashboard. Here, a drop-down menu is also provided with links to user profile, notifications and log out button. |
| 5. Account Activities Summary | This section gives a pensioner's key information in figures; on payrolls, payments done and open tickets. |
| 6. Payroll List | This section displays a list of payroll records: the monthly replacement salary that the pensioner has received so far. |
| 7. Beneficiaries Details | This section gives a preview of the pensioner's beneficiaries' records. A pensioner can add a new one. |
# Dashboard Menu
Clicking the menu bar icon will expand the panel to reveal menu items as shown in the illustration below. The user can click each item to open a specific page. The menu comprises links to the following pages:
i. Personal info
ii. Payrolls
iii. Payroll deductions
iv. C.O.E
v. Tickets
vi. Activity Logs
vii. Manage Accounts
viii. Log out Button.
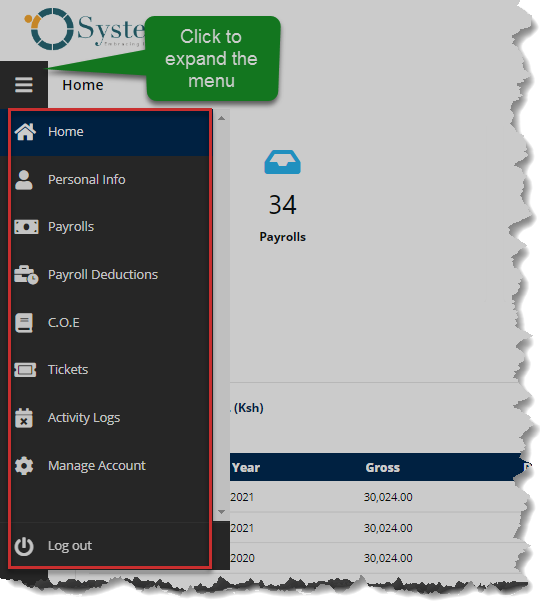
Action: Click the Home tab to expand the menu bar. Otherwise, click on a menu item to open the respective page.
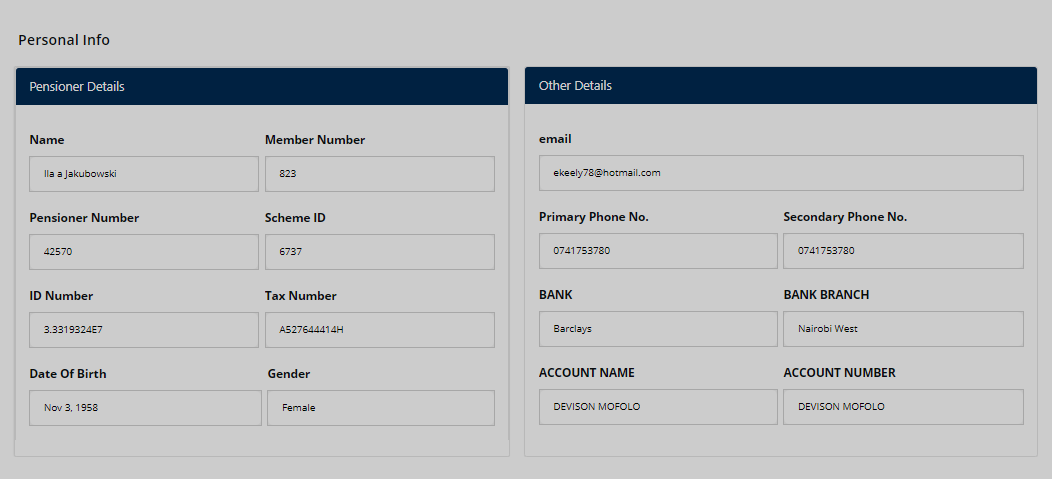
# Personal Info
Clicking the profile info menu will display the pensioner's personal information as displayed in the following illustration. From the left side, the key details are displayed as captured on the system. On the right side is the pensioner's other details such as bank account details.
# Payroll
Clicking the payroll menu to open a page showing a list of all payrolls (in form of monthly salary) that the pensioner has received so far, together with other details such as deductions made. See the illustration below.
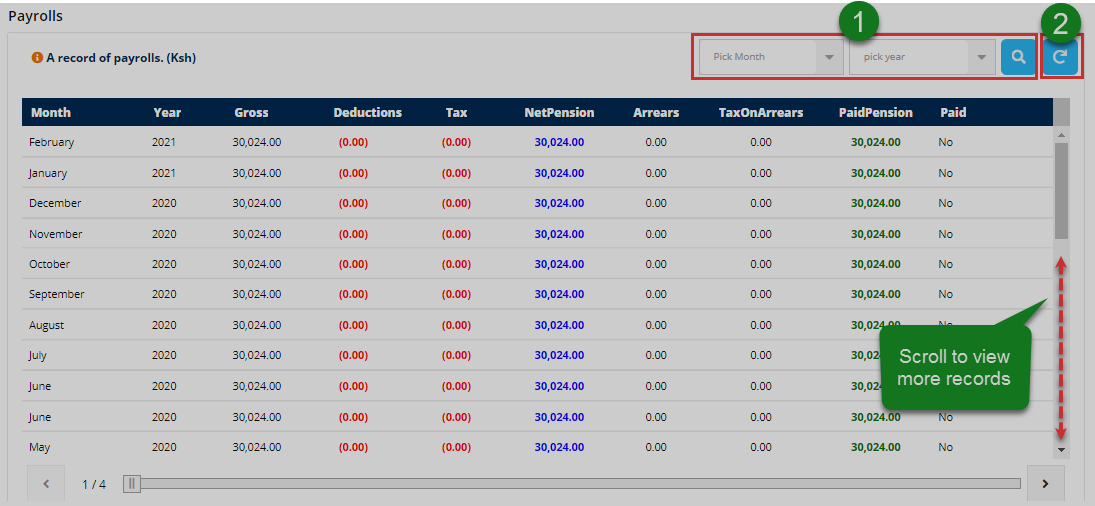
Action: Click the buttons labeled with green numbered circles to do the following:
Label 1: click to select month and year for filtering.
Label 2: click to refresh records.
# Payroll deductions
Click the payroll deduction menu to open a page with a list of deductions made upon the different payroll records. See the illustration below.
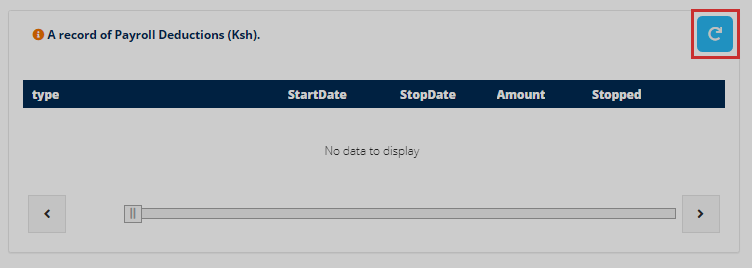
Action: Click the Refresh button in the upper right corner to repopulate records.
[]{#_Toc89257392 .anchor}
# C.O.E
Clicking the C.O.E (Certificate of Existence) tab will open a page with a list of certificates of existence cycles, a tab to selfie registration history. From this page, a user can register a selfie, authenticate and view a cycle certificate as shown in the following illustration.
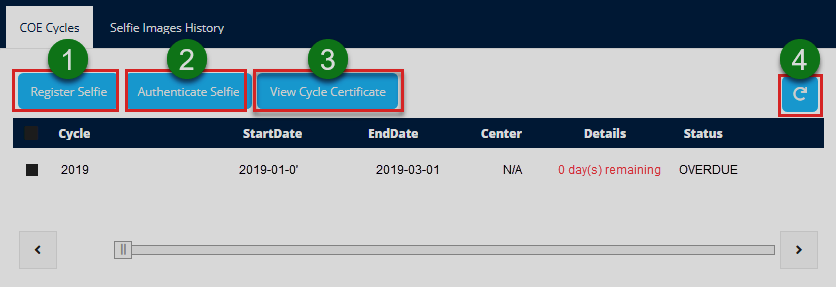
Action: Click the buttons labeled with green numbered circles to do the following:
Label 1: click to begin the process of selfie registration.
Label 2: click to authenticate selfie.
Label 3: click to view the cycle certificate.
Note
i. A cycle is a periodic time when a pensioner should prove he/she is alive so that he can continue to receive his/her pension. It shows the status of the cycle whether it is pending, overdue, or received.
A pending cycle is whereby the pensioner has not submitted a selfie or fingerprint, where applicable.
An overdue cycle is whereby the pensioner has not submitted COE and the end date has passed.
A received cycle is whereby a pensioner has submitted COE and cannot authenticate that cycle again.
ii. On registration, and selfie update, the process is the same as demonstrated on the Admin Profile.
iii. On authentication, you select a cycle first and the process follows as on registration. If COE is received, the pensioner can view a COE certificate.
Viewing selfie images history
Clicking the view selfie history tab will allow a user to review the history of selfie taken for a particular pensioner. See illustration below.
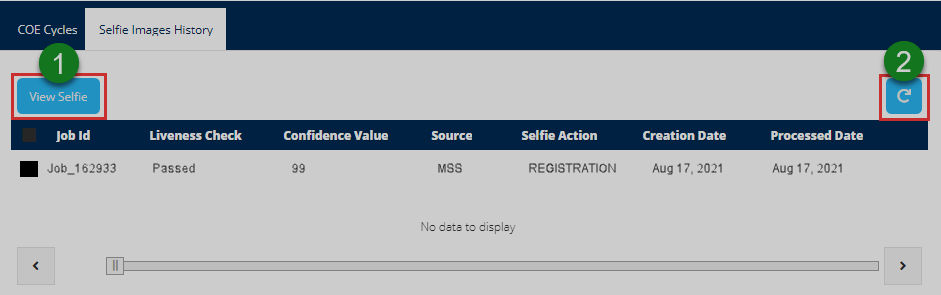
Action: Click the buttons labeled with green numbered circles to do the following:
Label 1: click to view the details of a selected selfie record.
Label 2: click to repopulate the records
Selfie details
Clicking the view selfie button as shown in the previous illustration will open a form showing a comparison between the image used for registration and the one used for circle authentication. The selfie identification engine will compare the two images based on two parameters: Liveness check and confidential level. See the illustration below.
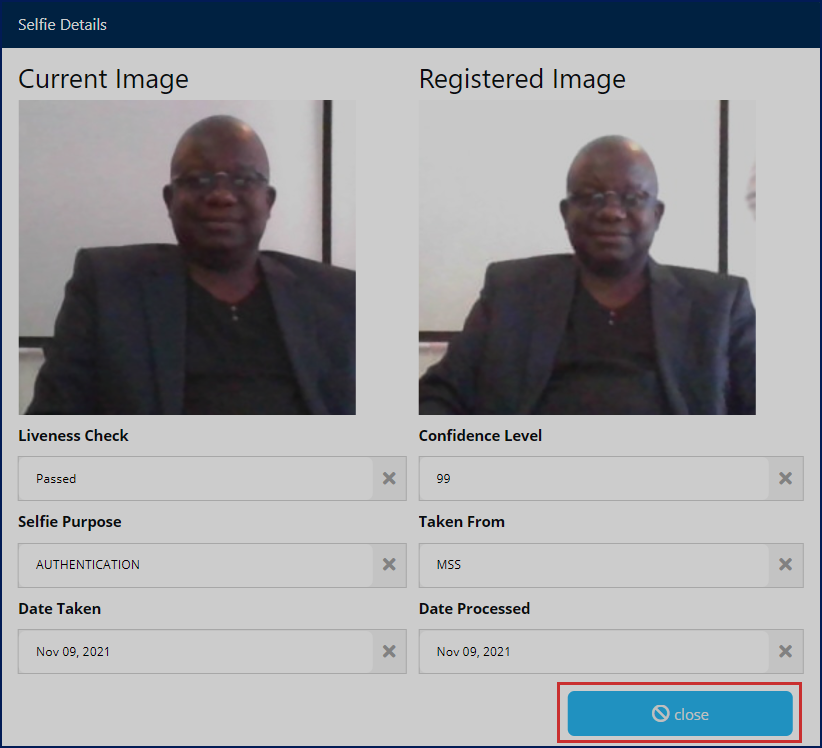
Action: Click the Close button to shut the window.
# Ticket
Clicking the manage tickets menu will open a page showing a list of all the tickets sent from the pensioner's profile. From this page, a user can quickly search for tickets from the list using keywords, adding new tickets among other activities as demonstrated in this section. See the illustration below.
Action: Click on the text fields and buttons labeled with green numbered circles to do the following:
Label 1: click to see all details of a selected ticket.
Label 2: click to type a ticket ID to search it quickly.
Label 3: click to see all documents attached to a ticket.
Label 4: click to repopulate all records.
Label 5: click to add a new ticket.
Add ticket
Clicking the add ticket button, as seen in a previous illustration, will open a form whereby one is able to prepare a ticket by providing details pertaining to the ticket such as selecting the issue, priority, subject and attaching a document if need be. See the illustration below.
Action: After identifying the issue, ticket priority and typing in the subject, click on the buttons labeled with green numbered circles to do the following:
Label 1: click to select a document from your device to accompany the ticket.
Label 2: click to save the ticket for routing within the system.
Label 3: click to close the form.
Support Ticket
Clicking the support tickets tab display a list of all support tickets raised for pensioner to attend within the portal. A user can select a ticket record from the list and view details. Besides being able to search for a ticket using ticket ID, a user can also forward a ticket to another profile to be handled there. See the illustration below.

Action: Click on the text fields and buttons labeled with green numbered circles to do the following:
Label 1: click to see all details of a selected ticket.
Label 2: click to type a ticket ID to search it quickly.
Label 3: click to see all documents attached to a ticket.
Label 4: click to repopulate all records.
Forward ticket
Clicking the forward ticket button shown in a previous illustration will allow a user to send a selected ticket from his/her list of tickets to another profile within the portal. A window from which a target profile is selected is launched at a click, as shown in the illustration below.
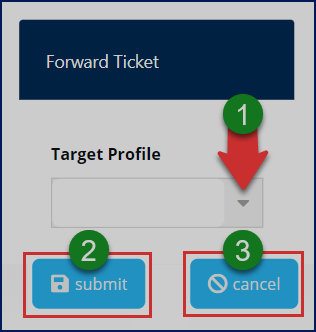
Action: Click the Submit buttons to send the ticket. Otherwise, click the Cancel button to terminate the process.
# Manage Account
Clicking the manage account menu will a page showing the personal details of the logged-in user. One can also change the profile picture and password details, as shown in the illustration below.
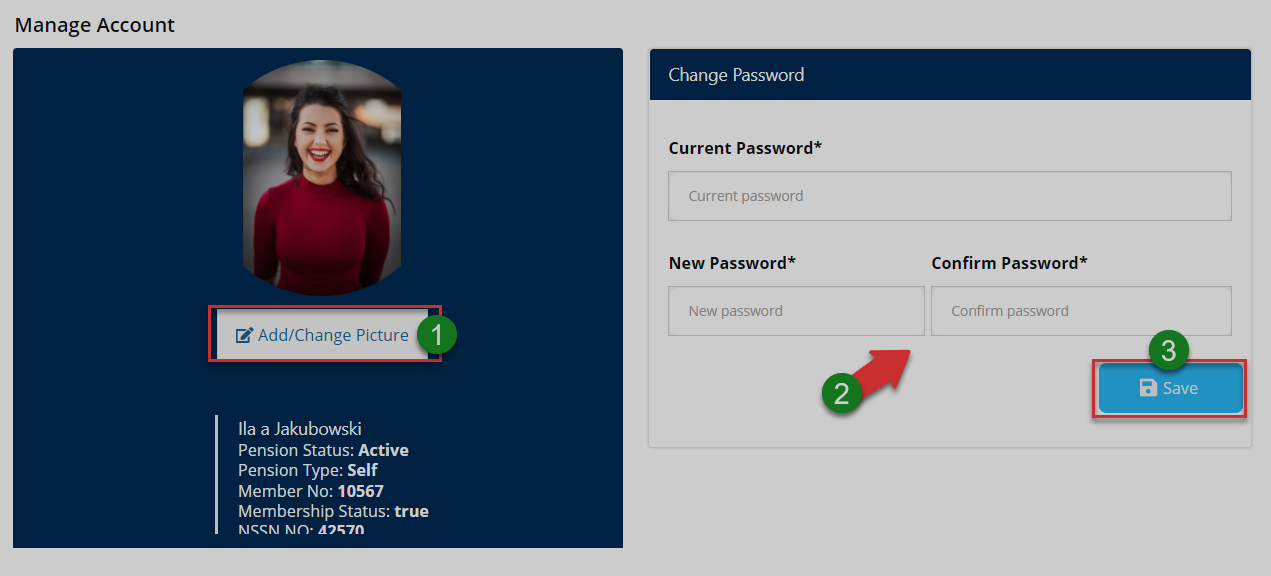
Action: Click the buttons labeled with green numbered circles to do the following:
Label 1: click to change profile picture.
Label 2: click to fill in new password details.
Label 3: click to confirm all changes.
Account picture
Click the add/change picture button as shown in the previous illustration to upload a picture as shown below.
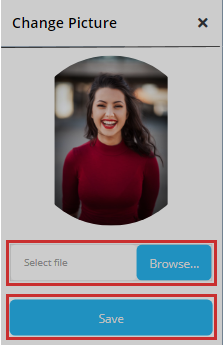
Action: Click the Browse button to select a picture from your device. Then click the Save button to upload the image. Otherwise, exit the window.
# Activity Logs
Clicking the activity logs menu will open a page showing a record of all the activities by all users who logged into the portal in the recent past. One can search records for specific periods through filtering by date.
Action: Click the buttons labeled with green numbered circles to do the following:
Label 1: click to reload the activity records.
Label 2: click to set start and end dates for filtering.
Label 3: click to type keywords to search records quickly.
Label 4: click to print a copy.
# FAQs
Clicking the FAQs tab, in the upper right corner, will open a window showing a report of the frequently asked questions in the portal. See the illustration below.
Action: Click the Text links to display the list of questions in accordion style. Click the Home tab to return to the portal home page. Otherwise, close the window.
# User Account
The logged-in users' details are displayed through a drop-down menu that provides shortcut access to notifications, user profile, and a button to log out of the portal.
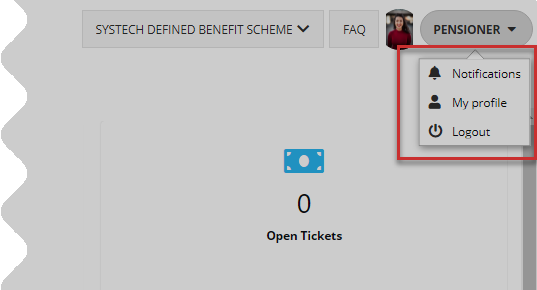
Action: Click on the enclosed text links to open respective pages. Otherwise, click the Logout button to exit the portal.
# Notifications
Clicking the notifications text link from the profile drop-down menu, located in the upper right corner, will open a page showing a list of messages sent from within the portal. They are grouped into Inbox and Outbox messages. One can select to read individual messages and compose. See the illustration below.
Action: Click on the text fields and buttons labeled with green numbered circles to do the following:
Label 1: click to view Outbox messages.
Label 2: click to repopulate records.
Label 3: click to compose a message.
Label 4: click to read a message.
Read a notification
Check the box of the record with the message you want to read, then click the status text link on the right to open a new window displaying the message details as shown below. You can also download the message.
Action: Click the Download File link to save the message file on your device. Otherwise, close the window.
# My profile
Clicking the Profile link text will open a Manage Account page (which can also be accessed on the menu bar) showing the personal details of the logged-in user. One can change profile picture, download membership certificate, and change password details. Refer to the Manage Account menu for the illustrations,
# Admin and Principal Officer (PO) Profile
This profile serves as an interface to the portal users who take the role of Admin and Principal Officers. PO officers have access to all the sponsors and their schemes, together with all members under every scheme. Such access rights enable these users to manage member's claims and other members operations. Note that POs are representatives of sponsors.
# Dashboard components
When a user login as a PO, he/she will be welcomed into the Principal Officers home page (dashboard) as shown in the illustration below.
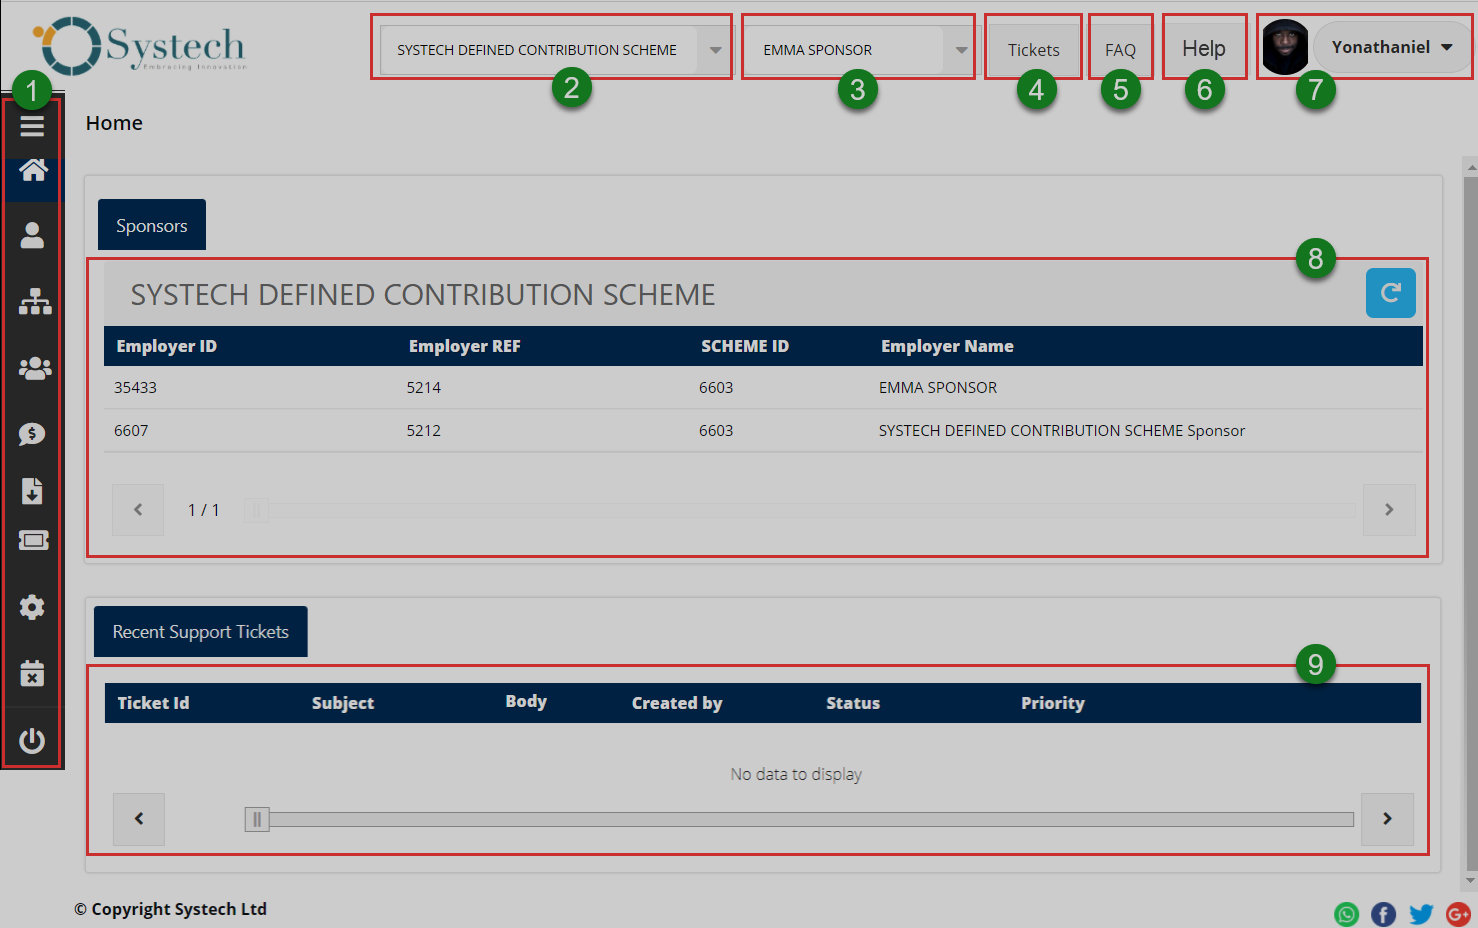
The numbered sections in this illustration above correspond to the numbers in the following table that describe the key components of the member's dashboard.
| Part | Description | | 1. Menu Bar | This is the menu bar from which various items can be accessed quickly. Click on the menu bar icon on the top to expand it. | | 2. Scheme Selector | A drop-down menu to select scheme. | | 3. Sponsor Selector | A drop-down menu to select a sponsor. | | 4. Tickets | A shortcut to view all tickets raised in the portal. | | 5. FAQs | A shortcut to view all frequently asked questions in the portal.| | 6. User Account | This is where the user's profile picture and name are displayed on the dashboard. Here, a drop-down menu is also provided with links to user profile, notifications and log out button. | | 7. Sponsors Scheme Details | This section displays records of a sponsor's schemes | | 8. Refresh Button | A clickable button for repopulating a scheme's records | | 9. Recent Support Tickets | This section gives a summary of support tickets raised |
# Dashboard Menu
Clicking the menu bar icon will expand the panel to reveal menu items as shown in the illustration below. The user can click each item to open a specific page. The menu comprises links to the following pages:
i. Personal info
ii. Schemes
iii. Members Operations
iv. Claims
v. Forms
vi. Tickets
vii. Manage Accounts
viii. Activity Log
ix. Log out Button.
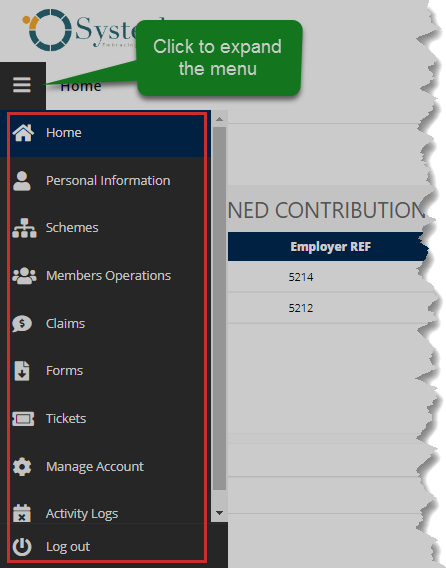
Action: Click the Home tab to expand the menu bar. Otherwise, click on a menu item to open the respective page.
# Personal Information
Clicking the personal information menu will display the Principal Officer's account details as shown in the following illustration.
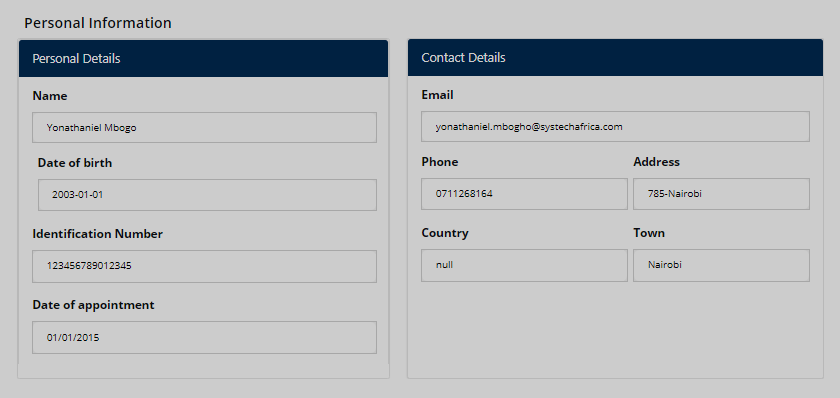
# Schemes
Clicking the schemes menu will open a page listing all the schemes in the portal. An officer can select a scheme from the list and view sponsor (employer) details. See the illustration below.
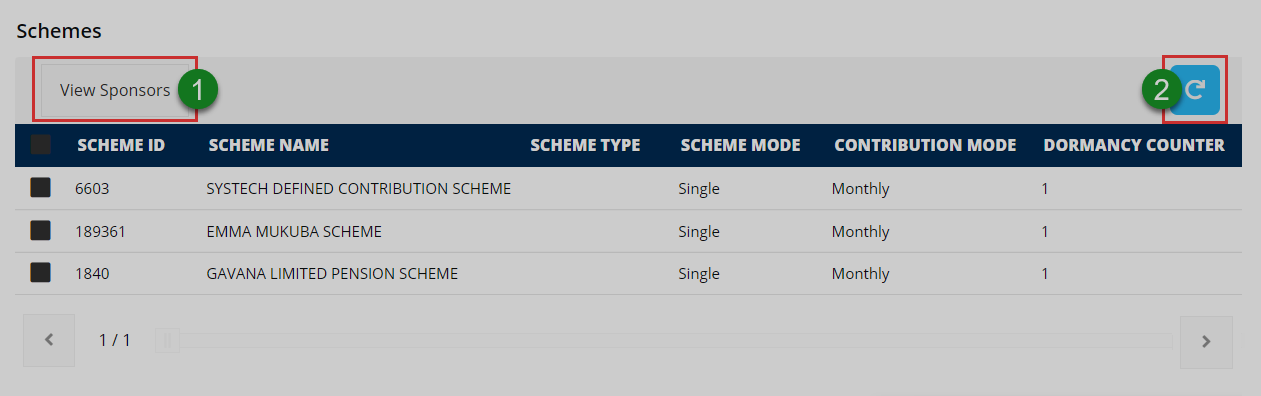
Action: Click on the buttons labeled with green numbered circles to do the following:
Label 1: click to view sponsors under each scheme.
Label 2: click to repopulate all records.
Scheme sponsors
Clicking the view sponsor tab seen in the previous illustration will open a page listing all employers under a selected scheme, as shown in the illustration below.
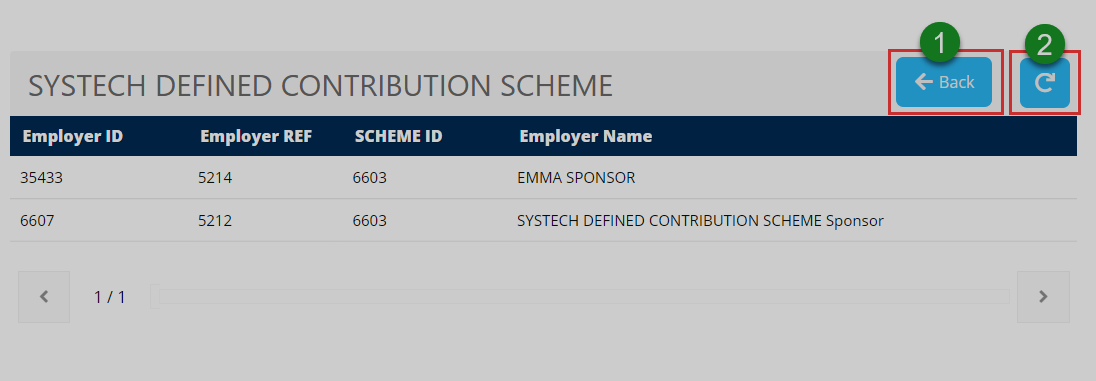
Action: Click on the buttons labeled with green numbered circles to do the following:
Label 1: click to return to the previous page.
Label 2: click to repopulate all records.
# Members Operation
Clicking the member operations menu will launch a page that contains information on members who have registered through the portal, the beneficiaries who are not approved, together with unapproved members. See the illustration below.
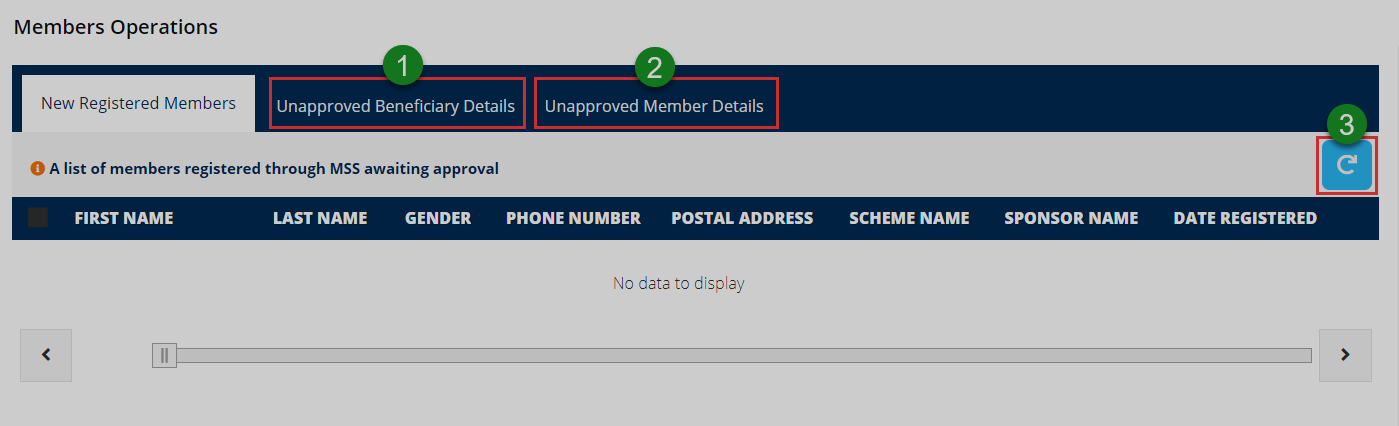
Action: Click on the buttons labeled with green numbered circles to do the following:
Label 1: click to view a list of unapproved beneficiaries.
Label 2: click to view a list of unapproved members.
Unapproved Member Detail
Click to see a list of members who have changed their details through the portal and waiting for approval from the FundMaster.

Action: Click on the Refresh button to repopulate all records.
Unapproved Beneficiary Details
Click to see a list of beneficiaries, both new and those whose details have been updated and waiting for approval from the FundMaster.
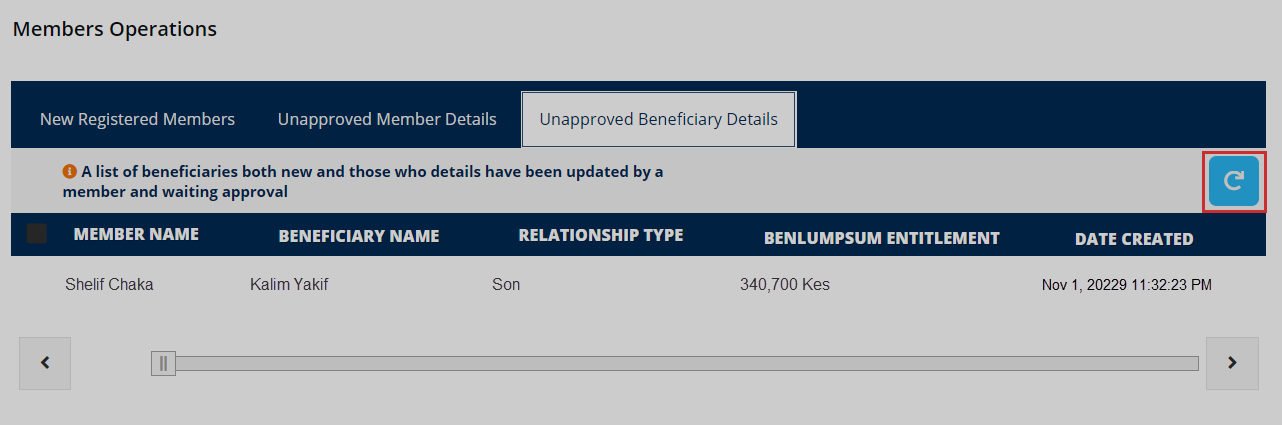
Action: Click on the Refresh button to repopulate all records.
# Claims
Clicking the claims menu will launch a page that contains list of records for all claims initiated in the portal. One can view the details of a claim by selecting it in the list and clicking the view button as shown in the illustration below.
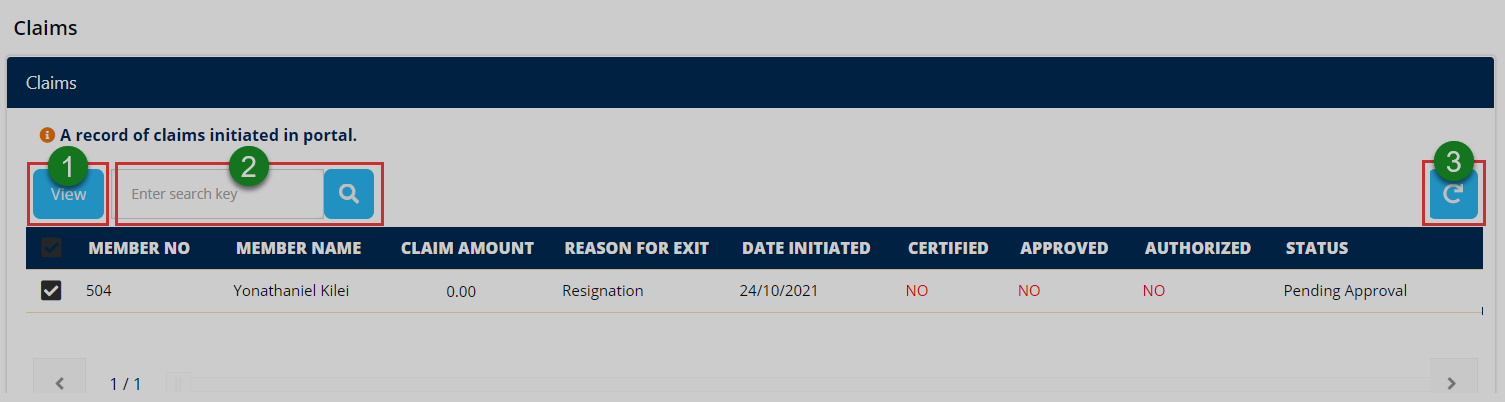
Action: Click on the buttons labeled with green numbered circles to do the following:
Label 1: click to view a details of a selected claim.
Label 2: click to type keywords and search records quickly.
Viewing claim details
Clicking the view button as shown in the previous illustration will open a window displaying the claim details as shown in the illustration below. The officer can also see the documents submitted to support a claim. Finally, after evaluating the claim, the sponsor can make a decision by declining the claim or certifying and approving it.
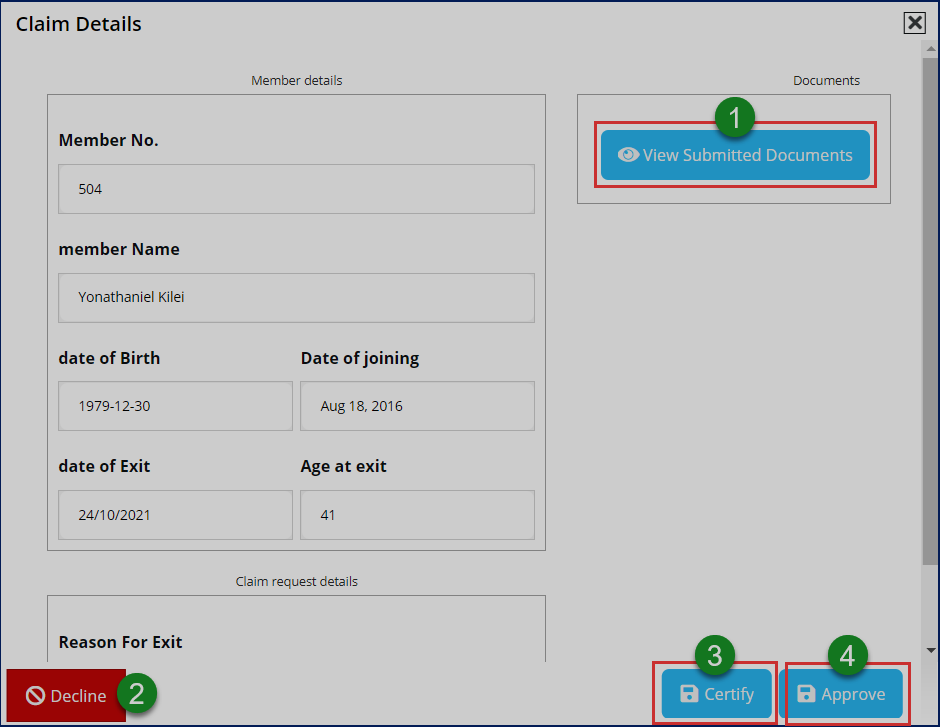
Action: Click on the text fields and buttons labeled with green numbered circles to do the following:
Label 1: click to view claim support documents.
Label 2: click to certify the claim.
Label 3: click to approve the claim.
Label 4: click to decline the claim.
# Forms
Clicking the form menu will open a page showing listing all forms in the portal. A user can identify a form on the list by title and description. A text link for downloading a form is provided for every record in the list. See the illustration below.
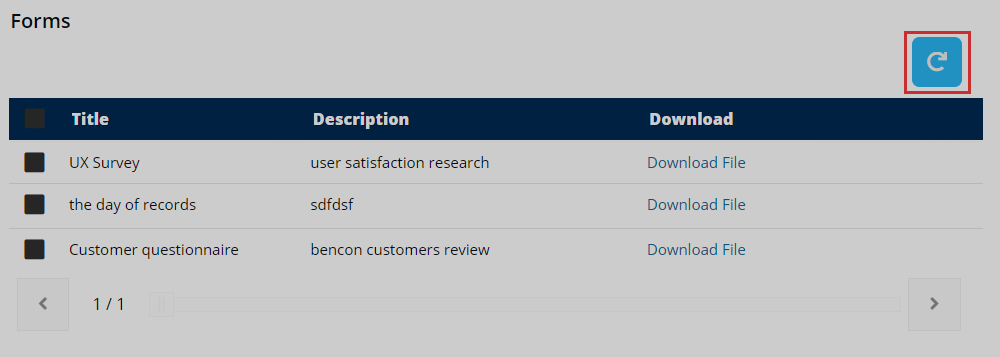
Action: Click the Download File link to have a copy saved to your device. Otherwise, click the Refresh button to repopulate the records.
# Tickets
Clicking the tickets menu will open a page showing a list of all the tickets raised within the Principal Office (PO) profile. From this page, a user can quickly search for tickets from the list using keywords, view the status of tickets, view accompanying documents and add new tickets among other activities as demonstrated in this section. See the illustration below.
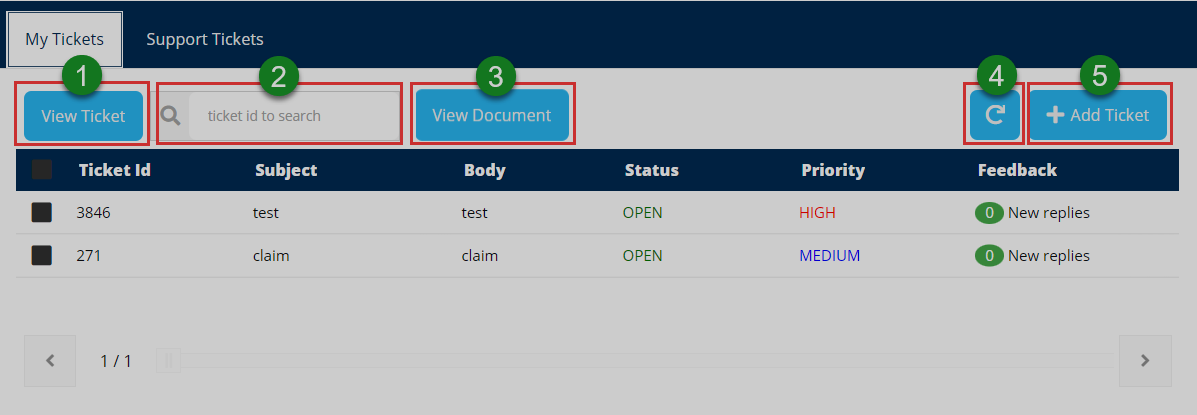
Action: Click on the text fields and buttons labeled with green numbered circles to do the following:
Label 1: click to see all details of a selected ticket.
Label 2: click to type a ticket ID to search it quickly.
Label 3: click to see all documents attached to a ticket.
Label 4: click to repopulate all records.
Label 5: click to add a new ticket.
Add ticket
Clicking the add ticket button as seen in a previous illustration will open a form whereby one is able to prepare a ticket by providing details pertaining to the ticket such as selecting the issue, priority, subject and attaching a document if need be. See the illustration below.
Action: After identifying the issue, ticket priority and typing in the subject, click on the buttons labeled with green numbered circles to do the following:
Label 1: click to select a document from your device to accompany the ticket.
Label 2: click to save the ticket for routing within the system.
Label 3: click to close the form.
Support Ticket
Clicking the support tickets tab display a list of all support tickets raised within the portal for PO profile officers to handle. A user can select a ticket record from the list and view details. Besides being able to search for a ticket using ticket ID, a user can also forward a ticket to another profile to be handled there. See the illustration below.
Action: Click on the text fields and buttons labeled with green numbered circles to do the following:
Label 1: click to see all details of a selected ticket.
Label 2: click to type a ticket ID to search it quickly.
Label 3: click to see all documents attached to a ticket.
Label 4: click to repopulate all records.
Forward ticket
Clicking the forward ticket button shown in a previous illustration will allow a user to send a selected ticket from the list of tickets to another profile within the portal. A window from which a target profile is selected is launched at a click, as shown in the illustration below.
Action: Click the Submit buttons to send the ticket. Otherwise, click the Cancel button to terminate the process.
# Manage Accounts
Clicking the manage account menu will a page showing the personal details of the logged-in user. One can also change the profile picture and password details, as shown in the illustration below.
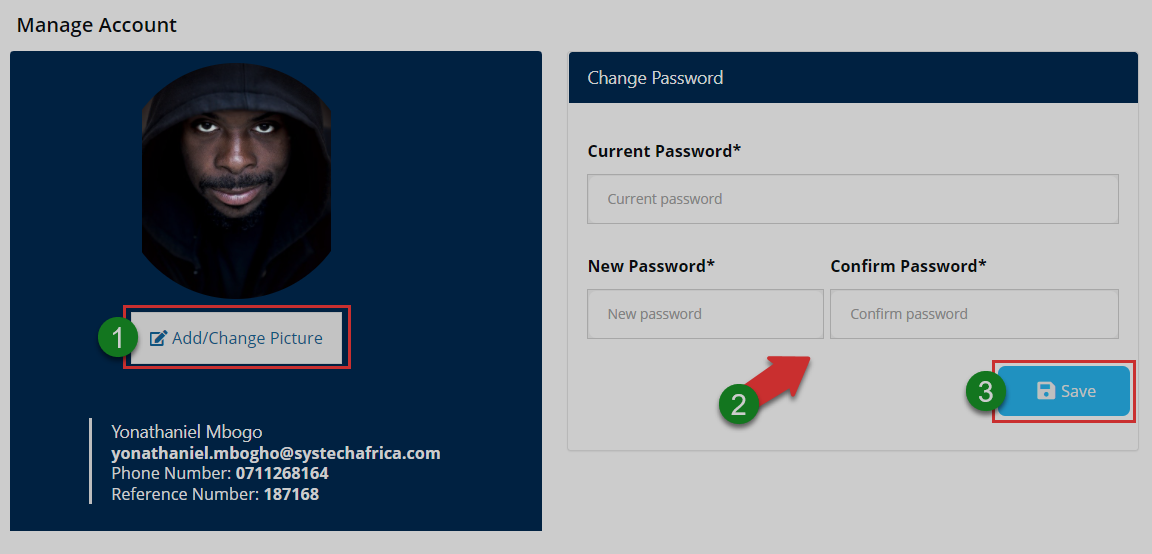
Action: Click the buttons labeled with green numbered circles to do the following:
Label 1: click to change profile picture.
Label 2: click to download the membership certificate.
Label 3: click to fill in new password details.
Label4: click to confirm all changes.
Account picture
Click the add/change picture button as shown in the previous illustration to upload a picture as shown below.
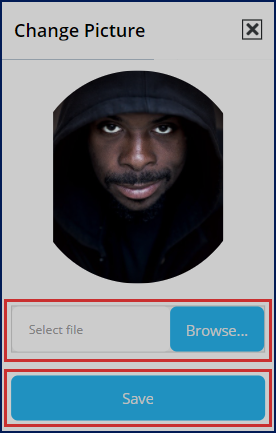
Action: Click the Browse button to select a picture from your device. Then click the Save button to upload the image. Otherwise, exit the window.
# Activity Log
Clicking the activity logs menu will open a page showing a record of all the activities by all users who logged into the portal in the recent past. One can search records for specific periods through filtering by date.
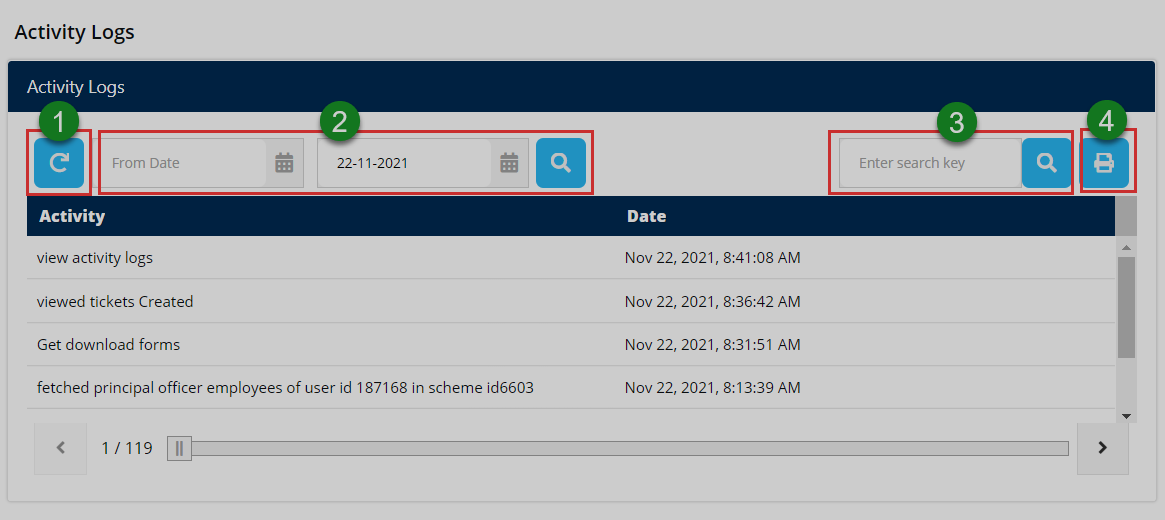
Action: Click the buttons labeled with green numbered circles to do the following:
Label 1: click to reload the activity records.
Label 2: click to set start and end dates for filtering.
Label 3: click to type keywords to search records quickly.
Label 4: click to print a copy.
# Client Relationship Manager Profile
This profile serves as an interface to the portal users who take the role of Client Relationship Manager. CRM users represent sponsors on the portal and are specifically involved in the management of claims initiated by various scheme members. Their role will be demonstrated throughout this section.
# Dashboard components
When a user login as CRM, he/she will be welcomed into the admin home (dashboard) as shown in the illustration below.
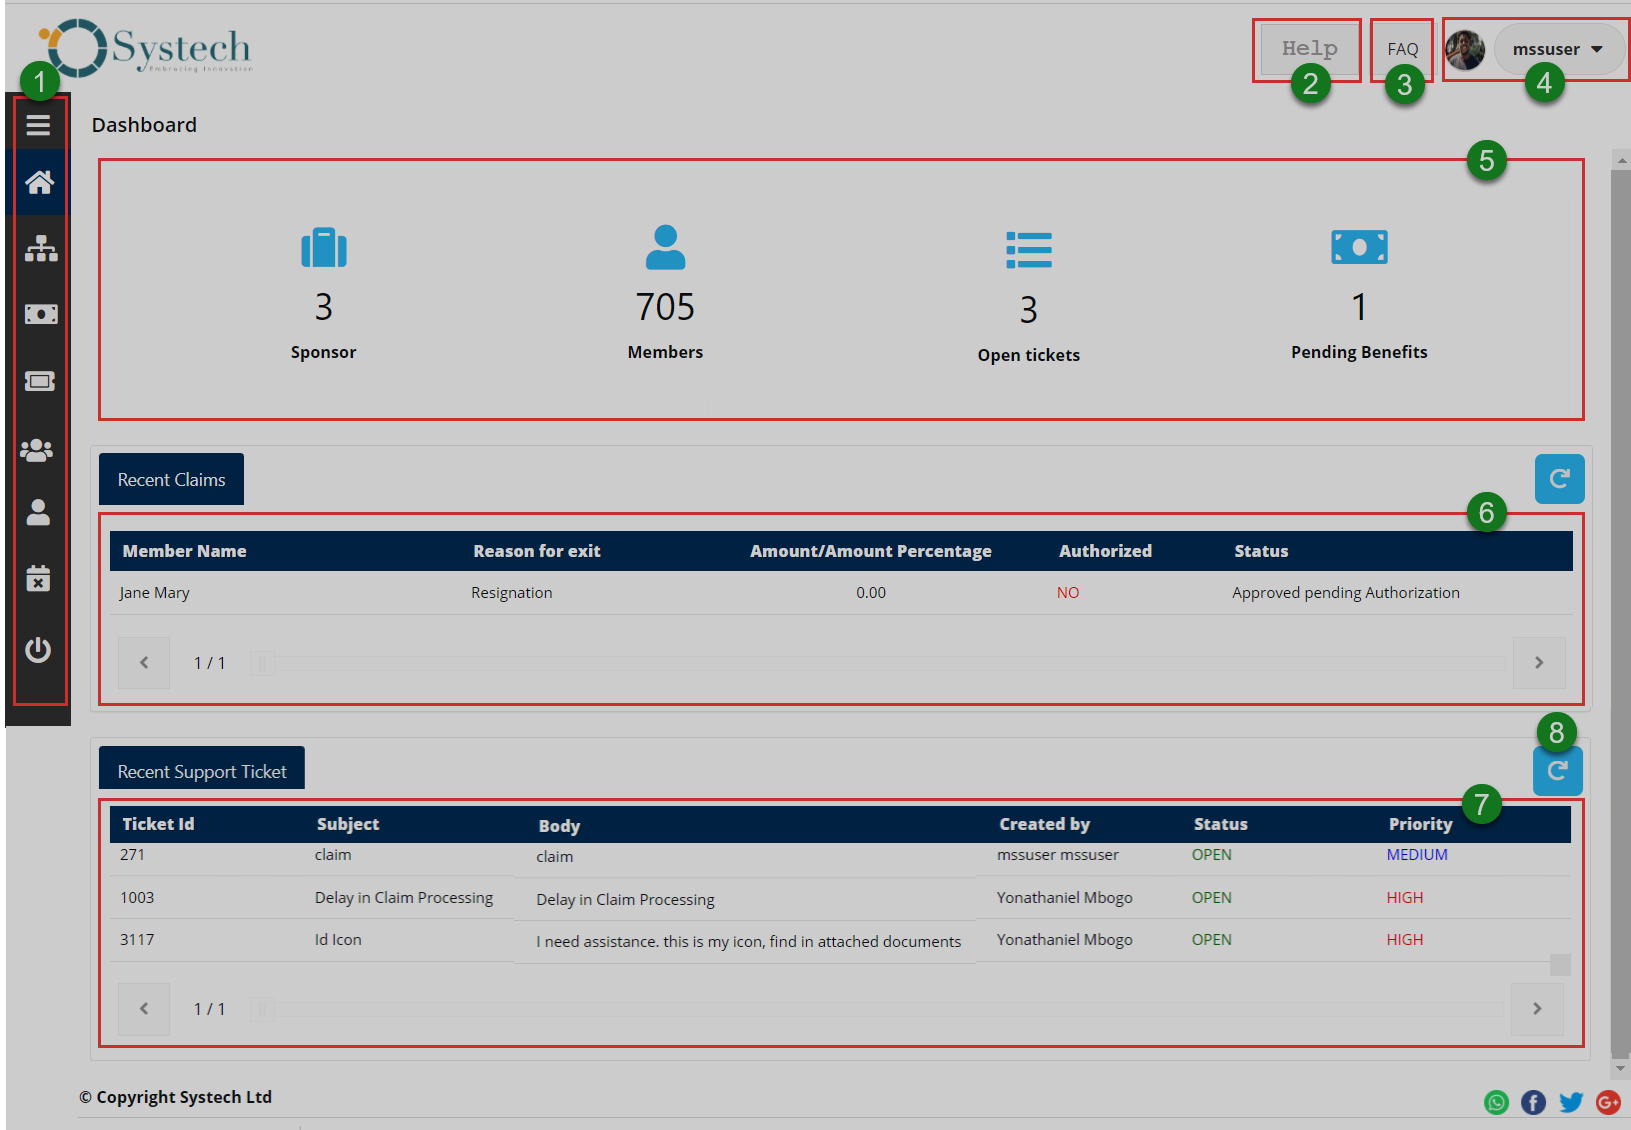
The numbered sections in this illustration above correspond to the numbers in the following table that describe the key components of the member's dashboard.
| Part | Description |
|---|---|
| 1. Menu Bar | This is the menu bar from which various items can be accessed quickly. Click on the menu bar icon on the top to expand it. |
| 2. Help | A shortcut to open user guide. |
| 3. FAQs | A shortcut to view all frequently asked questions |
| in the portal. | |
| 4. User Account | This is where the member's profile picture and name are displayed on the dashboard. Here, a drop-down menu is also provided with links to user profile, notifications and log out button. |
| 5. Sessions Summary | This section gives a summary key information in regard to the active account: summaries in figures for number of sponsors etc. |
| 6. Recent Claims | This section displays a list of claims by members |
| 7. Recent Support Ticket | This section displays a list of support tickets raised and gives more details about them. |
# Dashboard menu
Clicking the menu bar icon will expand the panel to reveal menu items as shown in the illustration below. The user can click each item to open a specific page. The menu comprises links to the following pages:
i. Sponsors
ii. Claims
iii. Tickets
iv. Claim Authorizers
v. Manage Account
vi. Activity Logs
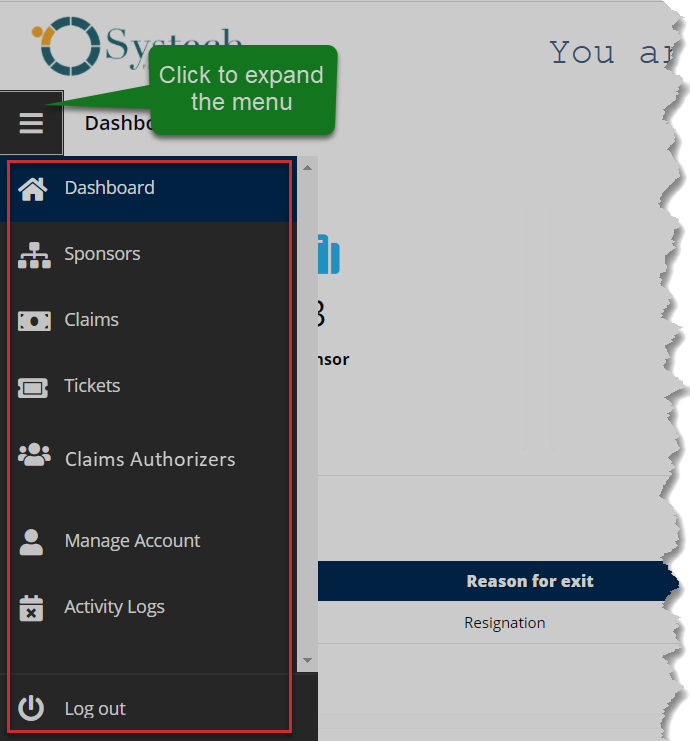
Action: Click the Home tab to expand the menu bar. Otherwise, click on a menu item to open the respective page.
# Sponsors
Clicking the sponsor menu will open a page displaying details of all sponsors including the schemes they have subscribed to. The CRM officer can select a sponsor from the list and view the details of all members in a particular scheme as shown in the illustration below.
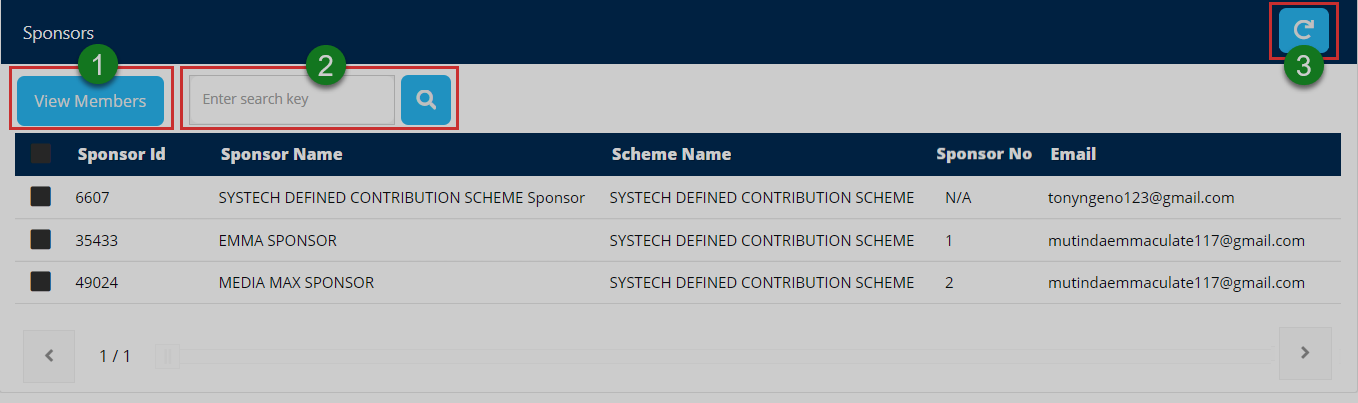
Action: Click on the text fields and buttons labeled with green numbered circles to do the following:
Label 1: click to see all details of a selected sponsor on the list.
Label 2: click to type keyword and search a record quickly.
Label 3: click to repopulate all records.
Members list
Clicking the view member's button shown in the previous illustration will open a page displaying a list of members under a sponsor. The CRM can view a selected member details and search through the records using a search key among other actions. See the illustration below.
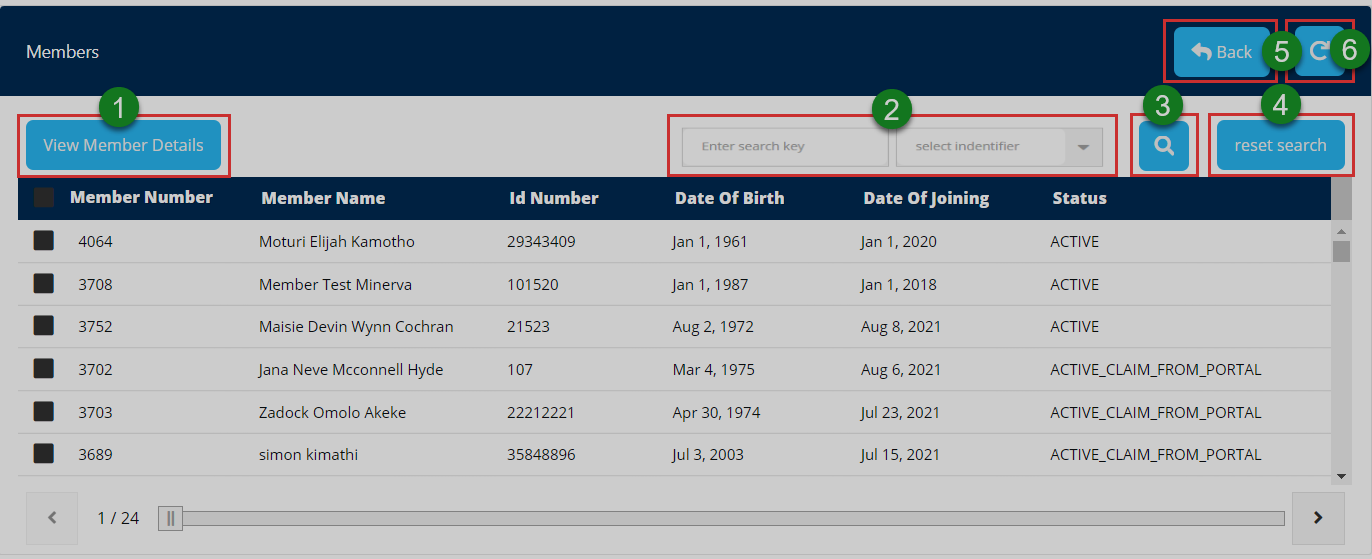
Action: Click on the text fields and buttons labeled with green numbered circles to do the following:
Label 1: click to see all details of a selected member on the list.
Label 2: click to type keyword and identifier and search a record quickly.
Label 3: click to search.
Label 4: click to reset search engine.
Label 5: click to go back to the previous page.
Label 6: click to repopulate all records.
Member's details
Clicking the view members details will open a page displaying all the details of a members: personal information, contribution summary, beneficiary's allocations and employment details. A member is also provided with a link to download his/her membership certificate and membership statement. See the following illustration.
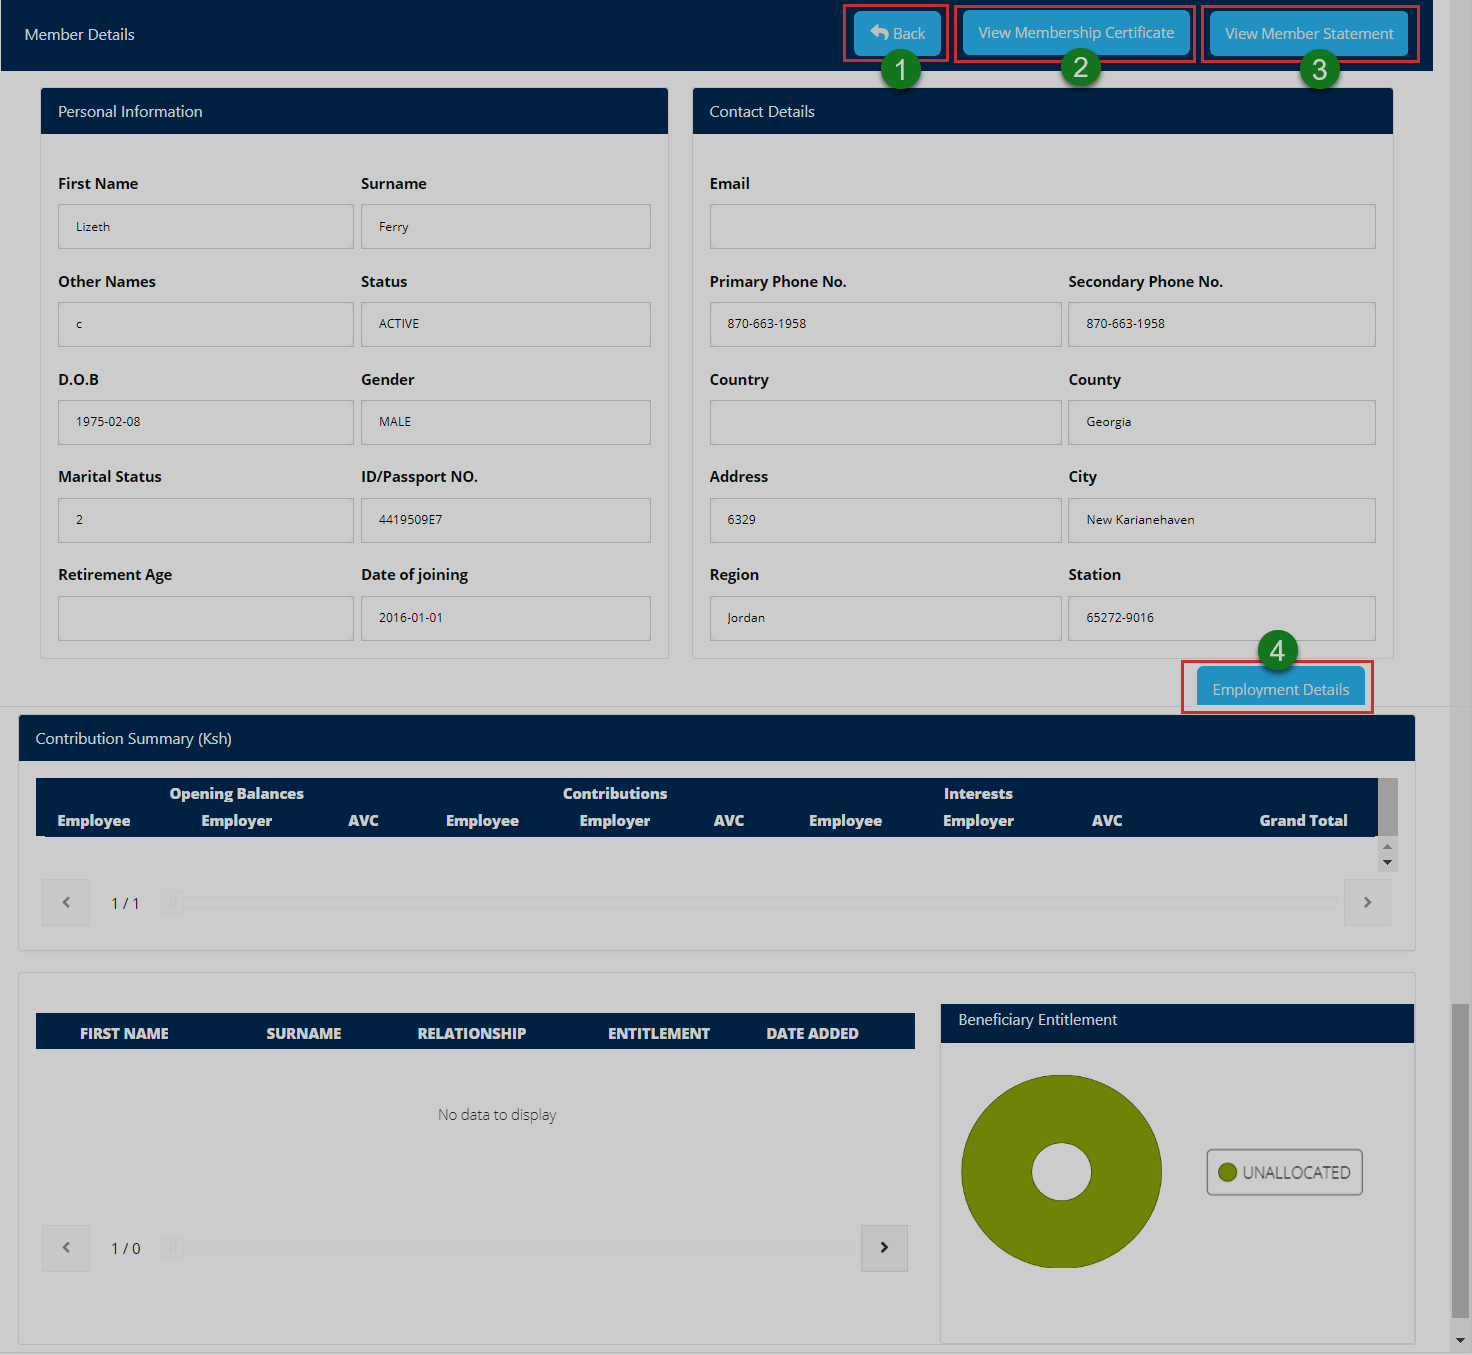
Action: Click on the buttons labeled with green numbered circles to do the following:
Label 1: click to go back to the previous page.
Label 2: click to open a link for viewing membership certificate.
Label 3: click to open a link for viewing member statement.
Label 4: click to open a window showing employment details.
Employment details
Clicking the employment details button will open a window displaying a members employment details as shown in the illustration below.
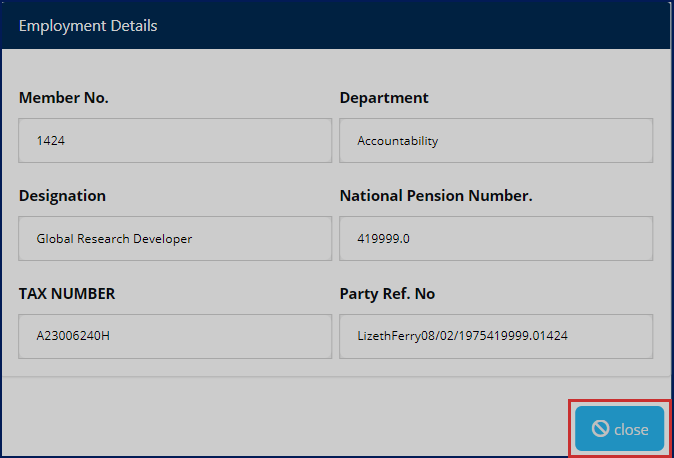
Action: Click the Close button to exit the window.
# Claims
Clicking the claim menu will open a page displaying details of all the member under a sponsor. The CRM is view a selected member details and search through the records using a search key among other actions. See the illustration below.
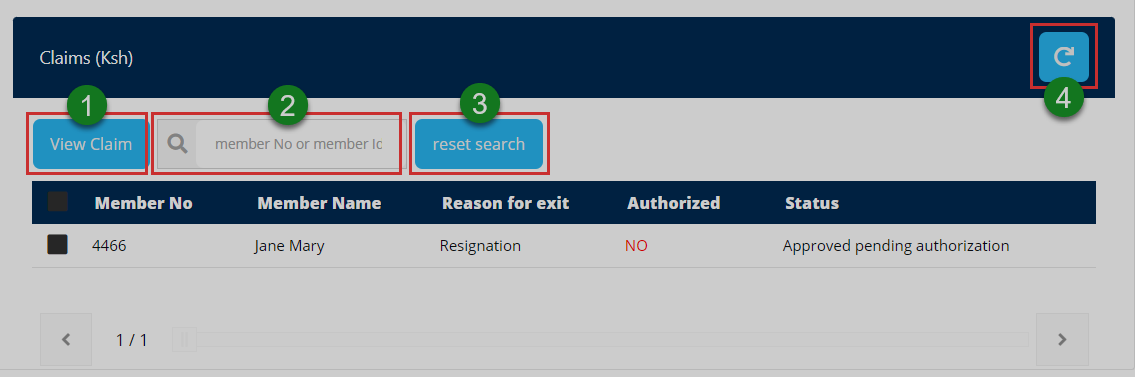
Action: Click on the text fields and buttons labeled with green numbered circles to do the following:
Label 1: click to see all details of a selected claim record.
Label 2: click to type keyword like member number to retrieve a record quickly.
Label 3: click to reset search engine.
Label 4: click to repopulate all records.
# Tickets
Clicking the tickets menu will open a page showing a list of all the tickets raised within the CRM profile. From this page, a user can quickly search for tickets from the list using keywords, view the status of tickets, view accompanying documents and add new tickets among other activities as demonstrated in this section. See the illustration below.
Action: Click on the text fields and buttons labeled with green numbered circles to do the following:
Label 1: click to see all details of a selected ticket.
Label 2: click to type a ticket ID to search it quickly.
Label 3: click to see all documents attached to a ticket.
Label 4: click to repopulate all records.
Label 5: click to add a new ticket.
View ticket
Clicking the view ticket button will open a new window showing all the details of a selected ticket from the list as shown in the illustration below.

Action: Click on the text fields and buttons labeled with green numbered circles to do the following:
Label 1: click to go back to the tickets listing page.
Label 2: click to resolve the ticket in case its concern has been addressed.
Label 3: click to view documents attached to a ticket.
Label 4: click to type a reply message.
Label 5: click to submit typed reply message.
Add ticket
Clicking the add ticket button as seen in a previous illustration will open a form whereby one is able to prepare a ticket by providing details pertain the ticket such as selecting the issue, priority, subject and attaching a document if need be. See the illustration below.
Action: After identifying the issue, ticket priority and typing in the subject, click on the buttons labeled with green numbered circles to do the following:
Label 1: click to select a document from your device to accompany the ticket.
Label 2: click to save the ticket for routing within the system.
Label 3: click to close the form.
Support Ticket
Clicking the support tickets tab display a list of all support tickets raised for CRM profile officer to handle. A user can select a ticket record from the list and view details. Besides being able to search for a ticket using ticket Id, a user can also forward a ticket to another profile to be handled there. See the illustration below.
Action: Click on the text fields and buttons labeled with green numbered circles to do the following:
Label 1: click to see all details of a selected ticket.
Label 2: click to type a ticket ID to search it quickly.
Label 3: click see all documents attached to a ticket.
Label 4: click to repopulate all records.
Forward ticket
Clicking the forward ticket button shown in a previous illustration will allow a user to send a selected ticket from his/her list to of tickets to another profile within the portal. A window from which a target profile is selected is launched at click as shown in the illustration below.
Action: Click the Submit buttons to send the ticket. Otherwise, click Cancel button to terminate the process.
# Manage Account
Clicking the manage account menu will a page showing the personal details of the logged-in user. One can also change the profile picture and password details as shown in the illustration below.
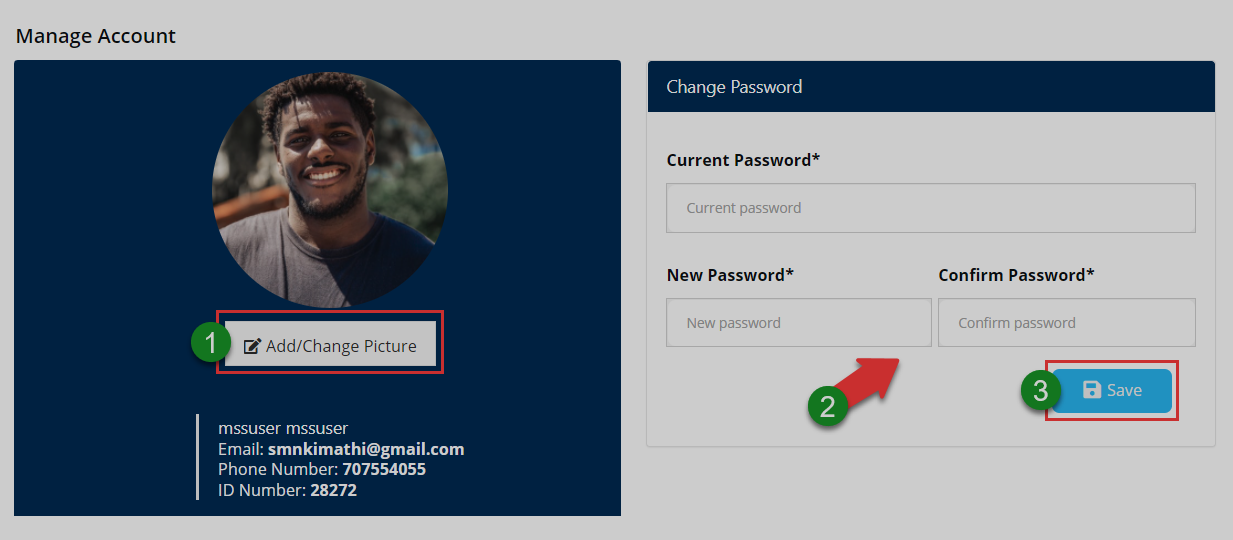
Action: Click the buttons labeled with green numbered circles to do the following:
Label 1: click to change profile picture.
Label 2: click to download membership certificate.
Label 3: click to fill in new password details.
Label4: click to confirm all changes.
Account picture
Click the add/change picture button as shown in the previous illustration to upload a picture as shown below.
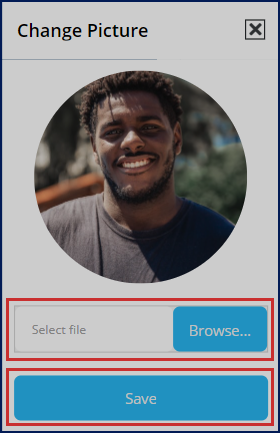
Action: Click the Browse button to select a picture from your device. Then click the Save button to upload the image. Otherwise, exit the window.
# Activity Logs
Clicking the activity logs menu will open a page showing a record of all the activities by all users who logged-into the portal in the recent past. One can search records for specific periods through filtering by date.
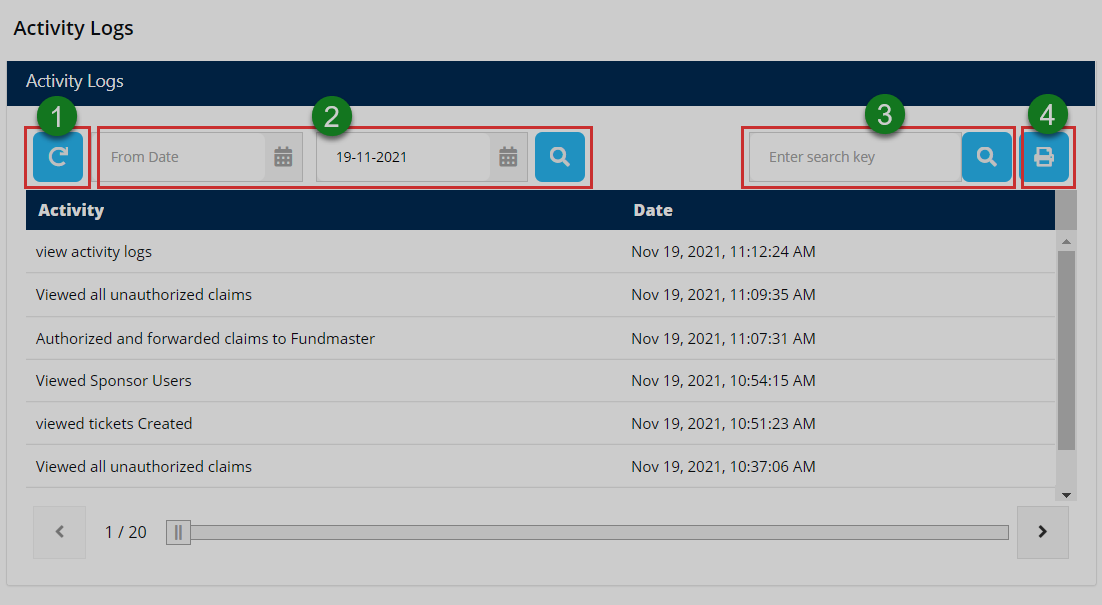
Action: Click the buttons labeled with green numbered circles to do the following:
Label 1: click to reload the activity records.
Label 2: click to set start and end dates for filtering.
Label4: click to type keywords to search records quickly.
Label4: click to print a copy.
# FAQs
Clicking the FAQs tab, on the upper right corner, will open a window showing a report of the frequently asked questions in the portal. See the illustration below.
Action: Click the text links to display the list of questions in accordion style. Click the Home tab to return to portal home page. Otherwise, close the window.
# User Account
The logged-in users' details are displayed through a drop-down menu that provides a short cut access to notifications, profile, and a button to logout of the portal.
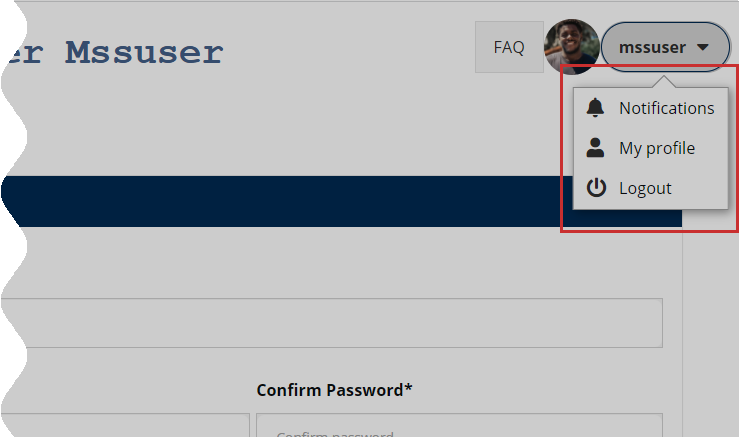
Action: Click on the enclosed text links to open respective pages. Otherwise, click the Logout button to exit the portal.
# Notifications
Clicking the notifications text link from the profile drop-down menu, located on the upper right corner, will open a page showing a list of messages sent from within the portal. They are grouped into inbox and outbox messages. One can select to read individual messages and compose. See the illustration below.
Action: Click on the text fields and buttons labeled with green numbered circles to do the following:
Label 1: click to open view Outbox messages.
Label 2: click to repopulate records.
Label 3: click to compose a message.
Label 4: click to read a message.
Read a notification
Check the box of the record with the message you want to read, then click the status text link on the right to open a new window displaying the message details as shown below. You can also download the message.
Action: Click the Download File link to save the message file on your device. Otherwise, close the window.
# My profile
Clicking the profile link text will open a Manage Account page (which can also be accessed on the menu bar) showing the personal details of the logged-in user. One can change profile picture, download membership certificate, and change password details. Refer to the Manage Account menu for the illustrations.